This kit (Medium Cam Agitator Repair Kit, Washer Agitator Cam Repair Kit, Cam Agitator) is used to repair the agitator. These parts are located inside the agitator auger near the top. You will need t...
This is a genuine OEM thrust spacer for your washer, and is also commonly known as a retainer ring. The spacer is about 2.5 inches in diameter, is made of plastic, and is white in color. It is used in...
This is an inner cap seal, but may also be known as an O-ring, and it is a part for your washing machine. Some symptoms replacing this part will fix include: leaking from your appliance, uncontrollabl...
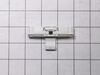
The point of the lid switch is for the tub to stop spinning when the washer lid is opened. It is a safety precaution just in case someone decides to stick their hand inside the washer while the tub is spinning.
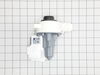
This is a replacement clutch assembly or cam kit for your washer. The clutch assembly is mounted on the drive shaft on the bottom of your washer. You may need to replace the clutch assembly if the spl...
This touch-up paint can be used on a wide variety of household appliances. It is most often used on washers, dryer, refrigerators, dishwashers, ranges, freezers, trash compactors, or microwaves. It is...
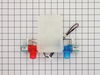
This part changes the transmission from agitation to spin mode. This actuator is for washers.
Actuator shifts the splutch and monitors the position of the splutch.
$73.40
In Stock
Questions And Answers for CAW9444DW0
Be the first to ask our experts a question about this model!
✖
Ask a Question
Ask our experts a question on this model and we'll respond as soon as we can.
The instructions came with the repair kit, it was fairly simple and straight foward.
One bolt held the entire agitator unit in the washer, as well as held the upper and lower halves together. Once that nut was removed the two halves seperated and the plastic clutch pieces could easily be replaced wtih the new onces in the repai
... Read morer kit.
Very easy do-it-yourself repair! Took about 20 minutes because I was being cautious. Next time I could do it in 5 minutes.
It was a blessing that I ordered the kit, because I thought it only needed the rubber seal and the four dogs. But because the seal and dogs cost less than the shipping I decided to order the kit and its good I did because the nochage on the basket sleeve was broke off. The blessing is that the sleeve was in the kit, sp it took 5 sec to sl
... Read moreip it on along with the rest of the kit, and after about 15 min my wife was back to work. Thanks for saving me time and money without this web site I would have bought another brand new washer, thanks. Lennis from NC.
I first pulled the softener dispenser cap off, then re-moved the inner cap/seal by twisting and pulling (it was a little stubborn, but alternating my grip from side to side while pulling was helpful). Using a 7/16" socket with an extension to reach down inside the mover, I then loosened the agitator mounting bolt. Note the amount of to
... Read morerque needed to "break " the bolt from the threads holding it as you don't want to overtighten it when you replace it. It doesn't require much effort to tighten it., depend-ing on the size of your wrench. I then lifted the agitator up and off its shaft by slipping my fingers under it on opposite sides of its base. Then, I lifted the mover or auger off the agitator and removed the thrust washer, cam and cam dogs. Don't worry; the illustrated instructions which are included with the new parts are quite clear and understandable. Then, I placed the new thrust washer and cam and dogs (a separate instruction sheet shows you how to assemble the cam, dogs and bearing; not difficult). Here's the only complaint I have about all this: the instructions advise you to apply agitator grease to the top surface of the thrust washer, but the grease isn't included in the kit. I used standard plumber's silicone grease which I had on hand. Hopefully, that won't be a problem. There's a part # for the grease shown on the illustration (#350849). It would be helpful if this information were given when ordering these replacement parts. You then put the auger and cam on the agitator and place the assembly back on the shaft in the wash tub and replace the mounting bolt and tighten it. Remember to not overtighten it. Then you place the inner cap/seal back inside the mover after lubricating the seal with plumber's grease or liquid soap and replace the dispenser cap. The instructions remind you that the mover is to turn only clockwise and, if that's what you have, you are finished. As a precaution, I checked the "play" (and there is some in it) in the mover/auger after assembly then checked it again after the first couple of loads we washed. It seems to be fine. Please don't let the length of this story alarm or discourage you. I'm trying to include everything which might be helpful to anyone who wants to do this. It really isn't difficult. Incidentally, it probably wasn't necessary to replace the mover/auger in my machine as it looked to be in very good condition, but I thought it wise (at another's suggestion) to replace it in case it might wear the other parts prematurely. I hope this helps somebody out there and that I didn't forget anything. Again, the parts come with very good instructions. Just don't forget the grease!


 Diagram and Parts List for Crosley Washer")