This high limit thermostat is used in a dryer and monitors the temperature to make sure it does not exceed 260 degrees Fahrenheit. When your dryer temperature reaches 260 it will cut it out and only c...
This door catch is used for a washer and dryer unit. The catch holds the door strike to keep the door securely closed during a cycle. If your door will not close or your dryer will not start, replacin...
This part is a heater, but may also be known as a heating element, and it is meant for your dryer. This is where the heat is generated during your machine cycle in order to properly dry your clothing....
This part could be found underneath a fridge, dryer, or freezer. The original foot may be cracked, broken, or perhaps missing altogether. If you notice the appliance is uneven to the floor or wobbling...
This is a replacement screw for your washer or dryer. The screw is approximately half an inch in length and is a Phillips-head screw. It screws in from the outside of the drum, into the vane/baffle. T...
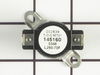
This part controls the temperature of the inside of the dryer drum and prevents the dryer from overheating. This part is located in the blower housing.
This high temperature adhesive is used for installing felt and rubber seals on dryers. The tube contains 1 ounce of product. This adhesive is made to withstand extremely hot temperatures. Before apply...
This is a gasket, but you may also know it as a door seal, for your dryer. This part prevents heat loss during a drying cycle by keeping the area around the door sealed. This gasket is all black, and ...
This is a genuine replacement drum roller for a dryer. This part includes a roller which has an axle and two tri-rings. The dryer drum roller holds the drum in place while it rotates on the dryer supp...
When I described the noise to a YouTube appliance diagnostician, I was directed to check the felt seals front and back of the rotating drum for wear, tears, or foreign objects. As it happens the felt seals looked find and there were foreign objects so, not wanting to disassemble and reassemble the dryer more than I had, I ended up replac
... Read moreing all the replaceable moving parts that I considered possible culprits: The idler tension spring, the idler tension bracket (which includes a nylon pulley wheel), the drum belt, the five rubber-tipped bearings that support the drum and keep it in place, and the foam seal on the blower housing which seemed a little brittle and old, as well as high-temperature adhesive for the latter. The instructional videos here and on YouTube were extremely helpful (I doubt that I would have attempted this job at all, had I not watched these ahead of time). The most time-consuming aspect was waiting for the arrival of the parts as I didn't order them all at the same time or all from the same place (I ordered from whomever could ship me a given part the fastest. Disassembly took less than an hour. Re-assembly with the new parts in place took about the same but was a little more awkward because this appliance sits in a very narrow closet and it's difficult to ensure that the 4" flexible duct stays in place when sliding the appliance back into the closet. No regrets. Now I know the basics if this dryer needs attention in future and I also know all the parts that I can eliminate as suspects in any future maintenance (the parts that I replaced)
Removed back of dryer with electric nut driver. Lots of screws. Removed old heating element to better access wires and thermostats. Removed baffle at end and transferred to new heater element. Transferred thermostats to new element, reconnected wiring in correct order. Installed new heater element in correct position using tab to loca
... Read morete. Replaced back of dryer. Reconnected dryer vent. Toughest part was squeezing out of space after reconnecting dryer vent. Unfortunately, too short for my weight.
All the symptoms indicated the thermister (located in the exhaust air stream of the dryer) was the problem. Pulled the lower panel off the dryer. Took out the two lower screws holding the door panel on so I could pull the front panel out just enough to get a screwdriver on the screws holding the thermister on. Unhooked the two wires co
... Read morennected to it and hooked them to the new thermister(no need to observe polarity). Put the new thermister in, screwed the door panel back down, put the lower panel on and started drying clothes.