


Models
>
BGGF3042KFP
BGGF3042KFP Frigidaire Range - Overview
Sections of the BGGF3042KFP
[Viewing 5 of 5]


Manuals & Care Guides for BGGF3042KFP
Click to downloadInstall
Installation Instructions
(1.56MB)
Manual
Owner's Manuals
(1.5MB)
Wiring
Wiring Diagram
(0.56MB)
Keep searches simple, eg. "belt" or "pump".

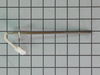
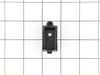
Temperature Sensor
PartSelect #: PS1528542
Manufacturer #: 316490000
This genuine OEM oven probe is also known as an oven temperature sensor or range probe. This part is manufactured for a range, stove, or oven to detect the temperature within the oven cavity. The prob...
$47.25
In Stock

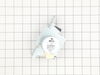
Light Bulb
PartSelect #: PS12751166
Manufacturer #: 316538904
This OEM 40 watt appliance light bulb is used for some ranges, refrigerators, freezers, and microwaves. Simply locate the existing bulb, unscrew it from its socket, and replace with new light bulb. If...
$19.73
In Stock

Natural Gas to Liquid Propane Conversion Kit
PartSelect #: PS2351422
Manufacturer #: GRLP3
This kit is used to convert your appliance to liquid propane. This liquid petroleum gas conversion kit contains seven orifices, each under an inch long.
$65.55
In Stock

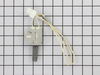
Oven Bake Igniter
PartSelect #: PS2364063
Manufacturer #: 316489403
The oven burner igniter simply ignites the gas so it can heat the oven burner. The igniter does this by drawing electrical currents through the oven safety valve to open it. If the element shortens ou...
$130.98
In Stock

Oven Rack
PartSelect #: PS1765356
Manufacturer #: 316496201
This part is found inside your oven. This oven rack comes in the color chrome and measures 24 inches in width and 16 inches in length. This is an extremely simple repair that requires no tools. The pa...
$121.67
In Stock

LENS
PartSelect #: PS16218465
Manufacturer #: 5304524341
The Frigidaire light bulb lens covers the interior light bulb in an oven. No tools are necessary to replace this item. After unplugging the appliance, slide off the wire bracket to remove the existing...
$10.90
In Stock

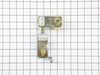
DRAWER GLIDE
PartSelect #: PS12584887
Manufacturer #: 316407402
This rear drawer glide, also known as a storage drawer glide, is used in ranges. This helps hold the front side of the storage drawer and allows the drawer to easily slide in and out of the range. If ...
$9.26
In Stock


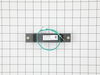
GLASS
PartSelect #: PS11728351
Manufacturer #: 5304503232
This tempered glass is supplied by the original manufacturer and measures 20 inches by 13 inches. It is an inner door glass, designed for use in ranges/ovens and has several purposes which include pro...
$152.88
In Stock

CAP
PartSelect #: PS11775705
Manufacturer #: 5304508442
The surface Meduim 9.5K burner cap is located on the top of the burner head and is used in ranges and ovens. The burner cap helps spread out the burner flame for even heating, and protects the burner...
$24.35
In Stock

Oven Rack Link
PartSelect #: PS2364129
Manufacturer #: 316546300
This part is a single oven rack link arm. It is a genuine OEM replacement part for your oven. It connects the oven rack to the door bracket, to allow the rack to extend out when you open the oven door...
$24.09
In Stock

CAP
PartSelect #: PS11775704
Manufacturer #: 5304508441
Sold individually. This part helps the flame to spread for even heat. Also protects your burner head from spills.
$30.07
In Stock
Questions And Answers for BGGF3042KFP
We're sorry, but our Q&A experts are temporarily unavailable.
Please check back later if you still haven't found the answer you need.
Common Symptoms of the BGGF3042KFP
[Viewing 10 of 10]Little to no heat when baking
Fixed by
these parts
these parts
Show All
Oven is too hot
Fixed by
these parts
these parts
Show All
Gas igniter glows, but will not light
Fixed by
these parts
these parts

Show All
Oven not heating evenly
Fixed by
these parts
these parts
Show All
Will Not Start
Fixed by
these parts
these parts
Show All
Element will not heat
Fixed by
these parts
these parts
Show All
Door won’t close
Fixed by
these parts
these parts


Show All
Touchpad does not respond
Fixed by
these parts
these parts

Show All
Gas smell
Fixed by
these parts
these parts

Show All
Door won’t open after self cleaning cycle
Fixed by
these parts
these parts
Show All


Keep searches simple. Use keywords, e.g. "leaking", "pump", "broken" or "fit".
Bought a new gas oven that did not come with a propane conversion kit.
I followed the simple instructions that were included in the kit. I started by replacing the 5 orifices on the top burners. The orifices are well labeled with numbers and colors. Next, I tightened the broiler burner orifice and the oven burner orifice with a 1/2 inch wrench. I had to tighten them pretty good to get the flame down where it
... Read more
is supposed to be. Then, I checked for leaks and I was then ready to cook.
Read less
Parts Used:
-
Denny from Bishop, CA
-
Difficulty Level:Easy
-
Total Repair Time:30 - 60 mins
-
Tools:Nutdriver, Wrench set
123 of 177 people
found this instruction helpful.
Was this instruction helpful to you?
Thank you for voting!
Stove was set up for natural gas and needed to be converted to LP
The LP conversion kit contained very good, detailed instructions. I replaced the gas orifices, took off the bottom door and adjusted the regulator.
Used the screwdriver to adjust the low flame and everything was done.
Used the screwdriver to adjust the low flame and everything was done.
Parts Used:
-
Ed from Orange, TX
-
Difficulty Level:Easy
-
Total Repair Time:30 - 60 mins
-
Tools:Nutdriver, Screw drivers
117 of 191 people
found this instruction helpful.
Was this instruction helpful to you?
Thank you for voting!
Cracked oven door inner glass
Repair was quite easy, as long as you have the instructions for removing the door. The screws that hold the bottom of the door to the fixed hinge are placed into the side of the hinge assembly after removal; this holds the door at a 45 degree angle for easy removal. After that, just place the door on a flat surface and dismantle the door
... Read more
from the inside. The inner glass is contained in a metal frame with another piece of glass; this frame comes apart easily using the clips in each side. The door assembles easily after the glass is replaced; just take your time and give yourself enough room to lay out the parts as you go. Good luck!
Read less
Parts Used:
-
Mitch from Fernandina Beach, FL
-
Difficulty Level:Easy
-
Total Repair Time:15 - 30 mins
-
Tools:Screw drivers
74 of 110 people
found this instruction helpful.
Was this instruction helpful to you?
Thank you for voting!