


Models
>
AGR6303MFS0
AGR6303MFS0 Amana Range - Overview
Sections of the AGR6303MFS0
[Viewing 8 of 8]


 Diagram and Parts List for Amana Range")
Keep searches simple, eg. "belt" or "pump".

Light Bulb - 40W
PartSelect #: PS884734
Manufacturer #: 8009
This an authentic OEM 40-Watt replacement light bulb, used in a number of household appliances. It is specially designed to withstand extreme temperatures, which is why these replacement bulbs are mos...
$11.73
In Stock

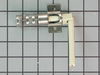
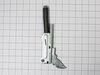
Bake Igniter
PartSelect #: PS11747217
Manufacturer #: WP9758079
This part ignites the gas to light the oven burner.
$57.35
In Stock

Screw
PartSelect #: PS12349731
Manufacturer #: W11233072
This is a multi-use and multi-appliance screw. It can be used on a microwave, refrigerator, range/oven, air conditioner, dehumidifier, washer, or dryer. The measurements of this screw are 8 x 1/2 inch...
$20.79
In Stock

Screw, Igniter
PartSelect #: PS11745563
Manufacturer #: WP8273062
This screw is sold individually.
$7.84
In Stock

Touch-Up Paint - White
PartSelect #: PS385132
Manufacturer #: 72017
This touch-up paint can be used on a wide variety of household appliances. It is most often used on washers, dryer, refrigerators, dishwashers, ranges, freezers, trash compactors, or microwaves. It is...
$8.00
In Stock

2 Piece Broiler Pan
PartSelect #: PS971245
Manufacturer #: 4396923
This is cookware designed for use in your range or oven. It is a two-piece dish that is used to grill or cook food while the broil function is on, meaning it can withstand high temperatures. This set ...
$37.51
In Stock


Side Trim - Right Hand Side
PartSelect #: PS11746045
Manufacturer #: WP8523166
This trim is white in color.
$80.85
In Stock

Side Trim - Left Side - White
PartSelect #: PS11746047
Manufacturer #: WP8523172
Screws are not included with the trim. Must order screws separately.
$54.91
In Stock

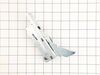
SOCKT-LITE
PartSelect #: PS16730838
Manufacturer #: W11594027
The light socket on your electric range connects the power source to the light bulb. If your oven light is malfunctioning, you may need to replace the light socket. The light socket is located in the ...
$59.64
In Stock

Rear Leveling Leg
PartSelect #: PS11748094
Manufacturer #: WPW10058460
Sold individually.
$11.06
In Stock
 – Part Number: WPW10310922")
Vent Trim - (Black)
PartSelect #: PS11752547
Manufacturer #: WPW10310922
This black stainless steel oven door vent fits on the top of the oven door, attaches the door handle and the outer glass to the door itself, and vents hot air out of the oven. The vent measures approx...
$206.57
In Stock
Questions And Answers for AGR6303MFS0
We're sorry, but our Q&A experts are temporarily unavailable.
Please check back later if you still haven't found the answer you need.
Sort by:
- < Prev
- 1
- Next >
Search filter:
Clear Filter
Your search term must have 3 or more characters.
Keep searches simple. Use keywords, e.g. "leaking", "pump", "broken" or "fit".
Sorry, we couldn't find any existing answers that matched.Try using some different or simpler keywords, or submit your new question by using the "Ask a Question" button above!
Lori
November 25, 2019
Need stove top knobs for the burners ones that are not so cheaply made that they melt what is the parttys number for the knobs or valves
For model number AGR6303MFS0
Hello Lori, thank you for inquiring. For your model, the Knobs are part number PS12114313 for black, part number PS11768805 for white, and part number PS12347974 for stainless. They are all sold individually. Good luck with your repair!
4 people found this helpful.
Was this helpful?
Thank you for voting!
GEORGE
August 13, 2021
Wondering if my oven prob is as mentioned here? I tested the temp sensor and it read 1080 ohms the gas valve test 216 ohms at each terminal coil. Replaced the spark module board and the oven bake and broil now comes on then shuts off after bout a minute or 2. The Flame is a dark deep blue so dont think its a weak igniter it uses a spark igniter electrode in oven. Any advice would be appreciated can a sensor probe test 1080 ohm but still be defective mechanically?
For model number AGR6303MFS0
Hello George, Thank you for your inquiry. We would recommend checking the bake and broil igniters as well as the gas valve. The sensor should test between 1080 and 1090 and it should be good if it does. Hope this helps.
Was this helpful?
Thank you for voting!
Jack
April 14, 2023
how to replace oven lite
For model number AGR6303MFS0
Hello Jack, thank you for contacting us. To change the oven light, follow the following steps:
1. Unplug the range or disconnect the power.
2. Turn the glass bulb cover in the back of the oven counterclockwise to remove it.
3. Turn the bulb counterclockwise to remove it from the socket.
4. Replace the bulb, then the bulb cover by turning clockwise.
5. Plug in the range or reconnect the power.
We hope this helps, good luck with this repair!
Was this helpful?
Thank you for voting!
- < Prev
- 1
- Next >
Common Symptoms of the AGR6303MFS0
[Viewing 8 of 8]Will Not Start
Fixed by
these parts
these parts

Show All
Little to no heat when baking
Fixed by
these parts
these parts

Show All
Door won’t close
Fixed by
these parts
these parts

Show All
Gas igniter glows, but will not light
Fixed by
these parts
these parts
Show All
Oven not heating evenly
Fixed by
these parts
these parts
Show All
Element will not heat
Fixed by
these parts
these parts
Show All
Oven is too hot
Fixed by
these parts
these parts
Show All
Gas smell
Fixed by
these parts
these parts
Show All


Keep searches simple. Use keywords, e.g. "leaking", "pump", "broken" or "fit".
mice had made nests in the insulation wrap in the range
I numbered every part. ex: 1 L., for first part removed left side. I used a magic marker to circle the holes and wrote the number of screws used on the part, set the srews in a separete place, so that I new where these screws went to. The cleanup was pretty time consuming, but I was able to keep my stove, when every repairman I called to
... Read more
fix my stove told me I was better off buying a new stove. ($600.00 stove 2 years old)Please Note: The insulation blanket needed for the entire stove is two pieces, the sides and top are one part # and the bottom and back, are another part #. I did not know this. I just purchased the top and sides. I got lucky, the back and bottom were still in good shape. So I guess I should have read the description of the part more carefully to see what it covers, before I ordered it. It took two people two hours to do the work, it was really nice to have an extra set of eyes, to remember what direction pieces of metal from the stove went. I would do it all over in a heart beat instead of buying a new stove.
Read less
Parts Used:

-
Wendy from Red Hook, NY
-
Difficulty Level:Easy
-
Total Repair Time:More than 2 hours
-
Tools:Screw drivers
98 of 132 people
found this instruction helpful.
Was this instruction helpful to you?
Thank you for voting!
Bake/broil would not work
Replaced igniter and also DSI/direct spark igniter did not fix problem. Called out repairman turned out to be bad gas valve. Replaced that part , now stove works fine.
Parts Used:

-
Greg from North Baltimore, OH
-
Difficulty Level:Really Easy
-
Total Repair Time:15 - 30 mins
-
Tools:Screw drivers, Wrench (Adjustable)
77 of 120 people
found this instruction helpful.
Was this instruction helpful to you?
Thank you for voting!
Socket Light had a bad thread
Socket Lite come with clips attached to the outside
of the housing. After you unhook the 3 lead wires
that are attached to the unit. All you have to do is push in on the clips and release the unit. Then you
snap in the new unit. Attach the 3 wire leads, put a
oven bulb in the socket end, and the install the light cove ... Read more r
of the housing. After you unhook the 3 lead wires
that are attached to the unit. All you have to do is push in on the clips and release the unit. Then you
snap in the new unit. Attach the 3 wire leads, put a
oven bulb in the socket end, and the install the light cove ... Read more r
Read less
Parts Used:

-
Edmund from Emporium, PA
-
Difficulty Level:Easy
-
Total Repair Time:15 - 30 mins
-
Tools:Pliers, Screw drivers
44 of 60 people
found this instruction helpful.
Was this instruction helpful to you?
Thank you for voting!