


Models
>
ACS4250AB
ACS4250AB (PACS4250AB) Amana Range - Overview
Sections of the ACS4250AB
[Viewing 4 of 4]


Keep searches simple, eg. "belt" or "pump".

Light Bulb - 40W
PartSelect #: PS884734
Manufacturer #: 8009
This an authentic OEM 40-Watt replacement light bulb, used in a number of household appliances. It is specially designed to withstand extreme temperatures, which is why these replacement bulbs are mos...
$11.73
In Stock

Terminal Block
PartSelect #: PS11750972
Manufacturer #: WPW10245259
This part is for oven ranges, it connects individual wires and protects the device from electrical surges, voltages, and current. With this part, the house power is connected to the range wire harness...
$34.09
In Stock

2 Piece Broiler Pan
PartSelect #: PS971245
Manufacturer #: 4396923
This is cookware designed for use in your range or oven. It is a two-piece dish that is used to grill or cook food while the broil function is on, meaning it can withstand high temperatures. This set ...
$37.51
In Stock

Cooktop Cleaner
PartSelect #: PS3492527
Manufacturer #: W10355051
This bottle of non-abrasive cooktop cleaner breaks down and gets rid of the hardest baked-on stains and residue without causing any harm to your appliance. The bottle is 10 oz and does not require a l...
$17.76
In Stock

Wire Oven Rack
PartSelect #: PS11740769
Manufacturer #: WP314763J
This wire oven rack is used on some ovens and ranges. It is twenty-three inches long and it is made of metal.
$40.86
In Stock

Frame Screw
PartSelect #: PS11743908
Manufacturer #: WP7101P126-60
Sold Individually.
$7.76
In Stock

Appliance Scraper
PartSelect #: PS408570
Manufacturer #: WA906B
Use this scraper for your ceramic/glass cooktop. It has a retractable blade and is an all-purpose tool for cooktops, mirrors, windows and tile. Use it to also remove paint, paper, dirt, stickers and more.
$10.79
In Stock

Stand Mixer Screw
PartSelect #: PS11742292
Manufacturer #: WP4159193
This screw is sold individually.
$8.63
In Stock

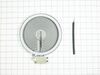
Radiant Surface Burner Element 1500W
PartSelect #: PS11764909
Manufacturer #: W10823699
This surface element is made for under glass set-ups and supplies the heat to a cooking area on top of the range. It has an outside diameter of approximately 7 inches (1500 watts), and is a genuine OE...
$106.72
In Stock

Hinge Kit - Right Side
PartSelect #: PS2172201
Manufacturer #: R0706011
The hinge kit, or oven door hinge, is used in ranges and wall ovens. The hinge attaches to the right side of the door and controls how fast the door opens. At a specific angle, it allows the door to r...
No Longer Available


Questions And Answers for ACS4250AB
We're sorry, but our Q&A experts are temporarily unavailable.
Please check back later if you still haven't found the answer you need.
Common Symptoms of the ACS4250AB
[Viewing 5 of 5]Element will not heat
Fixed by
these parts
these parts


Show All
Will Not Start
Fixed by
these parts
these parts

Show All
Little to no heat when baking
Fixed by
these parts
these parts

Show All
Door won’t close
Fixed by
these parts
these parts


Show All
Touchpad does not respond
Fixed by
these parts
these parts
Show All


Keep searches simple. Use keywords, e.g. "leaking", "pump", "broken" or "fit".
Burned terminal block and filter board
Removed and replaced above named parts, rewired.Be sure to tighten all nuts that secure wires. I believe this is what caused the problem.
Parts Used:

-
Joseph from Decatur, GA
-
Difficulty Level:Easy
-
Total Repair Time:30 - 60 mins
-
Tools:Nutdriver, Screw drivers, Socket set, Wrench set
90 of 192 people
found this instruction helpful.
Was this instruction helpful to you?
Thank you for voting!
Outer Heater ring not working on dual burner.
Turned off power to unit.
Tilted up Glass top and removed two screws holding rear hinges to range. Then I unplugged wire harness from lower range and placed the Glass top facing down on counter top with towel for cushion. Removed 1 screw holding center of burner to support frame, two alignment screws on perimeter, and two screws hol ... Read more ding support frame to glass top. This allowed me to slide out the old element with all wiring connections intact.
Placed the new assembly in same location under support frame, noting numbered positions of two alignment screws from old unit. This is necessary to properly align heater to surface glass. Replaced all screws connecting burner to frame. Then I removed each wire one-by-one from old unit, reconnecting to same location on new unit.
Replaced top in reverse order from removal. Powered on the circuit breaker and verified proper operation of dual unit with large/small selecttor switch. Total time to repair about 30 minutes.
Read less
Parts Used:

-
Mark from Richardson, TX
-
Difficulty Level:Really Easy
-
Total Repair Time:30 - 60 mins
-
Tools:Screw drivers
23 of 27 people
found this instruction helpful.
Was this instruction helpful to you?
Thank you for voting!
Both fan and light switches were broken.
TURN OFF POWER TO RANGE AT FUSE BOX -- a)Open the oven door, b) Unscrew the left and right silver nuts (not the black screws)that are in the oven under the control panel, c)pull off the four control knobs on the control panel, d) gently tilt out the control panel, e) set the control panel in/on the protruding arms, f) pull off THE connect
... Read more
ors at the back of the switches - remember which is top and bottom, g) use a screw drive to break off the plastic pieces that hold the switches in place, h) push out the old switches, i) push/snap in the new switches, j) reconnect wires, replace control panel and screw in the nuts.
Read less
Parts Used:

-
Peter from Media, PA
-
Difficulty Level:Easy
-
Total Repair Time:30 - 60 mins
-
Tools:Nutdriver, Pliers, Screw drivers
18 of 23 people
found this instruction helpful.
Was this instruction helpful to you?
Thank you for voting!