


Models
>
A4425GDTBWW
A4425GDTBWW General Electric Refrigerator - Overview
Sections of the A4425GDTBWW
[Viewing 8 of 8]


Manuals & Care Guides for A4425GDTBWW
Click to downloadKeep searches simple, eg. "belt" or "pump".

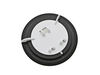
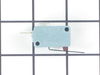
Temperature Sensor
PartSelect #: PS304103
Manufacturer #: WR55X10025
This sensor (Temperature Sensor, Thermistor, Refrigerator Temperature Sensor) sends the temperature reading of the compartment to the control board. If you notice your refrigerator is too warm, too co...
$27.00
In Stock

Drawer Slide Rail - Right Side
PartSelect #: PS306944
Manufacturer #: WR72X240
This drawer slide rail is for the right side of your refrigerator. The drawer slide rail attaches horizontally to the refrigerator wall and supports the drawer so it can easily slide in and out. If th...
$42.55
In Stock

Drawer Slide Rail - Left Side
PartSelect #: PS306943
Manufacturer #: WR72X239
This is a manufacturer-approved drawer slide rail for your refrigerator. This slide rail is for the left side of the fridge. All you need to complete this repair is a Phillips screwdriver. Remove the ...
$29.73
In Stock

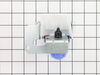
Ice Maker
PartSelect #: PS1993870
Manufacturer #: WR30X10093
This 10 by 5 inch ice maker (Electromechanical Icemaker Kit, Ice Maker Assembly) produces ice. This particular model will produce seven crescent shaped cubes every cycle. It is constructed of plastic ...
$216.23
In Stock

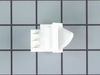
Dispenser Door Assembly or Flapper
PartSelect #: PS964304
Manufacturer #: WR17X11653
This “Dispenser Door Assembly” (Door Recess Assembly, Ice Door Assembly, Dispenser Door, Refrigerator Dispenser Ice Chute Door Kit, Dispenser Door Flap, Ice Chute Door, Flapper) keeps the room air fro...
$15.58
In Stock

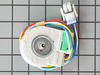
Dispenser Door Solenoid Assembly
PartSelect #: PS1483583
Manufacturer #: WR62X10055
This part is a possible option when ice door won't open or shut properly or when water is not dispensing.
$64.74
In Stock

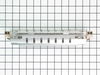
Defrost Heater and Bracket Assembly
PartSelect #: PS303781
Manufacturer #: WR51X10055
The defrost heater keeps the cooling coils from frosting over. The heater will get hot and melt any ice or frost build up around the coils.
$106.51
In Stock

Main Control Board Assembly
PartSelect #: PS16729744
Manufacturer #: WR55X10942C
This electronic board (Main Control Board Assembly, Control Board, Motherboard) controls the temperature and defrost functions of the unit. This control board is located on the back of the refrigerato...
$443.55
In Stock

Recess Door Spring
PartSelect #: PS285013
Manufacturer #: WR02X10585
This door recess spring or dispenser lever spring in your refrigerator is used to return the ice door to the closed position or the dispenser lever to the home position once released. You will find th...
$9.17
In Stock

Vegetable Drawer - Clear
PartSelect #: PS3487932
Manufacturer #: WR32X10834
Sold individually. This is used in refrigerator to store vegetable and fruits at an optimal temperature
$103.82
In Stock

Union Connector - 5/16 Inch to 5/16 Inch
PartSelect #: PS758446
Manufacturer #: WR02X11330
Quick connector for plastic water line - 5/16" to 5/16"
$9.03
In Stock

BUCKET AUGER
PartSelect #: PS17139776
Manufacturer #: WR29X42446
The ice bucket auger is located within the ice bucket assembly in your freezer. It stirs and dispenses the ice in the bucket. You may need to replace the auger if your ice maker is noisy, or not dispe...
No Longer Available
Questions And Answers for A4425GDTBWW
We're sorry, but our Q&A experts are temporarily unavailable.
Please check back later if you still haven't found the answer you need.
Common Symptoms of the A4425GDTBWW
[Viewing 27 of 27]Fridge too warm
Fixed by
these parts
these parts


Show All
Ice maker won’t dispense ice
Fixed by
these parts
these parts


Show All
Noisy
Fixed by
these parts
these parts


Show All
Leaking
Fixed by
these parts
these parts

Show All
Freezer section too warm
Fixed by
these parts
these parts
Show All
Ice maker not making ice
Fixed by
these parts
these parts

Show All
Not dispensing water
Fixed by
these parts
these parts
Show All
Freezer not defrosting
Fixed by
these parts
these parts
Show All
Will Not Start
Fixed by
these parts
these parts
Show All
Door won’t open or close
Fixed by
these parts
these parts

Show All
Light not working
Fixed by
these parts
these parts


Show All
Fridge too cold
Fixed by
these parts
these parts
Show All
Door Sweating
Fixed by
these parts
these parts

Show All
Frost buildup
Fixed by
these parts
these parts
Show All
Ice maker dispenses too little ice
Fixed by
these parts
these parts

Show All
Fridge and Freezer are too warm
Fixed by
these parts
these parts
Show All
Door latch failure
Fixed by
these parts
these parts
Show All
Clicking sound
Fixed by
these parts
these parts

Show All
Too warm
Fixed by
these parts
these parts
Show All
Fridge runs too long
Fixed by
these parts
these parts
Show All
Freezer too cold
Fixed by
these parts
these parts
Show All
Ice maker dispenses too much ice
Fixed by
these parts
these parts
Show All
Won’t start
Fixed by
these parts
these parts
Show All
Doesn’t stop running
Fixed by
these parts
these parts
Show All
Engine revs but auger will not turn
Fixed by
these parts
these parts
Show All
Too cold
Fixed by
these parts
these parts
Show All
Engine runs but cutters do not turn
Fixed by
these parts
these parts
Show All


Keep searches simple. Use keywords, e.g. "leaking", "pump", "broken" or "fit".
Plastic Auger blades broke in ice tray
I used a digital camera and photographed the assembled unit and the metal blades before I started the repair. Then, I removed the top screw on the clear shield. Flip over ice tray and removed two Phillips screws on bottom. Exterior plastic white cover comes off next. The cover sides have hard push-in white plastic tabs. Push them in; pry
... Read more
up top cover with small flathead screwdriver. Slide white top cover up and you will now see the metal blades and assembly. Auger is held in place with a metal c-clip and washer on the end. Use flat head screwdriver to pry off c-clip. Then you will see a nylon round slotted nut. The threads are reverse, use pliers and loosen nut. It is not that tight but pliers are needed. Then it all is loose and ready for removal. I slid all the blades off at one time and kept them stacked together. Slide out auger and clear flat shield cover. Install new auger, clear shield, and metal blade stack. When you put it all back together take a look at the long metal J-hook on the bottom make sure it is in the slot before you make everything tight. Failing to do this will prevent cubed ice from dispensing.
It is not that hard to do the repair it just takes some patience and paying attention to details.
It is not that hard to do the repair it just takes some patience and paying attention to details.
Read less
Parts Used:

-
Tim from Newport News, VA
-
Difficulty Level:A Bit Difficult
-
Total Repair Time:30 - 60 mins
-
Tools:Pliers, Screw drivers
583 of 621 people
found this instruction helpful.
Was this instruction helpful to you?
Thank you for voting!
Fridge too warm, evaporator icing up
After replacing the defrost heater, main board and thermistor I still had the same problem. Called a repair guy and he (with the help of GE on the phone) diagnosed that the temperature sensor was bad. So I ordered from partselect and installed it and it fixed the problem. Been good for a couple months (knocking on wood). To install I
... Read more
had to cut the 2 wires to the old sensor, crimp the 2 new wires on and snap the new sensor to the clip on the evaporator. Very easy. Make sure you seal the ends of the wire crimps so moisture doesn't get in and corrode the connection.
Read less
Parts Used:

-
Gerald from San Clemente, CA
-
Difficulty Level:Easy
-
Total Repair Time:15 - 30 mins
-
Tools:Screw drivers
600 of 719 people
found this instruction helpful.
Was this instruction helpful to you?
Thank you for voting!
The refrigerator made continous "whooing" sounds that increased and decreased in pitch. Sounded like a ghost. Would keep us up at night. Also noticed that the heater was not heating under the evaporator coils.
After checking the stories, the consensus of opinion was to change the mother board. I had a tremendous help from Tom Paone at quality@applianceeducator.com. He also told me to change the motherboard but to make sure that the coils were totally defrosted before starting up the refrigerator after changing the board.
Took off thr ... Read more ee nuts around the board at the back of the unit. Removed the input wires and you have to push in the plastic tabs holding the board in. Then just put the new board in place and push till the tabs click. Re-install the wires and put the cover back on.
Really simple task,
It is now a week since doing this and the unit is working perfectly. No soulds and good nights sleep. The ghost has moved on.
Read less
Parts Used:

-
John from Holly Springs, NC
-
Difficulty Level:Really Easy
-
Total Repair Time:Less than 15 mins
-
Tools:Nutdriver
556 of 645 people
found this instruction helpful.
Was this instruction helpful to you?
Thank you for voting!