This touch-up paint can be used on a wide variety of household appliances. It is most often used on washers, dryer, refrigerators, dishwashers, ranges, freezers, trash compactors, or microwaves. It is...
$8.00
In Stock
Order within the next 10 hrs and your part ships today!
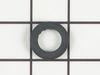
The hose clamp is used to hold the water hose in place which will prevent the hose from leaking water. Sometimes the clamp may lose its ability to latch on, causing a leaking washer. For the installat...
$11.10
In Stock
Order within the next 10 hrs and your part ships today!
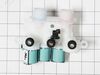
This lid lock assembly is supplied by the original manufacturer for use in various models of top-load washing machines. The assembly includes the lid lock mechanism and the wiring harness. You can fin...
$143.75
In Stock
Order within the next 10 hrs and your part ships today!
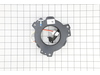
This is a water inlet valve made for washing machines. This part is used to control the flow of water into the fill hose of the washing machine, to allow the washer to fill up with water. If your wash...
$92.13
In Stock
Order within the next 10 hrs and your part ships today!
Appliance spray paint is a great way to cover up any chips and scratches that have appeared on your appliances. Instead of replacing the part entirely, this is an easy fix. This is also a great way to...
$22.68
In Stock
Order within the next 10 hrs and your part ships today!
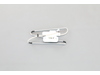
This lid hinge is a genuine OEM replacement part for your washing machine. This hinge is for the left side of your lid, although it is a good idea to replace btoh hinges at once. The hinge holds up th...
$25.32
In Stock
Order within the next 10 hrs and your part ships today!
This product comes in a bottle with a brush like Liquid Paper. It goes on incredibly easy. A second coat might be needed. I wanted to prevent rust from setting in so I covered the scratches and dings. The paint is a little brighter since my washer is 10 years old but it still looks great.
1.) disconnect power to your washer. Turn off water supply and disconnect from the washer.
open the washer top and remove plastic cap from the wash plate
2.) using 7/16 socket, remove bolt from the wash plate. If you can't remove it with a socket , I recommend using impact wrench.
3.) remove wash plate
... Read more( you might need to spray penetrating oil or wd40 inside the bolt hole to loosen it. Check to make sure the wash plate gear grooves are not worn down, if they are, replace it.
4.) using your Maytag specific spaner nut wrench, remove the spaner nut from the shaft of the gear case. This should be right underneath where the wash plate was. If you can't turn it by hand , use a rubber mallet or hammer to encourage it.
5.) some people remove the wash basket at this point. I don't think it is necessary.
6.) close your washing machine. Tape the top closed to keep it from flying open. Tilt your washer back and prop it up where you have access to the underside of the washing machine.
7) remove motor rotor bolt and pull rotor off of the motor.
8.) disconnect the two wire connectors that supply power to motor. using a socket, remove bolts that are keeping motor attached to the gear case.
9.) Now that the gear case is all the is remaining on the underside, you can remove the 4 bolts that are holding the gear case to the washer. Now try to pull gear case out.
10.) if gearcase will not pull out, lower washer back to upright position. Spray penetrating oil or wd40 around the shaft of the gearcase and allow it to sit for 5-10 minutes. Using a hammer, lightly tap on the shaft of the gearcase and it should now fall out. ( you might have to apply penetrating oil again, or apply more force with the hammer.
11.) reinstall motor to new gearcase. Insert new gear case to the washer. Reinstall bolts and reconnect power supply wires.
12. ReInstall spaner nut inside the washer, reinstall wash plate.
This is a very simple repair. My lid was severely cracked on the back left corner where there seems to be a lot of pressure/torque required to shut the lid. There is a metal L-shaped "tab" that inserts into the lid on both sides of the back edge of the lid. The lid is attached to these metal tabs with two screws for each side. My crack
... Read moreed lid had resulted in the lid breaking off of the metal tab with the screws still anchored into the metal tab.
Make sure screws have been removed from the metal tabs on both sides. Do not remove metal tabs- leave them attached to the washing maching (otherwise, you will not be able to attach the lid back onto the machine). Slide the lid over the tabs. There are square-shaped spaces along the edge of the lid where the tabs slide into the lid. Re-screw the screws into the lid, attaching the lid to the tabs through pre-drilled holes on the sides of the lid. It may take a little time to make sure the screws are properly inserted into the lid and tab screw holes. Tighten up and you're finished.


 Diagram and Parts List for Whirlpool Washer")