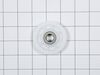
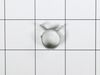
This part is sold individually. The drum support roller is found in your dryer. It is used to hold the drum in place in the cabinet while letting the drum rotate on the support rollers. It is recommen...
This dryer thermistor temperature sensor helps monitor and regulate the temperature inside a dryer. This part includes the wire harness. If your dryer overheats, does not produce enough heat, or takes...
The sensor controls the temperature in your dryer and will turn off once your clothes have reached the desired dryness level. If you notice that your dryer is not giving off enough heat to dry the clo...
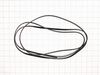
The belt wraps the length of the dryer drum, secured by a tension pulley and then loops around the motor pulley. If you find that the drum is not turning properly or at all while your dryer is in succ...
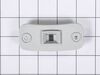
The thermostat is a part for your dryer, and it is roughly 1 inch long by roughly 1.5 inches wide. The purpose of the thermostat is to measure the temperature of the air inside your dryer drum. As the...
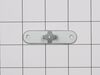
This part is the replacement high-limit thermostat, or simply the thermostat for your dryer. It is approximately 2 inches wide from tip to tip. The center, rectangular portion of the thermostat is app...
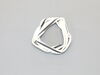
This genuine OEM felt gasket provides a cushioned seal between the inner tub of your electric dryer and the rear panel. It prevents your clothes from getting snagged and helps in heat retention. You w...
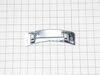
This plastic adjustable dryer leg is used to support the weight and adjust the height of your dryer to keep it level. To install the leg, tip the dryer back and screw it into the bottom of your dryer ...
$10.94
In Stock
Questions And Answers for 79690441900
We're sorry, but our Q&A experts are temporarily unavailable.
Please check back later if you still haven't found the answer you need.
1 question answered by our experts.
Sort by:
< Prev
1
Next >
Search filter:
Clear Filter
Your search term must have 3 or more characters.
Keep searches simple. Use keywords, e.g. "leaking", "pump", "broken" or "fit".
Sorry, we couldn't find any existing answers that matched.Try using some different or simpler keywords, or submit your new question by using the "Ask a Question" button above!
Tom
March 16, 2024
dryer runs but will not get hot
For model number 79690441900
Hello Tom, thank you for your inquiry. According to our research, the issue is most probably with the blower thermostat, part number PS8747887. It measures the temperature of the air inside your dryer drum. You may need to replace it to fix the issue. We hope this information helps!
Found disassembly video and watched several times. Suspected that one of the drum wheels had seized up. Found extreme volume of lint and hair inside unit as well as a dryer sheet melted on top of heating unit. Front left drum wheel was worn down from lint and hair jamming its movement. Video made it easy, not a really complicated piec
... Read moree of machinery. Replaced all 4 wheels due to normal wear on other three. Wanted to be sure drum evenly balanced on all 4. Parts came quickly and were easy to install. My sister and I did this together. Would not recommend doing it alone. Took time to vac and wipe down entire unit. Now it runs so quiet we have to look to see if it is operating. Got a brand new machine out of it, saved a couple of hundred dollars in repair bills, and found 11 cents inside the machine. For your own piece of mind, if you have had your dryer for several years, you need to open it up and clean it out. Its not hard... added note, we are both in our 60's... so if we can do it so can you.... Such a feeling of accomplishment, can't buy that in a store....
I noticed the flame would start, then quit after about 15 seconds. I checked the flame detector, and found the lenze cracked. I replaced it, and it's as good as gold.
It looked like a hard job to take the drum out to get at the part. But the top was off with 3 screws, the front about 6 I think. Then the front frame, only 4 s
... Read morecrews. I think setting the belt tentioner was the hardest thing to do.
Done in 45 minutes, both the job, then the next load of laundry.
I followed a Repair Clinic Urube video except the video had a model with the controls in front and my dryer has the controls on a back panel. The difference was in how to get the top of the dryer off after removing all the screws. The video said to push back on the top panel which did not work because of the back controls. Instead
... Read moreI had to push up on the front to release it and then push back. The rollers were also in a slightly different place but were easily found and replaced. The dryer is now back to normal.


")


 – Part Number: AGM75510755")
