The lint filter in your dryer is used to collect lint as it passes through the dryer vent. If you notice that your dryer is not providing enough heat, or if it takes too long to dry, you may need to r...
$50.07
In Stock
Order within the next 3 hrs and your part ships today!
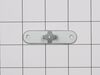
This part is sold individually. The drum support roller is found in your dryer. It is used to hold the drum in place in the cabinet while letting the drum rotate on the support rollers. It is recommen...
This thermal fuse acts as a high-limit thermostat, and shuts off the heating element when the dryer overheats by cutting off power to the dryer. If the thermal fuse has blown, the dryer will not start...
$24.24
In Stock
Order within the next 3 hrs and your part ships today!
This dryer thermistor temperature sensor helps monitor and regulate the temperature inside a dryer. This part includes the wire harness. If your dryer overheats, does not produce enough heat, or takes...
$89.47
In Stock
Order within the next 3 hrs and your part ships today!
The sensor controls the temperature in your dryer and will turn off once your clothes have reached the desired dryness level. If you notice that your dryer is not giving off enough heat to dry the clo...
$22.28
In Stock
Order within the next 3 hrs and your part ships today!
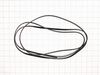
The belt wraps the length of the dryer drum, secured by a tension pulley and then loops around the motor pulley. If you find that the drum is not turning properly or at all while your dryer is in succ...
$31.27
In Stock
Order within the next 3 hrs and your part ships today!
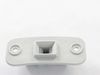
The thermostat is a part for your dryer, and it is roughly 1 inch long by roughly 1.5 inches wide. The purpose of the thermostat is to measure the temperature of the air inside your dryer drum. As the...
$45.92
In Stock
Order within the next 3 hrs and your part ships today!
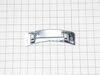
Located just inside the dryer door. The guide cover (or grill cover) is where the hot air circulates through the appliance. This part may crack or become damaged over time, causing clothes to get caug...
$30.68
In Stock
Order within the next 3 hrs and your part ships today!
They are all strung with a coiled wire made of a nickel and a chrome alloy. This wire receives, but resists, a controlled electric current and as a result, the wire heats up. The heat produced is used...
$247.88
In Stock
Order within the next 3 hrs and your part ships today!
The drum roller for your dryer holds the drum in place while the drum turns on the support wheels. The drum roller is round with a bearing in the middle and measures approximately 3 inches in diameter...
$87.42
In Stock
Order within the next 3 hrs and your part ships today!
This is a thermostat for various models of LG dryers. This thermostat specifically is the rear high limit thermostat, and it is designed as a safety device to shut off power to your dryer if the inter...
$51.97
In Stock
Order within the next 3 hrs and your part ships today!
Order within the next 3 hrs and your part ships today!
Questions And Answers for 79681172210
Ask our experts a question about this model and we'll get back to you as soon as possible!
1 question answered by our experts.
Sort by:
< Prev
1
Next >
Search filter:
Clear Filter
Your search term must have 3 or more characters.
Keep searches simple. Use keywords, e.g. "leaking", "pump", "broken" or "fit".
Sorry, we couldn't find any existing answers that matched.Try using some different or simpler keywords, or submit your new question by using the "Ask a Question" button above!
Ronald
March 10, 2022
Symptom: Short groan on starting, but running smoothly after starting. Have replace dryer drum belt, four support wheels, and tension/wheel assembly. Still have the groan. Could the motor mount be loose?
For model number 79681172210
Hi Ronald,
Thank you for your question. When a dryer makes a groaning noise, the rollers, the idler pulley and the belt are the parts you would check. If your dryer still makes a groaning sound when it comes on after replacing these parts, check the other dryer parts to see if they are damaged or worn. Check the motor as you mentioned and see if it is positioned correctly. Once you have determined the part you need, please feel free to call customer service. We are open 7 days a week and anyone will be happy to assist you. We look forward to hearing from you!
Was this helpful?
Thank you for voting!
< Prev
1
Next >
✖
Ask a Question
Ask our experts a question on this model and we'll respond as soon as we can.
Had to replace front drum support rollers. Removed screws underneath top in back that held bracket that keeps top in place. Slid top towards rear and lifted up. Removed 4 screws that hold plastic front panel in place (inside..2 on each corner) Unplugged front panel electric plugs to remove panel. Opened door..removed 2 screws at bottom of
... Read more door opening. Removed screws on top of front panel. Unplugged door switch plug. Removed front panel. Removed right front roller with 9/16th wrench for nut. Adjustable for back of stud. Lifted up on drum to get roller out. Reversed to install. Left roller a bit harder to get to stud. Removed and installed same as right side. Did not attempt to replace rear rollers. Have them if needed but very much more involved to replace.
I actually went to mr fix it on u tube. Great instruction on how to take dryer apart. First I unplugged the dryer. I found I could reach the heating system by removing the lint tube in the back of the dryer. I put my I phone with the light on inside the back of the dryer and tested the connections to see if all were working. The thermal f
... Read moreuse was not working. I removed the two wires , red on top and white on the bottom. Then used a small Phillips screwdriver to remove the two mounting screws and removed the fuse. I then used a vacuum to clear any lint from the back of the dryer and inside the dryer. This took me about an hour and a half. I did it this way because I did not want to disassemble the entire dryer to get to the components. I received the fuse in 3 days and tested it. It was fine. I then put it in the dryer screwed it in place, connected the wires. Replaced the lint tube. This took about 10 minutes. Dryer is running great.
I followed video instruction in disassembling and set screws from each section into diferent small bowls in the order they were removed. Hardest part was some of the screws were really hard to get loose without stripping them and my control panel did not match video but I figured it out. Replacing the parts were easy and putting it back
... Read more together. While it was apart I cleaned everything including fan blower wheel. Thanks for the right parts and your online video. With your help and a prayer this 62 year old woman fixed the problem and dryer runs like new.


 – Part Number: AGM75510755")


")


