


Models
>
71306
71306 ((ATICSER)) LG Refrigerator - Overview
Sections of the 71306
[Viewing 1 of 1] LG Refrigerator")
Exact Part matches for your search term
[Viewing 1 of 1]
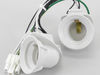
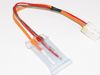
Switch cord
This part number matches the current model number 71306
PartSelect #: PS12204009
Manufacturer #: 71306
No Longer Available
Keep searches simple, eg. "belt" or "pump".

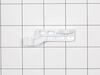
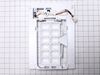
Refrigerator Door Switch
PartSelect #: PS3529268
Manufacturer #: 6600JB1010A
The interior light in your refrigerator is controlled by a switch that is activated when the door is opened and closed. If your refrigerator light will not turn on, or stays on when the door is closed...
$31.60
In Stock

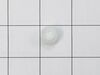
Handle Screw
PartSelect #: PS8752913
Manufacturer #: MJB63190001
This handle screw, also known as a mounting bolt, is a mounting screw to help secure the door handle to your refrigerator door. If your handle is loose, you may just need to tighten the screw. If your...
$9.35
In Stock

Drawer Rail Guide - Right Side
PartSelect #: PS3524837
Manufacturer #: 4975JJ2028C
This guide rail, also known as a drawer slide rail, is a genuine OEM replacement part for the freezer section of your refrigerator. This slide rail supports the storage basket in your freezer, allowin...
$107.00
In Stock


Rail Guide Assembly - Left Side
PartSelect #: PS3524838
Manufacturer #: 4975JJ2028D
This is the left side drawer slide for models of LG refrigerator-freezers. This drawer slide supports the drawer inside the freezer of your refrigerator and allows it to slide back and forth smoothly....
$120.80
In Stock


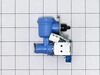
Refrigerator Ice Maker Assembly
PartSelect #: PS3617225
Manufacturer #: AEQ72909603
This ice maker assembly is for refrigerators.
Ice maker assembly contains the complete ice maker and housing. The assembly may include multiple parts; refer to your parts diagram for a complete li...
$240.83
In Stock


Questions And Answers for 71306
We're sorry, but our Q&A experts are temporarily unavailable.
Please check back later if you still haven't found the answer you need.
Common Symptoms of the 71306
[Viewing 7 of 7]Light not working
Fixed by
these parts
these parts

Show All
Door won’t open or close
Fixed by
these parts
these parts
Show All
Ice maker not making ice
Fixed by
these parts
these parts
Show All
Fridge too warm
Fixed by
these parts
these parts

Show All
Will Not Start
Fixed by
these parts
these parts
Show All
Leaking
Fixed by
these parts
these parts
Show All
Clicking sound
Fixed by
these parts
these parts
Show All
Keep searches simple. Use keywords, e.g. "leaking", "pump", "broken" or "fit".
Remove and replace light switch
Video makes it look easy. Kenmore refrigerator does not have "groove" along the right hand side of switch that allows for pushing down on release. Used a thin screwdriver to get under to push while holding switch edge with pliers. Kept slipping. Tape sides to avoid scratching inside of refrigerator.
Parts Used:
-
Debbie from Waltham, MA
-
Difficulty Level:A Bit Difficult
-
Total Repair Time:30 - 60 mins
-
Tools:Pliers, Screw drivers
36 of 58 people
found this instruction helpful.
Was this instruction helpful to you?
Thank you for voting!
old bushing worn and broken
removed the upper freezer door to access screws to remove lower door.
laid bottom door on its side, removed bad bushing, put new bushing in, put bottom door back on refridge, put upper door back on fridge. Door worked easy as when new. good closure of door and story..Happy customer, and wife even happier.....thank you....
laid bottom door on its side, removed bad bushing, put new bushing in, put bottom door back on refridge, put upper door back on fridge. Door worked easy as when new. good closure of door and story..Happy customer, and wife even happier.....thank you....
Parts Used:
-
Jerry from CORSICANA, TX
-
Difficulty Level:Really Easy
-
Total Repair Time:30 - 60 mins
-
Tools:Screw drivers, Socket set
13 of 20 people
found this instruction helpful.
Was this instruction helpful to you?
Thank you for voting!
Icemaker quit releasing ice from tray and water was pouring and freezing in ice storage bin
This couldn't have been easier. Two tiny screws in the front needed unscrewed, and then two plastic clips in the middle just had to be popped lose. Finally, you unplugged the power cord. Then, you just needed to reverse the process by plugging the new ice maker in, popping the clips in place, and screwing the two holes back in and turning
... Read more
the whole thing on. Voila! Perfect ice cubes again. And for only a little over $100.
Read less
Parts Used:

-
Amber from PEORIA, IL
-
Difficulty Level:Really Easy
-
Total Repair Time:15 - 30 mins
-
Tools:Screw drivers
8 of 11 people
found this instruction helpful.
Was this instruction helpful to you?
Thank you for voting!