This is a manufacturer-approved refrigerator door closure for your refrigerator. It is made of white plastic and measures approximately 3 inches by 2 inches. If your old closure is damaged, your refri...
$22.84
In Stock
Order within the next 5 hrs and your part ships today!
This door bin is made of white plastic, attaches to the inside of the refrigerator door, and typically holds condiments, jars, and bottles. This door basket measures approximately 14 inches wide x 11...
$60.24
In Stock
Order within the next 5 hrs and your part ships today!
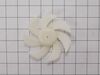
This is a genuine OEM evaporator motor that directly powers the evaporator mechanism within your refrigerator. This mechanism is responsible for pulling air over the evaporator coils, which are cold, ...
$91.02
In Stock
Order within the next 5 hrs and your part ships today!
This is a water filter bypass plug made for use with LG refrigerators. This plug is designed to act as a stand-in and allow water to flow to the dispenser or ice maker, even when the water filter is r...
$29.84
In Stock
Order within the next 5 hrs and your part ships today!
Questions And Answers for 71069
Be the first to ask our experts a question about this model!
✖
Ask a Question
Ask our experts a question on this model and we'll respond as soon as we can.
1. Shut off water to refrigerator. 2. Removed bottom sheet metal cover (6 screws). 3. Removed leaking water inlet valve assembly from refrigerator (1 screw). 4. Remove water inlet tube (loosen nut) and tube back to refrigerator (pull from water valve after remove cotter pin washer). 5. Detach two electrical wire harnesses. 6. Install new
... Read morewater inlet valve assembly to refrigerator (1 screw). 7. Replace both water tubes to water inlet assembly. 8. Re-attach both wiring harnesses. 9. Turn water to refrigerator on. 10. Check for leaks. 11. Re-attach bottom sheet cover (6 screws).
The Refrigerator now runs very quite. After watching several videos I started on mine and found that it was a bit different than any in the videos. However all but the back panel was shown and that was helpful. The back panel was a bit difficult but a hair dryer seemed to help . All in all it was a good choice to do it myse
... Read morelf as it was done quicker than waiting on a repair man.
Unplugged fridge, shut off water supply disconnected water supply from fridge. Remove screws that hold lower cover on back of fridge, removed screws holding valve assembly to fridge. Disconnect two electrical connections, remove black c-clip on out flow water line, lift fitting on outflow line side and pull water line off. Replace with va
... Read morelve assembly in reverse order