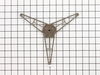
The turntable support assembly is also known as a roller guide and fits under the cooking tray and is used to support the tray and to engage the rotating coupler. The support assembly has 3 arms and e...
This AC synchronous motor is a genuine OEM replacement part specially made for microwaves. It operates on an alternating current, and it is responsible for rotating the turntable to ensure even heatin...
$29.38
In Stock
Order within the next 7 hrs and your part ships today!
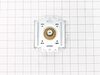
This magnetron in your microwave creates the radiation needed for cooking or warming your food. It is located inside the main cavity, typically near the transformer or waveguide. When the magnetron be...
$180.80
In Stock
Order within the next 7 hrs and your part ships today!
My 8 year old daughter cleaned the inside of the microwave with enough water to rival a tsunami. Resulted in a clean microwave with a fried out motor that no longer revolved. Part came quickly. Took cover and bottom off to get to the part. One screw held it on and a plug. Removed those, put on new part and she was good to go. No tri
... Read morep to home depot today.
Over the stove microwave installed in top cabinet row. 1. Unplug device. 2. Two people to remove from wall/cabinet (remove two, large, top mounting screws and rotate entire microwave down and off the wall mount). Should be some wood spacers between top of device and bottom of cabinet. 3. Remove screws from sheet metal cover
... Read more. 4. Remove one screw holding blowers in place and rotate out of the way, in order to gain access to 2 of 5 screws that hold the magnetron in place. 5. Unplug magnetron and remove the 5 screws. 6. Drop in new magnetron and re-assemble microwave in reverse order (steps 5-3). 7. Two people restore micro to wall/cabinet. Replace wood spacers, re-install two, large mounting screws (finger-tight). Test device. Secure the two large screws.
Note: also had to replace turntable. Removed top cover using secure driver set. Placed microwave on it's front, using a soft towel. Removed edge screws from bottom plate (leaving 4 screws in center attached to heavy transformer). Separated bottom plate from body of microwave (leaving transformer wires still attached) exposing Synchrono
... Read moreus motor. Removed two screws holding motor and electrical plug. Swapped new motor in its place. Re-attached bottom plate with its screws. Placed microwave onto it normal position. Re-attached top cover with its secure screws. Installed new turntable inside.