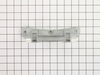
The door strike on your washing machine allows your washer door to lock properly, and operate efficiently. If you notice that your washer door will not open or close, leaks or the washer will not star...
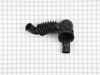
This is a door hinge with bushings and works in conjunction with your washer. The purpose of this part is to attach to the outside of the front door panel to help with the lid opening and closing prop...
This is a replacement screw for your washer or dryer. The screw is approximately half an inch in length and is a Phillips-head screw. It screws in from the outside of the drum, into the vane/baffle. T...
This is a shoulder screw and is used in conjunction with multiple appliances within your home. This specific model is size 10, and it has 16 threads to an inch. This part is made entirely of metal and...
This door boot is for washers.
The door boot forms a seal between the washtub and the door, preventing leaks.
$174.77
In Stock
Questions And Answers for 41741122310
We're sorry, but our Q&A experts are temporarily unavailable.
Please check back later if you still haven't found the answer you need.
3 questions answered by our experts.
Sort by:
< Prev
1
Next >
Search filter:
Clear Filter
Your search term must have 3 or more characters.
Keep searches simple. Use keywords, e.g. "leaking", "pump", "broken" or "fit".
Sorry, we couldn't find any existing answers that matched.Try using some different or simpler keywords, or submit your new question by using the "Ask a Question" button above!
Steve
January 9, 2020
Im getting an e55 error code. My washer goes through the wash cycle but will only agitate back and forth, it doesn't go into the final fast spin cycle at the end of the wash leaving my cloths soaked. Ive taken the belt off verified the motor moves freely and the pulley moves freely. Im leaning towards ordering the motor speed control board. Any thoughts? Thanks!
For model number 41741122310
Hello Steve, thank you for your question. That error code is in relation to the motor and an overheating or motor control unit issue. We would recommend replacing the motor speed control board first, as that is the most common cause of that issue. I hope this helps!
1 person found this helpful.
Was this helpful?
Thank you for voting!
Suzanne
March 21, 2022
I need to replace the rubber gasket due to mold buildup that will not come out. What is the part number? How much does it cost?I have already tried multiple rounds of bleach and the mold stains are not coming out.
thank you
For model number 41741122310
Hi Suzanne,
Thank you for your question. The part number listed under your model number for the bellow is PS10057189. If you need help placing an order for it, customer service is open 7 days a week and anyone will be happy to assist you. Please feel free to give us a call. We look forward to hearing from you!
this machine keeps losing cycles , i am down to the delicate cycle
For model number 41741122310
Hello Michael, thank you for getting in touch. Based on our understanding of the issue, we would suggest checking the control board, part number PS10063115, to solve the problem. Glad to be of assistance!
This was one of the simpliest repairs I have ever done taking less than 5 minutes to complete. On the inner door I removed the two screws that hold the plastic catch in place. I then removed the broken catch and put the new catch in place. Finally I replaced the two screws that hold the catch in place and it was done.
I removed the broken door catch, which consisted of removing two screws, making it a snap to do, all you needed was a screw driver, and replaced it with the new one using the same screws, This took about 5 mins. to do and was very simple. Turning the machine into a working washer again. : ) After looking all over for the part,and no
... Read moret finding it I was thrilled when you carried the part. Even though the machine is old, it works great. Thank you for the selection of all the parts you carry and how you make it so easy for us to find what we need. , and having it in stock, which was mailed right away, so I could replace the catch and have the washer back in use in less than a week. Thank you
The striker is really easy to replace. Remove 2 #3 phillips screws, replace the striker part, and tighten the screws.
It got more complicated when too many striker tips broke off inside the latch assembly and prevented the tip of the new striker from going inside. To get at the latch assembly, I had to remove the big rubber g
... Read moreasket that connects the drum to the frame of the machine. I removed this at the drum end. Big mistake! It took two of us to get the gasket back onto the drum, and I had to take the frame end of the gasket off anyway. That end is a lot easier to put back on. Anyway, I finally got to the latch assembly, which attaches to the machine with two screws. It has 3 connectors and the housing is a grey plastic clamshell that latches in 3 places. It came apart and parts came out. Jamming the latches open and very gently prying the clamshell open may let you escape the small parts barrage. Once I got everything back together, it all worked.
Unfortunately, the story doesn't end there. This machine has broken 4 strikers. They break during the wash cycle. Taking a cue from a previous DIY description on this site, I took the hinge apart. It looks like there is a part missing, because there isn't anything that keeps the door aligned with the rest of the machine. The door drops down as low as it can go on the hinge pin and the plastic of the door frame rides directly on the arm of the hinge part. I've shimmed it up about 3/16" temporarily, and it seems to work, but I can't escape the idea that I shouldn't have to do this...