Models > 3EHD261MMWR0

3EHD261MMWR0 Whirlpool Refrigerator - Overview

Sections of the 3EHD261MMWR0

[Viewing 12 of 12]
Keep searches simple, eg. "belt" or "pump".
Door Cam - Black – Part Number: WPW10329686
Door Cam - Black
★★★★★
★★★★★
(63)
PartSelect #: PS11752991
Manufacturer #: WPW10329686
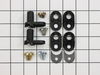
The Door Cam is a black plastic part which helps the door pivot shut while keeping the door and hinge in proper alignment. Lubricating this part upon installation may help it move easier. It attaches...
$10.56
  In Stock
Refrigerator Door Switch – Part Number: W11384469
Refrigerator Door Switch
★★★★★
★★★★★
(83)
PartSelect #: PS12728638
Manufacturer #: W11384469
Door switch turns the light off when you close the door.
$38.48
  In Stock
Door Closing Cam Kit – Part Number: 4318165
Door Closing Cam Kit
★★★★★
★★★★★
(23)
PartSelect #: PS358690
Manufacturer #: 4318165
This door closing cam kit is intended for use with the bottom of refrigerator and freezer door hinges. The cam helps with the closing of the doors and to keep them slightly in position when opened.
$13.52
  In Stock
Water Tube Kit – Part Number: W10823511
Water Tube Kit
★★★★★
★★★★★
(7)
PartSelect #: PS11730901
Manufacturer #: W10823511
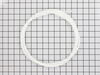
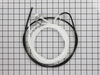
This is the replacement water tube kit for your refrigerator. This tubing is made of plastic, is 1/4 inch in diameter, and comes with 2 inserts. This tube may be longer than the original tube, and may...
$36.12
  In Stock
Cover Screw – Part Number: WP308685
Cover Screw
PartSelect #: PS11740701
Manufacturer #: WP308685
Sold individually.
$7.95
  In Stock
Screw – Part Number: WP488729
Screw
★★★★★
★★★★★
(1)
PartSelect #: PS11742721
Manufacturer #: WP488729
Metallic screw that is less than an inch long. Does not include the plastic washer.
$7.91
  In Stock
Touch-Up Paint - White – Part Number: 72017
Touch-Up Paint - White
★★★★★
★★★★★
(1)
PartSelect #: PS385132
Manufacturer #: 72017
This touch-up paint can be used on a wide variety of household appliances. It is most often used on washers, dryer, refrigerators, dishwashers, ranges, freezers, trash compactors, or microwaves. It is...
$8.00
  In Stock
Nozzle and Tube Kit – Part Number: WP4388152
Nozzle and Tube Kit
★★★★★
★★★★★
(7)
PartSelect #: PS11742481
Manufacturer #: WP4388152
This kit is intended for use with refrigerators that have a water dispenser in the door.
$110.36
  In Stock
Light Socket Kit – Part Number: 4387478
Light Socket Kit
★★★★★
★★★★★
(6)
PartSelect #: PS371236
Manufacturer #: 4387478
The light socket in your refrigerator houses the light bulb and connects it to the power source. If your refrigerator light is not coming on when you open the door, you may need to replace the light s...
$70.72
  In Stock
Ice Dispenser Motor Coupling – Part Number: WPW10169511
Ice Dispenser Motor Coupling
★★★★★
★★★★★
(3)
PartSelect #: PS11749442
Manufacturer #: WPW10169511
This part attaches to the drive shaft of the ice dispenser motor.
$18.75
  In Stock
Water Dispenser Reservoir Tubing – Part Number: WP2256126
Water Dispenser Reservoir Tubing
★★★★★
★★★★★
(1)
PartSelect #: PS11739924
Manufacturer #: WP2256126
This kit no longer includes the connectors. It is only the tubing/water reservoir. Note: This tubing requires an adapter coupler (PS369735) to take the tubing from 1/4 inch to 5/16 inch.
$99.98
  In Stock
Spray Paint - 12 oz. - White – Part Number: 350930
Spray Paint - 12 oz. - White
★★★★★
★★★★★
(2)
PartSelect #: PS347819
Manufacturer #: 350930
Appliance spray paint is a great way to cover up any chips and scratches that have appeared on your appliances. Instead of replacing the part entirely, this is an easy fix. This is also a great way to...
$22.68
  In Stock

Questions And Answers for 3EHD261MMWR0

Be the first to ask our experts a question about this model!

Common Symptoms of the 3EHD261MMWR0

[Viewing 13 of 13]
Door won’t open or close
Fixed by
these parts
Fixing Fixing Fixing
Show All
Light not working
Fixed by
these parts
Fixing Fixing Fixing
Show All
Leaking
Fixed by
these parts
Fixing Fixing Fixing
Show All
Clicking sound
Fixed by
these parts
Fixing Fixing
Show All
Door Sweating
Fixed by
these parts
Fixing Fixing Fixing
Show All
Fridge too warm
Fixed by
these parts
Fixing Fixing
Show All
Not dispensing water
Fixed by
these parts
Fixing Fixing Fixing
Show All
Ice maker won’t dispense ice
Fixed by
these parts
Fixing Fixing
Show All
Noisy
Fixed by
these parts
Fixing Fixing
Show All
Ice maker not making ice
Fixed by
these parts
Fixing Fixing
Show All
Fridge too cold
Fixed by
these parts
Fixing
Show All
Will Not Start
Fixed by
these parts
Fixing
Show All
Fridge runs too long
Fixed by
these parts
Fixing
Show All
Keep searches simple. Use keywords, e.g. "leaking", "pump", "broken" or "fit".
The door would not close properly. The CAM had broken.
The repair was very simple.

1. Remove the food from the door shelves.

2.Remove the door by first removing the three screws holding the hinge at the top of the refrigerator.

3. Lift door off of the bottom hinge.

4.Replace bottom CAM on bottom hinge (one screw)

5. Replace top CAM and shim on door (one screw)

6. I put a little grease on the cam to make it slide better.

7. Place door on bottom hinge. Remount top hinge.

8. Done and works better than new.
Parts Used:
Door Closing Cam Kit
  • Thomas from San Clemente, CA
  • Difficulty Level:
    Really Easy
  • Total Repair Time:
    Less than 15 mins
  • Tools:
    Nutdriver, Screw drivers
143 of 147 people found this instruction helpful.
Was this instruction helpful to you?
Thank you for voting!
Lights inside refrigerator not working
I used a flat-head screwdriver to pop out the old light rocker switch. Then, I unplugged the wires, plugged them into the new light rocker switch, and then popped the new switch into the hole. That's it! Lights began working again.
Parts Used:
Refrigerator Door Switch
  • Clint from Rayville, MO
  • Difficulty Level:
    Really Easy
  • Total Repair Time:
    Less than 15 mins
  • Tools:
    Screw drivers
118 of 192 people found this instruction helpful.
Was this instruction helpful to you?
Thank you for voting!
Light Would Not Go On In The Refrigerator
First I removed the old lightbulb from the socket and replaced it with a new one to confirm that the bulb was not the problem. I then pryed the socket out with a flat-head screwdriver. I could tell that the socket was anchored in its hole with clips so it was relatively easy to pry it out. Once the socket was out, I disconnected the lead wires and ordered a replacement socket kit from Partselect. When the new one arrived, I reconnected the lead wires to it, snapped it back into its hole, screwed in a new lightbulb, and presto!! The light was back on with no further problem. Thank you, Partselect!! A $15.00 part saved me what probably would have been at least a $100. service call and heaven knows what the technician would have told me I needed!!!
Parts Used:
Light Socket Kit
  • DANIEL from MINNEAPOLIS, MN
  • Difficulty Level:
    Easy
  • Total Repair Time:
    Less than 15 mins
  • Tools:
    Screw drivers
61 of 77 people found this instruction helpful.
Was this instruction helpful to you?
Thank you for voting!