


Models
>
36363692303
36363692303 Kenmore Microwave - Overview
Sections of the 36363692303
[Viewing 7 of 7]
Manuals & Care Guides for 36363692303
Click to downloadKeep searches simple, eg. "belt" or "pump".

FUSE
PartSelect #: PS1481237
Manufacturer #: WB27X10928
This ceramic microwave fuse is just over an inch in length. It is white in the center, and metal on both ends. This is a 20-amp fuse, and is used to power your microwave. If the touch pad on the micro...
$10.58
In Stock

Glass Cooking Tray
PartSelect #: PS956214
Manufacturer #: WB49X10129
There are two different couplers (also known as a turntable shaft) that can be used for this tray - a male D-shaped shaft and a female D-shaped shaft. The couplers are sold separately.
$106.23
In Stock

Door Latch Assembly
PartSelect #: PS230891
Manufacturer #: WB10X10021
This part is electrically designed for securing the door of the microwave while it’s in use.
$19.83
In Stock

Halogen Bulb - 20W - 12V
PartSelect #: PS951718
Manufacturer #: WB01X10239
This light bulb is a 12 Volt/20 Watt bi-pin base halogen lightbulb, meaning it emits a bright, white light which is similar to natural daylight and is inserted into its socket, as opposed to being rot...
$37.02
In Stock

Halogen Light Bulb - 10W 12V
PartSelect #: PS247364
Manufacturer #: WB36X10163
Sold individually.
$32.50
On Order

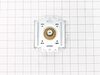
MOUNTING PLATE ASM
PartSelect #: PS16216996
Manufacturer #: WB56X35363
This mounting plate, also known as a bracket, is crucial for keeping your microwave mounted to the wall, when placed above the stove. This OEM part is sold separately from the screws that are needed t...
$13.76
In Stock


Magnetron
PartSelect #: PS3529034
Manufacturer #: 6324W1A001L
This magnetron in your microwave creates the radiation needed for cooking or warming your food. It is located inside the main cavity, typically near the transformer or waveguide. When the magnetron be...
$180.80
In Stock


Questions And Answers for 36363692303
We're sorry, but our Q&A experts are temporarily unavailable.
Please check back later if you still haven't found the answer you need.
Common Symptoms of the 36363692303
[Viewing 5 of 5]No heat
Fixed by
these parts
these parts


Show All
Won’t turn on
Fixed by
these parts
these parts

Show All
Door not closing properly
Fixed by
these parts
these parts
Show All
Touchpad does not respond
Fixed by
these parts
these parts
Show All
Doesn’t shut off
Fixed by
these parts
these parts
Show All
Keep searches simple. Use keywords, e.g. "leaking", "pump", "broken" or "fit".
Microwave completely stopped working
Turned out the issue was easily solved by replacing a single, inexpensive fuse.
First off, UNPLUG THE MICROWAVE.
The fuse is located under the plastic grill at the top of the microwave. It's held on by two screws. Once you've removed the screws and taken off the plastic grill, you go to the right side of the mic ... Read more rowave and remove another screw that holds a small metal grill in place. Removing the small metal grill is probably the toughest part of this repair. You kind of have to rock it back and forth a bit to get it to release. Once that's off, you can get to the fuse. I removed the burnt out one with a pair of needle nose pliers. I also put a small piece of cardboard under the fuse when I did this so I didn't accidentally drop it into the innards of the microwave. I did the same thing when I replaced the new fuse. I then plugged the appliance back in and made sure it worked. Once that was confirmed, I replaced both grills.
Read less
Parts Used:
-
Kim from Cliffside Park, NJ
-
Difficulty Level:Really Easy
-
Total Repair Time:15 - 30 mins
-
Tools:Screw drivers
953 of 1228 people
found this instruction helpful.
Was this instruction helpful to you?
Thank you for voting!
One of the two plastic latches broke off, disabling my microwave
I have a GE Advantium/micorwave oven. It is the model that has the hinges on the side, NOT the bottom. First, removing the door is necessary. The grill has to be removed first, then the door lifts right out. Next the plastic backing on the door has to be very carfully taken off to expose where the new latch has to be placed. Use a fla
... Read more
t screw driver or putty knife to go around the permiter releasing the internal, unseen, plastic catches that hold it on. This should be done carefully, to avoid breaking the catches that you can't see. After the plastic is mostly removed putting in the spring is not too difficult, but a second set of hands is almost manditory.
Read less
Parts Used:
-
Dennis S. from Fremont, OH
-
Difficulty Level:A Bit Difficult
-
Total Repair Time:30 - 60 mins
-
Tools:Screw drivers
55 of 73 people
found this instruction helpful.
Was this instruction helpful to you?
Thank you for voting!
Broken door catch
Easy as pie!
1. Remove the 2 outer screws holding the top vent in place and remove the vent (it helps to have the door open)
2. Lift the door up, pull the top of the door away from the hinge and then list it up a little more to clear the bottom hinge.
3. Lay the door on the counter and with a putty knife, work your way aro ... Read more und the perimeter of the door between the door and the inside bezel. The bezel is held in place with little tabs spaced evenly around the perimeter.
4. Once the bezel is off, the catch assembly is accessible. List it up against the spring pressure, and push it towards the outside of the door to release it from the frame.
5. Reverse procedure to install.
Read less
Parts Used:
-
Robert from Burlington, CT
-
Difficulty Level:Easy
-
Total Repair Time:15 - 30 mins
-
Tools:Screw drivers
43 of 55 people
found this instruction helpful.
Was this instruction helpful to you?
Thank you for voting!