


Models
>
35HA-26X-ON
35HA-26X-ON Magic Chef Range - Overview
Sections of the 35HA-26X-ON
[Viewing 3 of 3]


Keep searches simple, eg. "belt" or "pump".

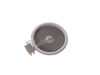
Light Bulb - 40W
PartSelect #: PS884734
Manufacturer #: 8009
This an authentic OEM 40-Watt replacement light bulb, used in a number of household appliances. It is specially designed to withstand extreme temperatures, which is why these replacement bulbs are mos...
$11.73
In Stock

Terminal Block
PartSelect #: PS11750972
Manufacturer #: WPW10245259
This part is for oven ranges, it connects individual wires and protects the device from electrical surges, voltages, and current. With this part, the house power is connected to the range wire harness...
$34.09
In Stock

2 Piece Broiler Pan
PartSelect #: PS971245
Manufacturer #: 4396923
This is cookware designed for use in your range or oven. It is a two-piece dish that is used to grill or cook food while the broil function is on, meaning it can withstand high temperatures. This set ...
$37.51
In Stock

Oven Door Spring
PartSelect #: PS11744749
Manufacturer #: WP7803P058-60
The oven door springs create tension which allows the door to open and close with ease. This spring can be used on either the left or right side of your oven, is made completely of metal, and is appro...
$17.05
In Stock

Cooktop Cleaner
PartSelect #: PS2344170
Manufacturer #: TJ114
Cleans/Polishes all glass, ceramic, porcelain and fiberglass surfaces.
No Longer Available

6 Inch Element with Limiter
PartSelect #: PS11764912
Manufacturer #: W10823704
This element can be used for the left front or right rear.
$268.43
In Stock
 – Part Number: WPY04000041")
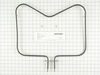
Bake Element (15 Inch long x 19 Inch wide)
PartSelect #: PS11757468
Manufacturer #: WPY04000041
This spade style bake element with push on wire terminals is 15 inches long and 19 inches wide. The depth of the terminals is three inches.
$86.59
In Stock

Frame Screw
PartSelect #: PS11743908
Manufacturer #: WP7101P126-60
Sold Individually.
$7.76
In Stock

Appliance Scraper
PartSelect #: PS408570
Manufacturer #: WA906B
Use this scraper for your ceramic/glass cooktop. It has a retractable blade and is an all-purpose tool for cooktops, mirrors, windows and tile. Use it to also remove paint, paper, dirt, stickers and more.
$10.79
In Stock

Stand Mixer Screw
PartSelect #: PS11742292
Manufacturer #: WP4159193
This screw is sold individually.
$8.63
In Stock

Twist-Style Clock Knob
PartSelect #: PS1655662
Manufacturer #: 7711P172-60
Sold individually.
No Longer Available

Oven Rack
PartSelect #: PS1656457
Manufacturer #: 7801P030-60
Sold individually.
No Longer Available
Questions And Answers for 35HA-26X-ON
We're sorry, but our Q&A experts are temporarily unavailable.
Please check back later if you still haven't found the answer you need.
Common Symptoms of the 35HA-26X-ON
[Viewing 5 of 5]Element will not heat
Fixed by
these parts
these parts


Show All
Little to no heat when baking
Fixed by
these parts
these parts
Show All
Will Not Start
Fixed by
these parts
these parts
Show All
Door won’t close
Fixed by
these parts
these parts

Show All
Touchpad does not respond
Fixed by
these parts
these parts
Show All


Keep searches simple. Use keywords, e.g. "leaking", "pump", "broken" or "fit".
Burned terminal block and filter board
Removed and replaced above named parts, rewired.Be sure to tighten all nuts that secure wires. I believe this is what caused the problem.
Parts Used:

-
Joseph from Decatur, GA
-
Difficulty Level:Easy
-
Total Repair Time:30 - 60 mins
-
Tools:Nutdriver, Screw drivers, Socket set, Wrench set
90 of 192 people
found this instruction helpful.
Was this instruction helpful to you?
Thank you for voting!
replaced heating element on flat surface stove top
I removed 4 screws and then lifted up the top it gave me access to the element I followed the direction that came with the element (very clear to follow) removed and installed the new element and it worked fine. Remember to unplug the stove if it is electric this is not in the instructions.
Parts Used:

-
dennis from assonet, MA
-
Difficulty Level:Really Easy
-
Total Repair Time:15 - 30 mins
-
Tools:Nutdriver
34 of 47 people
found this instruction helpful.
Was this instruction helpful to you?
Thank you for voting!
Small Element On Counter Top Range Not Heating.
1. Turned off power to trouble shoot the counter top range elements. 2. Raised the counter top up to work on it and slid two evenly placed wooden slats under the bottom of the housfor stability so it would not fall backdown into the counter top cut-out. 3. With a 1/4" nut driver removed the 10 hex-head screw that were holding the blac
... Read more
k glass top in place, pulled off the 4 . Control knobs and carefully removed the glass cover and carefully seet it aside in a safe place. 5. A visual inspection of the non working element showed that it had a burn out spot causing it not to heat. 6. Got the model number of the appliance and checked the internet for parts suppliers, chose parts elect because they had the part in stock and could overnight it for reinstallation the next day, part did arrive the next morning. A visual inspection show that it was the correct part and it would be a like for like swap out. 7. Prior to replacing the element check to see that the electrical power was still off at the circuit breaker, made a quick sketch of the wiring and identified the wires so that they would be reterminated at the same points. 8. Using the needle nose pliers pulled off the 4 stake on terminations. 9. Lifted out the 6" from the body of the unit , removed the 4 phillips screws holding parts what were to be transfered onto the new element. 10. Transfered parts onto the new element, reinstalled the element into the body of the unit, reinstalled the 4-stake-on wires to there appropriate terminals and verified with previous wiring sketch. 11. Reinstalled the glass top, 10 screw holding it in place and the 4-control knobs. 12 . Turned main power to the unit back on and turned on the replaced element, it work correctly, also checked the other 3 elements to make sure that they were working correctly. 13. When the unit had cooled, removed the wooden slats and lowered the counter top back into its cut-out making sure not to damage the glasstop. Job complete.
Read less
Parts Used:
-
Brian E from Waldorf, MD
-
Difficulty Level:Easy
-
Total Repair Time:30 - 60 mins
-
Tools:Nutdriver, Screw drivers
17 of 20 people
found this instruction helpful.
Was this instruction helpful to you?
Thank you for voting!