This drip pan is designed for gas cooktops and ranges. The pan has an approximate diameter of 8 inches, and the hole in the middle has a diameter of roughly 4 inches. The purpose of this part is to ca...
This is a burner grate for your surface burner, and it is compatible with your range stove top. The purpose of this part is to provide a balanced and stable surface for you to set your cookware on whi...
This is a clock knob for an electric range, oven, or stove. It allows you to adjust the clock and cooking timer. No tools are required for this repair, the knob simply pops on and off the turn shaft. ...
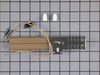
This flat style gas oven igniter is 5.53 inches long and comes with a bracket and wire nuts. Its amperage range is between 3.2 and 3.6 amps. May be different in appearance but will function as the orginal part.
Warning- we found a lot of bare wires in this stove, check your wires before replacing the bad switches. I lifted the top, disconnected the power, pulled off the knobs, unscrewed the switch for the back light, removed seven screws to finally get the front panel off. Once you have the front panel off, changing the swich takes less than a m
... Read moreinute. The switches just slide off the gas valve stems. Instructions show how to line up the new D-shaped switch mechanism to match the D-shaped shaft. Gently pull the two wires off the old switch and slide onto the new switch. Then put the panel back.
2) Remove oven door. There requires that you remove the two square drive (SD) bolts on the inside, partially close the door and lift it off the hinges.
3) Remove the grills.
4) At the back remove the rear shield (aluminum panel held by 2 SD sheet metal screws
... Read more.
5) this exposes the broiler igniter and its two wires. If its been replaced in past, there should be two porcelain screw-on wire connectors. Undo the connectors by turning them counter-clockwise. With a volt-ohmmeter, measure the resistance across the igniter. If its open circuited, its broken. If not, then its in the circuit board, and this help stop here. If this is the original igniter, it ends in a plastic connector. Disconnect by pulling it apart from its mating plug and again, check the continuity of the igniter. If its defective, reconnect the connector and cut each wire on the igniter side. Strip back about 1/2 inch of insulation on each lead.
6) inside the oven, using the SD driver, remove the 4 screw securing the broiler burner from the roof of the oven. The burner can now be removed, pulling the burner away from the gas jet on the right.
7) The igniter is now exposed and can be remove by removing the two SD drive screws.
8) Replace with the new igniter, being careful not to touch the black element, and feeding the wires though the rear oven wall.


 Tappan Range")