This replacement bar end cap can be used for a shelf in your freezer. The end cap is 4.25 inches long and 2.4 inches wide. You may need a flat blade screwdriver in order to pop out the existing end ca...
This door shelf retainer bar is a replacement part for your refrigerator. To replace this part, you may need a flat blade screwdriver to apply leverage. Pop out the end caps on the shelf you are repla...
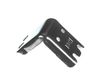
This Defrost Timer works like a clock by switching on the defrost heater circuit after a predetermined amount of compressor run time. This allows the defrost circuit to clear the evaporator of ice or ...
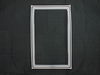
Glass only. This glass insert measures 23.82 x 15.50-in.
This is an authentic Frigidaire replacement part. The crisper shelf insert is designed by the manufacturer for use in refrigerators. This par...
This part is the replacement door shelf retainer bar end cap for your refrigerator. It is made of white plastic and measures approximately 3 inches by 4 inches. The door shelf retainer bar end cap is ...
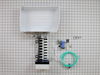
The evaporator fan motor (Motor Evaporator Fan, Evaporator Fan Motor Kit, Evaporator Fan Motor, Refrigerator Evaporator Fan Motor) circulates air through the food compartment for efficient cooling in ...
This OEM 40 watt appliance light bulb is used for some ranges, refrigerators, freezers, and microwaves. Simply locate the existing bulb, unscrew it from its socket, and replace with new light bulb. If...
This is the replacement meat pan for your refrigerator. It is made of clear plastic and is approximately 18 inches long and 13 inches wide. The meat pan slides into the bottom of the refrigerator shel...
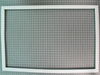
Sold individually. Genuine Refrigerator Freezer Wire Shelf. The wire shelf attaches into the freezer to provide storage space.
This part works with the following brands: Frigidaire, White Westingh...
No instructions included, so it took a little bit of staring at the new part to figure out how it works. The barbed ridge on the gasket fits into a slot on the door. The flat face of the gasket has an internal magnetic strip that helps keep the seal tight against the steel face of the refrigerator. Installation requires no tools. This is
... Read morethe basic process: 1) Unbox the new gasket and get it ready to install so you don't have to leave the fridge open too long. 2) Open the door and grab the old gasket at one of the corners and pull away. This will unseat the barbed ridge I mentioned above. Work your way around the door until the whole gasket is free. 3) Set aside the old gasket 4) Grab a moistened paper towel and wipe down the (now exposed) sealing surface of the fridge and door. 5) Align the new gasket in the door and start pushing the barb into place. I found that the new gasket seemed slightly oversize compared to the original, so it took a little tweaking. What worked for me was to get all the corners seated, then work my way around the door making sure the gasket is fully seated. 6) Once you have the new gasket installed, close the door to make sure everything fits OK. 7) Open the door again and run your finger along the inside edge of the gasket seal. What you want to do is fold the edge of the gasket down so it lays flat against the outer wall of the door. 8) Shut the door and look from the sides and top to try to spot any gaps. You should be able to poke the gasket from the side and get the magnet strips to click into place. It seems like after a day or so the gasket 'relaxed' and I didn't have to worry about this anymore. 9) Dispose of the old gasket. I was able to pull the gasket into four pieces (separating at the corners) so it would fit in my city trash can...
I removed the fan housing in the freezer section by removing all the screws. (7) There are two screws behind the vents. I did not have an ice maker to contend with so this was very easy. There is only two wires to disconnect....the ground wire and the electricity supply. Then you remove the unit from the back of the housing cover by rem
... Read moreoving two screws. Then the motor is removed from it's housing by removing 2 more screws. 1...2...3 and you're ready to reverse the procedure. I am not mechanically inclined and this was easy. Saved myself perhaps $120.00. Repair folks wanted mininum of $60.00 just to come out. Part and shipping cost me 33 bucks.OH, DON'T FORGET TO UNPLUG THE FRIDGE. :>)
OK, what I really want to talk about is the really poor quality of the fan motor. This is the third time that it has failed (about once per year). Local maintenance shops do not stock the motor, hence the frozen food thaws before they can get a part. I always keep a spare motor so that I can immediately repair the fridge.
Th
... Read moree repair is very easy - remove all racks in the freezer and then remove their slides. Then remove the screws in the back plate. Due to the ice maker, the plate will not come out, so just pull it up and tie it off. Remove the screws to remove the motor fan assembly. I did the repair with the power on, BUT BE CAREFUL if you do so. Uplug the power from the motor, and remove the assembly from the freezer. Disamble and replace the motor. Then revese the above and you're freezing again.