


Models
>
25323114100
25323114100 Kenmore Freezer - Overview
Sections of the 25323114100
[Viewing 3 of 3]
Keep searches simple, eg. "belt" or "pump".

Freezer Door Key
PartSelect #: PS1991481
Manufacturer #: 297147700
This freezer door key is designed for use with most upright and chest freezers. It is an authentic OEM replacement part. Your appliance has a lid or door that locks and unlocks, this key controls that...
$11.23
In Stock

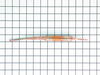
Freezer Door Gasket
PartSelect #: PS11770643
Manufacturer #: 5304507199
This gasket is used to seal the freezer door when closed to keep the cool air inside and the warm temperature surrounding the freezer from getting in. It is white in color. If you notice that your fre...
$158.73
In Stock

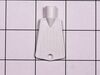
Handle Mounting Block
PartSelect #: PS427804
Manufacturer #: 218396700
Sold individually.
$41.17
In Stock

Gasket Retainer Clip Kit - 24 Pieces
PartSelect #: PS469567
Manufacturer #: 5303922007
This gasket retainer clip kit is for freezers. There are 24 pieces in this kit. The clips are what secure the gasket and liner to the freezer lid. The clips are white in color and made of plastic. If ...
$56.11
In Stock

Screw
PartSelect #: PS1525540
Manufacturer #: 215503203
Cross Recessed Pan Head Screw Size: 10-16 X 0.500
$7.27
In Stock

Adjustable Leveling Foot - Black
PartSelect #: PS425733
Manufacturer #: 216396900
This part could be found underneath a fridge, dryer, or freezer. The original foot may be cracked, broken, or perhaps missing altogether. If you notice the appliance is uneven to the floor or wobbling...
$25.82
In Stock

Hexagonal Screw
PartSelect #: PS1526503
Manufacturer #: 241710601
Sold individually.
$11.21
In Stock

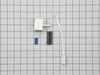
Run Capacitor
PartSelect #: PS817298
Manufacturer #: 218909912
This part helps the compressor kick on and off while maintaining a constant temperature to keep things frozen in your freezer.
$58.93
In Stock

Shelf Support - Right Side
PartSelect #: PS977265
Manufacturer #: 297001500
This is a shelf support for freezers. It is used to help hold the inside of the shelf from both sides (left and right.) Please note: right and left side of shelf support are sold separately. If the sh...
$14.50
In Stock


Shelf Support - Left Side
PartSelect #: PS977266
Manufacturer #: 297001600
This is a shelf support for the left side of a freezer. It is used to help support the inside of the shelf from both sides. *Please note: right and left side of shelf support are sold separately. If t...
$14.50
In Stock

Questions And Answers for 25323114100
We're sorry, but our Q&A experts are temporarily unavailable.
Please check back later if you still haven't found the answer you need.
Common Symptoms of the 25323114100
[Viewing 8 of 8]Frost buildup
Fixed by
these parts
these parts


Show All
Won’t start
Fixed by
these parts
these parts

Show All
Too warm
Fixed by
these parts
these parts
Show All
Will Not Start
Fixed by
these parts
these parts
Show All
Fridge too warm
Fixed by
these parts
these parts
Show All
Doesn’t stop running
Fixed by
these parts
these parts
Show All
Freezer section too warm
Fixed by
these parts
these parts
Show All
Fridge and Freezer are too warm
Fixed by
these parts
these parts
Show All


Keep searches simple. Use keywords, e.g. "leaking", "pump", "broken" or "fit".
Gasket old and leaking
This freezer has many screws that hold the cover on the back of the door and assist clamping the edge of the gasket in place. Be sure to just loosen the screws 3/4 the way out, use a flat head screw driver to pry the cover from the door in case over time it is stuck to the door. The new gasket will come in a creative box trying not to kin
... Read more
k the gasket itself, but there will be some distortion of the gasket when you get it. Put it in the sun or in hot water. I put it in my dryer for 10 minutes. Remove the old gasket, and start at the top of the door to replace the gasket. TIPS: If the screws are backed out enough, there should not be any problem sliding the back part of the gasket under the cover. When on the sides, do not pull the gasket down to make it easier to slide the gasket underneath the cover. This will distort and lengthen the gasket so it will not fit and thin it out so it will not function well. Once the gasket is in place, tighten the screws being sure to feel along the outside edge of the gasket for any bulging that would indicate that portion of the gasket is NOT under the cover properly.
Read less
Parts Used:
-
Thomas from RIXEYVILLE, VA
-
Difficulty Level:A Bit Difficult
-
Total Repair Time:30 - 60 mins
-
Tools:Screw drivers
103 of 110 people
found this instruction helpful.
Was this instruction helpful to you?
Thank you for voting!
replacement freezer keys
I accidently threw away both freezer keys to our upright Gibson and G.E. Freezers!!!! I had no luck finding replacements locally, so I got on the internet and came across PartSelect.com. I called them on the telephone; and after giving the model numbers of my freezers, the keys were on their way!! I received the keys very quickly and bot
... Read more
h worked perfectly. I would highly recommend Partselect.com. Charlotte M. Bishop
Read less
Parts Used:
-
CHARLOTTE from SEDALIA, MO
-
Difficulty Level:Really Easy
-
Total Repair Time:30 - 60 mins
70 of 78 people
found this instruction helpful.
Was this instruction helpful to you?
Thank you for voting!
Faulty Controller and Possibly Capacitor
After building a test box and determining the Controller was bad simply ordered parts and installed. Installation was a little difficult due to locking spades on electrical connections.
Unplug all power from freezer. Remove Bail wire from controller capacitor unit and remove from compressor by pulling STRAIGHT from compre ... Read more ssor body to avoid bending contacts.
Use a very small instrumentation screwdriver to release locking spade on yellow and white wires. To unlock slide screwdriver in slot along wire entry to controller body while gently pulling on wire. Note position of wires and replace on new unit in same position/order. Plug new run capacitor into new controller being careful to orient capacitor to proper position (hole matches guide on controller unit). Plug newly installed controller and capacitor into condensor and replace bail wire.
Make sure timer is not in defrost mode - manually advance timer if necessary to ensure timer is in run mode. Turn temperature control to coldest setting. Plug in and hopefully enjoy the humming noise of your newly repaired and operational compressor and freezer.
Read less
Parts Used:

-
eric from inglewood, TN
-
Difficulty Level:A Bit Difficult
-
Total Repair Time:Less than 15 mins
-
Tools:Pliers, Screw drivers
33 of 39 people
found this instruction helpful.
Was this instruction helpful to you?
Thank you for voting!