Models > 10RJ11

10RJ11 Hotpoint Range - Overview

Sections of the 10RJ11

[Viewing 1 of 1]
Keep searches simple, eg. "belt" or "pump".
Bake Element – Part Number: WB44X5043
Bake Element
★★★★★
★★★★★
(8)
PartSelect #: PS249449
Manufacturer #: WB44X5043
$65.15
  In Stock
DISCONTINUED – Part Number: WB21X5212
DISCONTINUED
PartSelect #: PS235960
Manufacturer #: WB21X5212
  No Longer Available
BROIL UNIT – Part Number: WB44X5006
BROIL UNIT
PartSelect #: PS249440
Manufacturer #: WB44X5006
$147.78
  Special Order
SWITCH LATCH RELEASE – Part Number: WB24X5014
SWITCH LATCH RELEASE
PartSelect #: PS694386
Manufacturer #: WB24X5014
$39.89
  Special Order
DISCONTINUED – Part Number: WB9X5010
DISCONTINUED
PartSelect #: PS667699
Manufacturer #: WB9X5010
  No Longer Available
DISCONTINUED – Part Number: WB10X5001
DISCONTINUED
PartSelect #: PS677903
Manufacturer #: WB10X5001
  No Longer Available
DISCONTINUED – Part Number: WB2X5091
DISCONTINUED
PartSelect #: PS692416
Manufacturer #: WB2X5091
  No Longer Available

Questions And Answers for 10RJ11

Be the first to ask our experts a question about this model!

Common Symptoms of the 10RJ11

[Viewing 2 of 2]
Little to no heat when baking
Fixed by
these parts
Fixing
Show All
Element will not heat
Fixed by
these parts
Fixing
Show All
Keep searches simple. Use keywords, e.g. "leaking", "pump", "broken" or "fit".
The oven's bottom bake element burned up
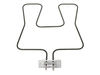
First I turned the circuit breaker switch off for the stove unit. I then removed the two screws that hold the element in place at the back of the oven. I then pulled the element out about 3 inches and disconnected the two wires. I attached the new element, bolting the wires into place and then screwed the element back into place on the back wall of the oven. I flipped the breaker switch back on, and turned on the oven. I was done in roughly 15 minutes. The most difficult part was having to shine a flash light into the oven to replace the part, and negotiating the hard cold kitchen floor.
Parts Used:
Bake Element
  • Dennis from Los Alamos, NM
  • Difficulty Level:
    Really Easy
  • Total Repair Time:
    Less than 15 mins
  • Tools:
    Socket set
19 of 23 people found this instruction helpful.
Was this instruction helpful to you?
Thank you for voting!
The oven element burned completely into.
I first removed the two screws holding the element in place. Then I pulled the element out about 2 or 3 inches and then took out the 2 small screws holding the 2 wires in place. I then removed the old element and discarded it and installed the new one in the reverse order that I took out the old one. It was quite easy to do, only took about 10 to 15 minutes total time.
Parts Used:
Bake Element
  • John from Kiowa, CO
  • Difficulty Level:
    Really Easy
  • Total Repair Time:
    Less than 15 mins
  • Tools:
    Nutdriver
10 of 12 people found this instruction helpful.
Was this instruction helpful to you?
Thank you for voting!
Burned out
First I removed the two screws that hold the element in place. I then pulled the element out about 3 inches and disconnected the two wires...)
Parts Used:
Bake Element
  • Jeff from Phoenix, AZ
  • Difficulty Level:
    Really Easy
  • Total Repair Time:
    Less than 15 mins
  • Tools:
    Screw drivers
6 of 11 people found this instruction helpful.
Was this instruction helpful to you?
Thank you for voting!