Models > 1068221660

1068221660 Kenmore Freezer - Overview

Sections of the 1068221660

[Viewing 4 of 4]
Keep searches simple, eg. "belt" or "pump".
Light Bulb - 40W – Part Number: 8009
Light Bulb - 40W
★★★★★
★★★★★
(66)
PartSelect #: PS884734
Manufacturer #: 8009
This an authentic OEM 40-Watt replacement light bulb, used in a number of household appliances. It is specially designed to withstand extreme temperatures, which is why these replacement bulbs are mos...
$11.73
  In Stock
Door Cam - Black – Part Number: WPW10329686
Door Cam - Black
★★★★★
★★★★★
(63)
PartSelect #: PS11752991
Manufacturer #: WPW10329686
The Door Cam is a black plastic part which helps the door pivot shut while keeping the door and hinge in proper alignment. Lubricating this part upon installation may help it move easier. It attaches...
$10.56
  In Stock
Door Closing Cam Kit – Part Number: 4318165
Door Closing Cam Kit
★★★★★
★★★★★
(23)
PartSelect #: PS358690
Manufacturer #: 4318165
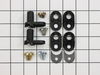
This door closing cam kit is intended for use with the bottom of refrigerator and freezer door hinges. The cam helps with the closing of the doors and to keep them slightly in position when opened.
$13.52
  In Stock
Cover Screw – Part Number: WP308685
Cover Screw
PartSelect #: PS11740701
Manufacturer #: WP308685
Sold individually.
$7.95
  In Stock
Screw – Part Number: WP488729
Screw
★★★★★
★★★★★
(1)
PartSelect #: PS11742721
Manufacturer #: WP488729
Metallic screw that is less than an inch long. Does not include the plastic washer.
$7.91
  In Stock
Light Socket Kit – Part Number: 4387478
Light Socket Kit
★★★★★
★★★★★
(6)
PartSelect #: PS371236
Manufacturer #: 4387478
The light socket in your refrigerator houses the light bulb and connects it to the power source. If your refrigerator light is not coming on when you open the door, you may need to replace the light s...
$70.72
  In Stock
Kickplate Support Clip – Part Number: WP944224
Kickplate Support Clip
★★★★★
★★★★★
(5)
PartSelect #: PS11746875
Manufacturer #: WP944224
Sold individually.
$11.14
  In Stock
Screw – Part Number: WP999367
Screw
PartSelect #: PS11747799
Manufacturer #: WP999367
Sold individually.
$7.95
  In Stock
Single Hex Head Screw – Part Number: WP489069
Single Hex Head Screw
PartSelect #: PS11742731
Manufacturer #: WP489069
Sold individually. The size of this screw is 1/4" hex head and 10-12 x 1/2".
$5.42
  In Stock
Screw – Part Number: WP489128
Screw
PartSelect #: PS11742733
Manufacturer #: WP489128
This screw is sold individually.
$13.17
  In Stock
LEVELER – Part Number: W11117769
LEVELER
PartSelect #: PS12114323
Manufacturer #: W11117769
This is an OEM part that is made of metal and sold individually. The leveling leg is generally used with refrigerators, dryers, freezers, ranges, cooktops, and microwaves. The leveling leg is meant to...
$10.70
  In Stock
Retainer Bar End Cap – Part Number: WP986540
Retainer Bar End Cap
PartSelect #: PS11747552
Manufacturer #: WP986540
Sold individually.
$11.10
  In Stock

Questions And Answers for 1068221660

Be the first to ask our experts a question about this model!

Common Symptoms of the 1068221660

[Viewing 7 of 7]
Door won’t open or close
Fixed by
these parts
Fixing Fixing
Show All
Clicking sound
Fixed by
these parts
Fixing Fixing
Show All
Light not working
Fixed by
these parts
Fixing
Show All
Fridge too warm
Fixed by
these parts
Fixing Fixing
Show All
Door Sweating
Fixed by
these parts
Fixing Fixing
Show All
Noisy
Fixed by
these parts
Fixing Fixing
Show All
Fridge runs too long
Fixed by
these parts
Fixing
Show All
Keep searches simple. Use keywords, e.g. "leaking", "pump", "broken" or "fit".
The door would not close properly. The CAM had broken.
The repair was very simple.

1. Remove the food from the door shelves.

2.Remove the door by first removing the three screws holding the hinge at the top of the refrigerator.

3. Lift door off of the bottom hinge.

4.Replace bottom CAM on bottom hinge (one screw)

5. Replace top CAM and shim on door (one screw)

6. I put a little grease on the cam to make it slide better.

7. Place door on bottom hinge. Remount top hinge.

8. Done and works better than new.
Parts Used:
Door Closing Cam Kit
  • Thomas from San Clemente, CA
  • Difficulty Level:
    Really Easy
  • Total Repair Time:
    Less than 15 mins
  • Tools:
    Nutdriver, Screw drivers
143 of 147 people found this instruction helpful.
Was this instruction helpful to you?
Thank you for voting!
Light Would Not Go On In The Refrigerator
First I removed the old lightbulb from the socket and replaced it with a new one to confirm that the bulb was not the problem. I then pryed the socket out with a flat-head screwdriver. I could tell that the socket was anchored in its hole with clips so it was relatively easy to pry it out. Once the socket was out, I disconnected the lead wires and ordered a replacement socket kit from Partselect. When the new one arrived, I reconnected the lead wires to it, snapped it back into its hole, screwed in a new lightbulb, and presto!! The light was back on with no further problem. Thank you, Partselect!! A $15.00 part saved me what probably would have been at least a $100. service call and heaven knows what the technician would have told me I needed!!!
Parts Used:
Light Socket Kit
  • DANIEL from MINNEAPOLIS, MN
  • Difficulty Level:
    Easy
  • Total Repair Time:
    Less than 15 mins
  • Tools:
    Screw drivers
61 of 77 people found this instruction helpful.
Was this instruction helpful to you?
Thank you for voting!
Main Door wouldn't self-close
After removing all the food items from the door, I popped the plastic cover off of the hinge assembly located on the top of the door. With a fine point Sharpie pen , I marked the outline of around the hinge assembly so I could return it to original position. I then loosened each of the 3 bolts holding the hinge on just enough to allow me to clear the pin of the hinge out of the hole in the door. Once the top was free of the hinge, I lifted the door off of the bottom hinge/pin assembly. My cam parts on the bottom hinge and door were either broken and/or partially missing. I removed the broken and worn pieces by removing each of the screws holding the top and bottom (of the bottom hinge assembly) cam pieces and installed the new ones using same screws. I then reversed the steps and slid the bottom of the door back onto the bottom hinge assembly and then lifted the top hinge enough to allow the hinge pin to slid back into the hole on top of the door. Positioned the hinge so it matched the outline and tightened the 3 bolts. I checked the closing and made a slight adjustment to door as one of the shelves was hitting the interior as it tried to close. I did this by loosening the 3 bolts and pushing the door up and to the right (this door was on the right side of refrigerator). Tightened the bolts and reinstalled the hinge cover.
Pretty easy. My door cams were a little different so I didn't use all the parts in the kit. My shims were metal and did not move when I replace the cams so I didn't use anything in this repair except the 2 lower cam parts. I also put some grease/vaseline on the cams to lubricate them.
I figure the plastic cams just wore out over the years and all the heavy junk we put in the door shelves. I lived with this problem about 2 years before it donned on me that it was probably just a plastic piece or two that was broken or worn out.
Parts Used:
Door Closing Cam Kit
  • Gary from Huntington, WV
  • Difficulty Level:
    Easy
  • Total Repair Time:
    30 - 60 mins
  • Tools:
    Nutdriver, Screw drivers
43 of 45 people found this instruction helpful.
Was this instruction helpful to you?
Thank you for voting!