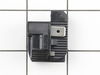
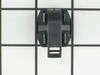
The lower door closing cam is used in refrigerator doors, it can be located on the fresh food side or the freezer side. It helps hold the door open. This cam is made out of plastic, so it might crack ...
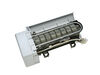
This Ice Maker (Icemaker Assembly, Complete Icemaker Assembly, Ice Maker Assembly, Refrigerator Ice Maker) can be used with 25-27 cubic feet refrigerators that have a vertical auger dispenser located ...
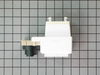
The “Icemaker Control Assembly” (Module & Motor Assembly, Ice Maker Control Module, Icemaker Module, Refrigerator Ice Maker Module) is what controls the actions of your ice maker. The control turns th...
This is a refrigerator ice guide that is made entirely of clear plastic. This ice guide is located in the freezer door. Turn your refrigerator ice dispenser off before replacing the part. This is a si...
In this kit you will find the support, the ice door, spring, and delay. The heater ribbon is no longer needed and therefore will not be included with this part. This kit works in the dispenser chute t...
This is a multi-use and multi-appliance screw. It can be used on a microwave, refrigerator, range/oven, air conditioner, dehumidifier, washer, or dryer. The measurements of this screw are 8 x 1/2 inch...
This refrigerator ice maker fill cup dispenses the water into the ice cube mold during the fill cycle. Replacing the water fill cup is a possible solution if you notice that the ice maker is leaking, ...
$40.40
In Stock
Questions And Answers for 10644109300
Be the first to ask our experts a question about this model!
✖
Ask a Question
Ask our experts a question on this model and we'll respond as soon as we can.
removed flap door in front of icemaker...removed 3 screws with bolt heads...removed one additional screw with bolt head and ice unit slid out. I removed motor unit (pops out no screws). Replaced and had ice within 3 hours.
Remove the icemaker service door... gently pry the door pins from the hinge sockets. Remove the 3 screws from the under side of the icemaker with a nut driver (1/4"). Gently remove the icemaker . It's a tight fit between the top of the compartment and the icemaker lower support tray. Next, disconnect the electrical connector at the ri
... Read moreght side. You're done! Reverse procedure for installing. Good luck. Remember, your working with cold plastic...take your time and don't force too much.
We waited two years to do this because we didn't want to hassle with a repair man to come out and charge us arm+leg for something so simple. Finally we searched and found the part on line. It came two days FASTER than promised. Kudos to Part Select. Snapping it on was a breeze, although you do have to apply more pressure than feels
... Read morecomfortable with plastic clips. We can know get ice out of the external door system again.


 – Part Number: WP2186494B")


")