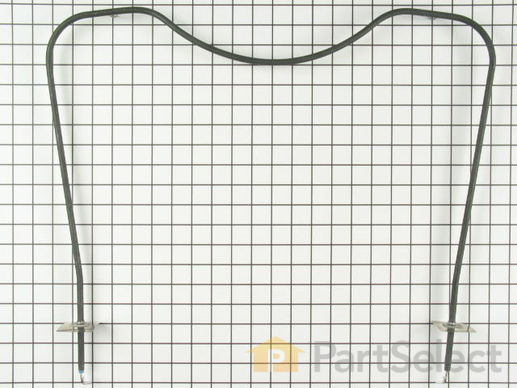
Part Location Diagram of 326793 Whirlpool Bake Element - 240V 2500W
See part 30 in the diagram
( Grid squares measure 1x1 inch )
Customer Service Representative

Get in touch, we're here to help!

Daily 8am - 9pm EST

customerservice@partselect.com

Bake Element - 240V 2500W 326793

★★★★★
★★★★★
11 Reviews

Rated by 16 customers 

Really Easy 

Less than 15 mins 

Ratings submitted by customers like you who bought this part.

$ 66.17
  In Stock

Get this part fast! Average delivery time for in-stock parts via standard shipping: 1.8 days.

PartSelect Number PS340507
Manufacturer Part Number 326793
Manufactured by Whirlpool
Product Description

Bake Element - 240V 2500W Specifications

This partially open tapered style bake element has push on wire terminals.
How Buying OEM Parts Can Save You Time and Money

How Buying OEM Parts Can Save You Time and Money

Troubleshooting
This part fixes the following symptoms:
Little to no heat when baking | Element will not heat
This part works with the following products:
Range.
This part works with the following products:
Whirlpool, Roper.
Part# 326793 replaces these:
AP3095830, 2751, 14210263, 255104, 257057, 257368, 257988, 258978, 310214, 326793, 326793BULK, CH2860, TS2860, TS2860/841, TS727, TS841, TS841/2860, YCH2860
Back to Top
Customer Reviews
Average Rating:
★★★★★
★★★★★
11 Reviews
4.8
Filter By Rating:
  • 5 Stars
    9
  • 4 Stars
    2
  • 3 Stars
    0
  • 2 Stars
    0
  • 1 Star
    0
Sort by:
  • 1
  • 2
Sorry, we couldn't find any existing reviews that matched. Try using some different or simpler keywords.
  • 1
  • 2
Customer Repair Stories
 Average Repair Rating: 4.6 / 5.0, 16 reviews. What's this?
Sort by:
  • 1
  • 2
Sorry, we couldn't find any existing installation instruction that matched.
Bake Element Stopped Working
Before performing any service on an oven, find the breaker switch and turn off power to the appliance. Test to be sure.

The bake element is held in place by a single screw at each end (two total). This being a very old oven, I removed these with an impact to avoid rounding out the heads, but a regular Phillips screwdriver would suffice so long as one is careful (do NOT use an impact to put the screws back in).

With the screws removed, gently pull the ends of the old bake element out of the oven wall. The ends where the wires connect are bent 90 degrees, perpendicular to the sides of the bake element, so take care not to hook the connectors on the edge of the wall opening as you pull them out. Don't pull the connectors off of the old element until you have secured the wires to prevent them slipping back inside the wall of the oven, or you may never fish them back out. I used a couple clothes pins.

Inspect your wires and connectors for damage and corrosion. If the insulation on the wires is at all brittle, discolored, missing, or if the spade connectors are discolored or loose, replace these with the parts included with the bake element. A dirty, poor connection will cause resistance, which causes heat, which will fry your new element same as the old one if your wiring is in bad shape. I had to trim about three inches off of each wire and splice in the new wire sections that came with the new element. For this you'll need wire strippers that can handle 10 gauge wire. Trim away any damaged wire, then strip the insulation from about a quarter inch, and splice in the new sections using the provided wire nuts. I followed with electrical tape to ensure these connections weren't stressed when tucked back into the inside of the oven wall.

Once the connectors are ready, simply place them over the connector blades on each end of the new element. Gently tuck the wires back into the oven wall, followed by the ends of the bake element. Push the ends back into the oven wall until the screw holes align, and replace both screws.

With everything reassembled and tools accounted for, turn the power back on and test the new element. It will give off a new appliance smell the first time as it burns off oils from manufacturing and/or storage. This should subside within 15-30 minutes.

The whole process takes 15-30 minutes, probably less if your wiring and connectors are in good condition. Take your time. The main things that can go wrong are mistakes such as losing the wires inside the oven wall, or failing to make sure the wiring and connections are clean and properly insulated. The bake element itself is largely plug-and-play.
  • Zachary from BATON ROUGE, LA
  • Difficulty Level:
    Really Easy
  • Total Repair Time:
    15 - 30 mins
  • Tools:
    Screw drivers
2 of 2 people found this instruction helpful.
Was this instruction helpful to you?
Thank you for voting!
Lower burner element inop
Turned off circuit breaker. Removed two mounting screws and pulled element toward front of oven to reveal one wire on each side clipped to element. Removed clips from old, then reconnected to new element. Pushed back in place and reinstalled two screws. Turned circuit breaker back on and ops checked. Very straight forward repair.
  • Jim from SMYRNA, TN
  • Difficulty Level:
    Really Easy
  • Total Repair Time:
    15 - 30 mins
  • Tools:
    Screw drivers
1 person found this instruction helpful.
Was this instruction helpful to you?
Thank you for voting!
Baking element broke
Very easy. Removed shelves after turning off breaker then removed screws holding element and removed screw holding wire. Removed old element and then placed new one. Attached wires with screw and then placement screws. Turned on break, replaced shelving racks and turned on. It worked and 5-10 minute fix.
  • Paula from LARAMIE, WY
  • Difficulty Level:
    Really Easy
  • Total Repair Time:
    Less than 15 mins
  • Tools:
    Pliers, Screw drivers
1 person found this instruction helpful.
Was this instruction helpful to you?
Thank you for voting!
burned out lower element
I unscrewed the element from the oven where the ends enter the back of the oven. I pulled out the element ends and unhooked the wire connectors being careful not to let them pull back into the oven wall. I connected the wire connectors to the new element, making sure that the front support was pointed down, and replaced the screws.
  • Mark from Houston, TX
  • Difficulty Level:
    Really Easy
  • Total Repair Time:
    Less than 15 mins
  • Tools:
    Screw drivers
1 of 2 people found this instruction helpful.
Was this instruction helpful to you?
Thank you for voting!
window frame --Broken, Would not heat.
Replaced bake and broil Elements. Replaced broken window frame, anr replaced all control knobs.The only tool I needed was a Philips Screwdriver.
Other Parts Used:
Broil Element Bake Element - 240V 2500W Exterior Door Window Frame Surface Burner Knob
  • Larry from Vernon, UT
  • Difficulty Level:
    Really Easy
  • Total Repair Time:
    15 - 30 mins
  • Tools:
    Screw drivers
6 of 12 people found this instruction helpful.
Was this instruction helpful to you?
Thank you for voting!
Oven temperature was not as selected
Removal of two phillips head screws, pull 2 wire connectors apart, reversed the procedure and now the temperature I select on the oven controls is within 20 degrees of what the oven actually heats up to!!!
  • Mark from Enterprise, AL
  • Difficulty Level:
    Really Easy
  • Total Repair Time:
    Less than 15 mins
  • Tools:
    Screw drivers
2 of 2 people found this instruction helpful.
Was this instruction helpful to you?
Thank you for voting!
Heating unit burnt out
First shut off breaker to oven before starting the repairs. Removed old unit by removing two phillips head screws at each side above element entrance. Gently pull element out to expose wire attachments. Remove wires from each side careful not to lose wires inside back of oven. Replace with new element,(which was ordered online, and received within three days)in reverse order in which it was removed. Turn breaker to oven back on. Oven like new and ready to bake.
  • Rick from Dodge City, KS
  • Difficulty Level:
    Really Easy
  • Total Repair Time:
    15 - 30 mins
  • Tools:
    Screw drivers
1 of 2 people found this instruction helpful.
Was this instruction helpful to you?
Thank you for voting!
Bake element quit working
First cut electrical circuit to oven for safety, then removed screws, two Phillips head, removed two wires from element, and put some clips on those wires so they wouldn't fall behind the oven wall. Then I got the new element, put on the two wires removed from the old element, attached element to rear wall of oven with the two screws removed previously, closed circuit breaker to oven, tested oven and it worked fine! Just like new. Standard shipment was plenty fast enough.
  • Steven from Cheboygan, MI
  • Difficulty Level:
    Really Easy
  • Total Repair Time:
    Less than 15 mins
  • Tools:
    Screw drivers
2 of 3 people found this instruction helpful.
Was this instruction helpful to you?
Thank you for voting!
The bake element was arcing/smoking and needed immediate replacement.
I removed (2) mounting screws from the back of the oven and pulled the element out far enough to access the terminal lugs. I unplugged the old element and plugged in the new element. I also replaced the old mounting screws w/new hardware and replaced one of the terminal lugs on a damaged wire. I went ahead and replaced the broiler element at the same time (also only 2 screws on the top of the oven) although there was no indication of a problem. The process was very easy although I caution non-electrically skilled people to insure the power is off at the breaker panel when performing this work and, if the electrical wires are damaged, seek qualified assistance to repair them.
Other Parts Used:
Broil Element Bake Element - 240V 2500W
  • John from Houston, TX
  • Difficulty Level:
    Really Easy
  • Total Repair Time:
    Less than 15 mins
  • Tools:
    Screw drivers
10 of 12 people found this instruction helpful.
Was this instruction helpful to you?
Thank you for voting!
the bottom element on our 32 yrs old oven went out.
We thought we'd try to fix it before we went out and brought a new (special order) stove/oven. The element came right out and the new one fit prefect. We were very happy that you had a part for this old thing and it was very easy to order from your web site. When the top element goes out, we'll be back!
  • Kathy from Arvada, CO
  • Difficulty Level:
    Really Easy
  • Total Repair Time:
    Less than 15 mins
  • Tools:
    Pliers, Screw drivers
3 of 4 people found this instruction helpful.
Was this instruction helpful to you?
Thank you for voting!
  • 1
  • 2
Questions and Answers

Ask our experts a question about this part and we'll get back to you as soon as possible!

4 questions answered by our experts.
Sort by:
  • 1
Sorry, we couldn't find any existing answers that matched.Try using some different or simpler keywords, or submit your new question by using the "Ask a Question" button above!
C
January 31, 2018
What's the distance between the ends that plug in to the oven?
PartSelect logo
Hello, Thank you for your question. The distance between the 2 ends on the bale element are approximately 18 1/2 inches. I hope this helps. Thank you and have a great day!

6 people found this helpful.

Was this helpful?
Thank you for voting!
Barbara
January 8, 2019
What is the depth of this unit, from the mounting plates to the front?
PartSelect logo
Hello Barbara, thank you for your question. This part is 16 inches from the mounting plates to the front of the element. I hope this helps!

5 people found this helpful.

Was this helpful?
Thank you for voting!
Jane
February 11, 2020
Does this element fit this model
For model number RDE2300P2
PartSelect logo
Hi Jane, Thank you for your question. This would not be the correct baking element for this model. The part number listed under your model number for the baking element is PS340505. To place an order for the part you may order it either online, by visiting our live chat sessions, Monday to Friday from 8AM to 4PM EST, or by calling our customer service line at 1-888-738-4871 and anyone will be happy to assist you. We hope this helps. Thank you and have a great day.

2 people found this helpful.

Was this helpful?
Thank you for voting!
Joe
May 8, 2019
What size is the male connector on the bake unit 326793? I need to replace the female end of the wire while replacing the bake unit.
For model number rye2600w
PartSelect logo
Hi Joe, Thank you for your question. The male connector on the bake element is approximately a 1/2 inch. I hope this helps. Thank you and have a great day!

1 person found this helpful.

Was this helpful?
Thank you for voting!
  • 1
Model Cross Reference
This part works with the following models:
PartSelect Number: PS340507
Manufacturer Part Number: 326793
Brand
Model Number
Description
Whirlpool
RDE2300A
Range - Whirlpool Range/Stove/Oven Model RDE2300A Parts
Roper
RDE2300E
Range - Roper Range/Stove/Oven Model RDE2300E Parts
Whirlpool
RDE2300P
Range - Whirlpool Range/Stove/Oven Model RDE2300P Parts
Whirlpool
RDE2300Y
Range - Whirlpool Range/Stove/Oven Model RDE2300Y Parts
Whirlpool
RDE61009-2
Range - Whirlpool Range/Stove/Oven Model RDE61009-2 (RDE610092, RDE61009 2) Parts
Whirlpool
RDE6100P2
Range - Whirlpool Range/Stove/Oven Model RDE6100P2 Parts
Whirlpool
RDE6300A2
Range - Whirlpool Range/Stove/Oven Model RDE6300A2 Parts
Whirlpool
RDE6300C2
Range - Whirlpool Range/Stove/Oven Model RDE6300C2 Parts
Whirlpool
RDE6300D2
Range - Whirlpool Range/Stove/Oven Model RDE6300D2 Parts
Whirlpool
RDE6300E2
Range - Whirlpool Range/Stove/Oven Model RDE6300E2 Parts
Whirlpool
RDE6300G2
Range - Whirlpool Range/Stove/Oven Model RDE6300G2 Parts
Whirlpool
RDE6300H2
Range - Whirlpool Range/Stove/Oven Model RDE6300H2 Parts
Whirlpool
RDE6300N2
Range - Whirlpool Range/Stove/Oven Model RDE6300N2 Parts
Whirlpool
RDE6300P2
Range - Whirlpool Range/Stove/Oven Model RDE6300P2 Parts
Whirlpool
RDE6300Y2
Range - Whirlpool Range/Stove/Oven Model RDE6300Y2 Parts
Whirlpool
RDE6550A
Range - Whirlpool Range/Stove/Oven Model RDE6550A Parts
Whirlpool
RDE6550A-1
Range - Whirlpool Range/Stove/Oven Model RDE6550A-1 (RDE6550A1, RDE6550A 1) Parts
Whirlpool
RDE6550E
Range - Whirlpool Range/Stove/Oven Model RDE6550E Parts
Whirlpool
RDE6550E-1
Range - Whirlpool Range/Stove/Oven Model RDE6550E-1 (RDE6550E1, RDE6550E 1) Parts
Whirlpool
RDE6550P
Range - Whirlpool Range/Stove/Oven Model RDE6550P Parts
Whirlpool
RDE6550P-1
Range - Whirlpool Range/Stove/Oven Model RDE6550P-1 (RDE6550P1, RDE6550P 1) Parts
Whirlpool
RDE6550Y
Range - Whirlpool Range/Stove/Oven Model RDE6550Y Parts
Whirlpool
RDE6550Y-1
Range - Whirlpool Range/Stove/Oven Model RDE6550Y-1 (RDE6550Y1, RDE6550Y 1) Parts
Whirlpool
RHM2820P
Range - Electric
Whirlpool
RRE-25
Range - Whirlpool Range/Stove/Oven Model RRE-25 (RRE25, RRE 25) Parts
Whirlpool
RRE2588A2
Range - Whirlpool Range/Stove/Oven Model RRE2588A2 Parts
Whirlpool
RRE2700-2
Range - Whirlpool Range/Stove/Oven Model RRE2700-2 (RRE27002, RRE2700 2) Parts
Whirlpool
RRE2700W2
Range - Whirlpool Range/Stove/Oven Model RRE2700W2 Parts
Whirlpool
RTE2588P
Range - Whirlpool Range/Stove/Oven Model RTE2588P Parts
Whirlpool
RTE25P
Range - Whirlpool Range/Stove/Oven Model RTE25P Parts
Customer Service Representative

Get in touch, we're here to help!

Daily 8am - 9pm EST

Contact Customer Service