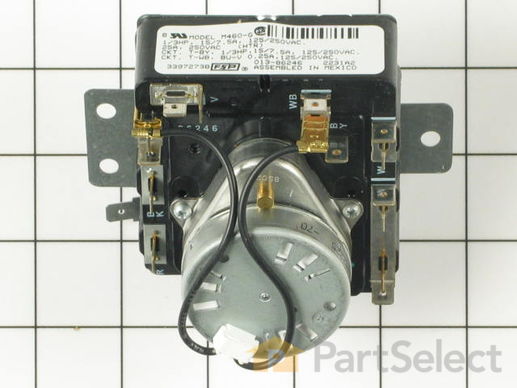
Part Location Diagram of WP3397273 Whirlpool Timer
See part 21 in the diagram
( Grid squares measure 1x1 inch )
Customer Service Representative

Get in touch, we're here to help!

Daily 8am - 9pm EST

customerservice@partselect.com

Timer WP3397273

★★★★★
★★★★★
3 Reviews

Rated by 11 customers 

Easy 

15 - 30 mins 

Ratings submitted by customers like you who bought this part.

$ 223.66
  In Stock

Get this part fast! Average delivery time for in-stock parts via standard shipping: 1.8 days.

PartSelect Number PS11741487
Manufacturer Part Number WP3397273
Manufactured by Whirlpool
Product Description

Timer Specifications

This dryer timer is used to control the unit's cycles by regulating the length of time that power is directed to each setting.
How Buying OEM Parts Can Save You Time and Money

How Buying OEM Parts Can Save You Time and Money

Troubleshooting
This part works with the following products:
Dryer.
This part works with the following products:
Whirlpool, Kenmore.
Part# WP3397273 replaces these:
3397273
Back to Top
Customer Reviews
Average Rating:
★★★★★
★★★★★
3 Reviews
5.0
Filter By Rating:
  • 5 Stars
    3
  • 4 Stars
    0
  • 3 Stars
    0
  • 2 Stars
    0
  • 1 Star
    0
Sort by:
  • 1
Sorry, we couldn't find any existing reviews that matched. Try using some different or simpler keywords.
  • 1
Customer Repair Stories
 Average Repair Rating: 4.0 / 5.0, 11 reviews. What's this?
Sort by:
  • 1
  • 2
Sorry, we couldn't find any existing installation instruction that matched.
bad timer
removed bad timer switched all wire connections to new timer and installed in dryer
  • Glenn from CARRINGTON, ND
  • Difficulty Level:
    Easy
  • Total Repair Time:
    30 - 60 mins
  • Tools:
    Pliers, Screw drivers
1 person found this instruction helpful.
Was this instruction helpful to you?
Thank you for voting!
Dryer would not always start and would not finish cycle all the time.
Removed back panel (behind timer0 6 screws. Removed timer with nut driver (two screws). I then removed wire from old timer and replaced on new timer one at a time and then replaced timer. The old timer had a brown jumper wire (both ends plugged into timer) that the new timer did not have. Must not have mattered as the new timer works fine.
  • David from North Ridgeville, OH
  • Difficulty Level:
    Easy
  • Total Repair Time:
    Less than 15 mins
  • Tools:
    Nutdriver
2 of 3 people found this instruction helpful.
Was this instruction helpful to you?
Thank you for voting!
Dryer would not turn on for any cycle
I removed the six screws for the back cover of the control panel of my Whirlpool electric dryer (model #LEP6848AW0). I located the timer assembly and loosened/removed the two screws holding it in place. Using pliers, I removed the wires on the old timer, reconnected them on the new timer, installed the new timer into the control panel, and reinstalled the back cover. Note: the old timer design used a jumper wire, but the new design eliminates the need for this wire by making the entire terminal one piece of metal.
  • Joseph from Alexandria, VA
  • Difficulty Level:
    Really Easy
  • Total Repair Time:
    Less than 15 mins
  • Tools:
    Nutdriver, Pliers, Screw drivers
4 of 5 people found this instruction helpful.
Was this instruction helpful to you?
Thank you for voting!
dryer only worked sometime on less dry
i remove four screws removed timmer left it plug io wires
ordered part from partselect put the part on work like new
you guys are really fast shipping parts.
partselect is in my address book THANKS
  • Isiah from albany, GA
  • Difficulty Level:
    Really Easy
  • Total Repair Time:
    15 - 30 mins
  • Tools:
    Nutdriver, Screw drivers
1 of 2 people found this instruction helpful.
Was this instruction helpful to you?
Thank you for voting!
Buzzer Would Go On At Start Position
I unplugged the dryer and removed the back cover. I removed the two screws that held the timer in place and pulled off the dial knob from the front of the panel. After that I started replacing each wire from the old part to the new, one by one. I screwed the new part back in place, screwed the back panel,plugged in the dryer and in 10 minutes was done. I had a company check out the problem and they asked me for $328. 00 To fix it. Am I glad I searched for the part online.
  • ELENI from TROY, MI
  • Difficulty Level:
    Easy
  • Total Repair Time:
    Less than 15 mins
  • Tools:
    Nutdriver, Screw drivers
2 of 2 people found this instruction helpful.
Was this instruction helpful to you?
Thank you for voting!
The original timer was simply worn out
I unplugged the dryer and removed the back access plate from the control panel (six small screws retain this panel).

I removed two screws that attached the timer mounting bracket to the face of the control panel, leaving the timer hanging loose and all wires still connected.

I carefully examined the old unit and compared it side-by-side with the new one, noting a minor design change. The old one used a small jumper wire between two connectors, while the new one bridged that connection by having those connectors share the same mount. Functionally the same, but it meant I'd have two fewer connections to make.

Then, with the two units side-by-side, I used a small flat-head screwdriver to gently pry the blade connectors free one at a time (they had little tabs on them that locked them in place, so the screwdriver was a better option than the needlenose pliers I'd intended to use). I carefully transferred each connector to the same position on the new timer. There were seven or eight of these in all.

Attached the new timer using the original two mounting screws, replaced the rear access panel using its original screws, plugged the dryer in. Success!
  • Jeff from South Charleston, WV
  • Difficulty Level:
    Easy
  • Total Repair Time:
    30 - 60 mins
  • Tools:
    Nutdriver, Screw drivers
16 of 17 people found this instruction helpful.
Was this instruction helpful to you?
Thank you for voting!
Dryer would not come on the for all of the cycles
I removed the two srcews that hold the timer assembly in place. Then I removed each wire, one by one, from the old timer and reconnecting them one by one to the same terminal location on the replacement timer. When all were reconnected then I refastened the new rewired timer to the control frame with the two screws. The only difficulty was with getting the wires off the old terminals. They do not all pull off without minipulating the notch in the wire connector ... just take a little time and pull off carefully with a pair of pliers.
  • Dave from Marvin, NC
  • Difficulty Level:
    Easy
  • Total Repair Time:
    15 - 30 mins
  • Tools:
    Pliers, Socket set
4 of 5 people found this instruction helpful.
Was this instruction helpful to you?
Thank you for voting!
Timer needed replacing
Removed six machine screws holding the metal backing plate behind the controls and two machine screws holding the timer in place. After that it was just a matter of moving the wired connectors from the old switch to the new one, replacing the timer and back panel and voila--like new!
  • Skip from Lincoln, NH
  • Difficulty Level:
    Easy
  • Total Repair Time:
    15 - 30 mins
  • Tools:
    Nutdriver
2 of 3 people found this instruction helpful.
Was this instruction helpful to you?
Thank you for voting!
dryer would not turn on.
First I unplugged the dryer. Then I removed the back plate and disconnected a half dozen wires. I installed the new timer making sure to attach the correct wires to the correct location on the timer. I
reattached the new timer in place with the screws and it works GREAT.
I will keep Parts Select in mind when my next repair is necessary for any of my appliances.
  • Frank from Pittsburgh, PA
  • Difficulty Level:
    Really Easy
  • Total Repair Time:
    15 - 30 mins
  • Tools:
    Screw drivers
1 person found this instruction helpful.
Was this instruction helpful to you?
Thank you for voting!
Dryer only started in certain dial positions.
I removed the dryer back cover and control section cover using a nut driver. I checked the heating element by observing the red glow during heating cycle when the timer dial was in a position that worked. This confirmed the timer was intermittent.
I matched the timer from my dryer to the pic on PartSelect and ordered the part. It arrived in a few days.
With the dryer unpluged, I used the nut driver to remove the timer assembly. I swaped the wires by taking one off the old part and placing it on the new part in the same postion. I installed the new timer. It works great and I saved $150 plus parts for not using the maytag repair man.
  • JOHN from AUSTIN, TX
  • Difficulty Level:
    Really Easy
  • Total Repair Time:
    15 - 30 mins
  • Tools:
    Nutdriver
6 of 7 people found this instruction helpful.
Was this instruction helpful to you?
Thank you for voting!
  • 1
  • 2
Questions and Answers

Be the first to ask our experts a question about this part!

Model Cross Reference
This part works with the following models:
PartSelect Number: PS11741487
Manufacturer Part Number: WP3397273
Brand
Model Number
Description
Kenmore
11096587200
Dryer
Kenmore
11096587210
Dryer
Kenmore
11096587400
Dryer
Kenmore
11096587410
Dryer
Kenmore
11097587200
Dryer
Kenmore
11097587210
Dryer
Kenmore
11097587400
Dryer
Kenmore
11097587410
Dryer
Whirlpool
8LGC7858AN0
Dryer - Residential, Gas
Whirlpool
8LGC7858AN2
Dryer - Residential
Whirlpool
LEC6848AN0
Dryer - Residential, Electric
Whirlpool
LEC6848AN1
Dryer - Residential, Electric
Whirlpool
LEC6848AN2
Dryer - Residential, Electric
Whirlpool
LEC6848AN3
Dryer - Residential, Electric
Whirlpool
LEC6848AQ0
Dryer - Residential
Whirlpool
LEC6848AQ1
Dryer - Residential, Electric
Whirlpool
LEC6848AQ2
Dryer - Residential, Electric
Whirlpool
LEC6848AQ3
Dryer - Residential, Electric
Whirlpool
LEC6848AW0
Dryer - Residential, Electric
Whirlpool
LEC6848AW1
Dryer - Residential
Whirlpool
LEC6848AW2
Dryer - Residential, Electric
Whirlpool
LEC6848AW3
Dryer - Residential, Electric
Whirlpool
LEC6848AZ0
Dryer
Whirlpool
LEC6848AZ1
Dryer - Residential, Electric
Whirlpool
LEC6848AZ2
Dryer - Residential, Electric
Whirlpool
LEC6848AZ3
Dryer - Residential, Electric
Whirlpool
LEC6858AQ3
Dryer - ELECTRIC DRYER
Whirlpool
LEC7848DQ0
Dryer - Residential, Electric
Whirlpool
LEC7848DQ1
Dryer - Residential, Electric
Whirlpool
LEC7848DZ0
Dryer - Residential, Electric
Customer Service Representative

Get in touch, we're here to help!

Daily 8am - 9pm EST

Contact Customer Service