Part Location Diagram of 35-2374N Whirlpool Water Inlet Valve
See part 17 in the diagram
( Grid squares measure 1x1 inch )
Customer Service Representative

Get in touch, we're here to help!

Daily 8am - 9pm EST

customerservice@partselect.com

Water Inlet Valve 35-2374N

★★★★★
★★★★★
1 Review

Rated by 11 customers 

Easy 

30 - 60 mins 

Ratings submitted by customers like you who bought this part.

$ 178.98
  In Stock
Get FREE EconoShip on orders over $100! T&C apply

Get this part fast! Average delivery time for in-stock parts via standard shipping: 1.8 days.

PartSelect Number PS2037989
Manufacturer Part Number 35-2374N
Manufactured by Whirlpool
Product Description

Water Inlet Valve Specifications

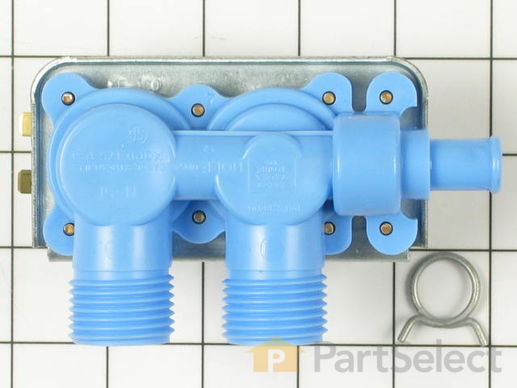
This valve has two ports for water to enter. It also comes with a metallic hose clamp.
How Buying OEM Parts Can Save You Time and Money

How Buying OEM Parts Can Save You Time and Money

Troubleshooting
This part fixes the following symptoms:
No hot or cold water | Leaking
This part works with the following products:
Washer.
This part works with the following products:
Norge, Magic Chef, Admiral, Crosley.
Part# 35-2374N replaces these:
AP4045669, 3441, 21001378, 21001396, 35-2374, 35-2374N
Back to Top
Customer Reviews
Average Rating:
★★★★★
★★★★★
1 Review
4.0
Filter By Rating:
  • 5 Stars
    0
  • 4 Stars
    1
  • 3 Stars
    0
  • 2 Stars
    0
  • 1 Star
    0
Sort by:
  • 1
Sorry, we couldn't find any existing reviews that matched. Try using some different or simpler keywords.
  • 1
Customer Repair Stories
 Average Repair Rating: 3.4 / 5.0, 11 reviews. What's this?
Sort by:
  • 1
  • 2
Sorry, we couldn't find any existing installation instruction that matched.
Little Cold Water Flow
Unplug power cord; turn off hot and cold water supply; remove water hoses from machine; open top of machine by prying lid open; remove two hex screws holding water inlet valve in place; remove hose from top of old water inlet valve; remove 4 wires; connect bottom set of wires (red and white) to new water inlet valve; reinstall water hose to top of new water inlet valve; install new water inlet valve onto machine using same hex screws; connect remiaining red and white wires; install hot and cold water hoses to machine; turn on water supply valves at wall; reconnect wall plug; turn water type selector to cold, pull out timer and watched the water flow full-force for the first time in 2 years! Have wife give you a hug for saving cost of new washing machine!
  • David from Lexington, KY
  • Difficulty Level:
    Easy
  • Total Repair Time:
    30 - 60 mins
  • Tools:
    Pliers, Socket set, Wrench (Adjustable)
1 of 2 people found this instruction helpful.
Was this instruction helpful to you?
Thank you for voting!
No hot water on wash or rinse cycles
I read some stuff on the internet where folks with the same problem replaced the water inlet valve to repair this same problem. So I did the same. However, after I installed the new water inlet valve, the problem was still there. It was at that point I decided not to guess at the what issue was and instead test the components in the washer. Yes, I am a lazy dumb ass. There are many of us out there. I decided to use a continuity tester to test all components in the hot water fill circuit and determined that the water temperature switch was bad. So I ordered a new switch from Parts Select (they rock - it showed up next day) replaced the water temperature control switch and...walla. fixed!!! Only took about 30 minutes to replace. Lesson learned: Don't be a dumb ass and guess. Test.
  • James from Buffalo Grove, IL
  • Difficulty Level:
    Really Easy
  • Total Repair Time:
    More than 2 hours
  • Tools:
    Nutdriver, Screw drivers
3 of 3 people found this instruction helpful.
Was this instruction helpful to you?
Thank you for voting!
tub overflowed
Back of this washer did not remove, so we had to go in through the top--more restricting space. As you remove the old electrical metal contacts (two each of white and red), pay close attention to where they connect properly. Best to mark them so as not to confuse how to place new contacts. Also, we disconnected a white plastic hose on opposite side of top which determines load size and amount of water, so be sure to look for this.
  • Ellen from Wilcox, AZ
  • Difficulty Level:
    A Bit Difficult
  • Total Repair Time:
    1- 2 hours
0 of 1 people found this instruction helpful.
Was this instruction helpful to you?
Thank you for voting!
part received one day after ordering, excellant
took back off washer with nutdriver, pulled wires off by hand, ( was unplugged ). pliars used to remove hose, regular clamp put back on. reinstalled back plugged in, tested water,,,, done
  • jrrry from Sebree, KY
  • Difficulty Level:
    Easy
  • Total Repair Time:
    15 - 30 mins
  • Tools:
    Nutdriver, Pliers
2 of 3 people found this instruction helpful.
Was this instruction helpful to you?
Thank you for voting!
no cold water
I pulled the top ofthe washer up, I disconnected the cold and hot water hoses, took the 2 bolts off with a socket and pulled the water valve from the top. I used the pliers to take the pressure ring off and pulled over flow hose off. I pulled the four wires off with pliers. Put the new water valve in reverse order...easy.
  • juan from moreno valley, CA
  • Difficulty Level:
    Really Easy
  • Total Repair Time:
    15 - 30 mins
  • Tools:
    Pliers, Socket set
1 of 4 people found this instruction helpful.
Was this instruction helpful to you?
Thank you for voting!
I have hard water and it ruined the valve so the water would not shut off
Popped the top of the washer up and on the right rear of the washer was the valve. Disconnected the hoses and removed the screws, drop the new valve in and replaced the hoses and it was done. Total time was less then 5 minutes. Any one can do it!
  • Cindy from McGregor, MN
  • Difficulty Level:
    Really Easy
  • Total Repair Time:
    Less than 15 mins
  • Tools:
    Pliers, Screw drivers
2 of 2 people found this instruction helpful.
Was this instruction helpful to you?
Thank you for voting!
Fill water would not reliably shut off.
Open the top of the washing machine by using a putty knife to release the latches at the right and left side. Prop up the top so it doesn't fall while working.
Remove the inlet hoses and put in bucket to catch water.
Remove the two screws that hold the inlet valve in place.
Remove the wires from the inlet valve. (One of the spade connectors one wire broke and I had to replace it.) I used needle nose pliers to pull the spade connectors off.
Remove the outlet hose.
Throw out old valve assembly.
Attach hose to new valve assembly. (My old valve assy outlet was slightly smaller in diameter than the new valve, but I was able to get the outlet hose to stretch enough to fit--couldn't use old spring clamp though, but new valve came with a hose clamp--worked fine.)
Attach wires same way as they cam off old valve.
Position and use the two screws to screw assy back into back of washing machine. (The screws had to tap the holes on the valve, so start out a little hard.)
Reattach the inlet hoses and check for leaks.
I also ran both the hot and cold in a cycle and the reraised the top to check for any leaks internal to the machine.
Pus the top back down to engage its fastening clips.
Job done.
My washing machine is 23 years old.
  • GARD from FAIRFAX STATION, VA
  • Difficulty Level:
    Easy
  • Total Repair Time:
    30 - 60 mins
  • Tools:
    Pliers, Socket set
8 of 9 people found this instruction helpful.
Was this instruction helpful to you?
Thank you for voting!
water filling up inside washer from a steady drip
First, I unplugged the washer.

then, I used a small prybar to pop open the front top of the waher. It's hinged at the back top edge. I drew a rough sketch of the four color coded connecting wires so I could disconnect the old water inlet valve and replace it the same way with the new one.
( just in case I lost track of which wire went where.)

I cut off the water supply for both the hot and cold water, (you can also cut off the water main,) then diconnected the supply hoses--noting where the hot water was connected, and where the cold water connected. Maytag had cut out a "C" and
a "H" our of the back wall of the washer,
to assist with hose installation.

I unscrewed the two hex nuts holding the old inlet valve to the back wall of the washer. ( from the outside back of the machine.) and pulled the old inlet valve up to the top of the machine. I didn't remove the basket that holds the laundry, so it was a kind of tight workspace.

Once you reconnect the wires to the new water inlet valve, attach the inlet valve to the washer wall, and reconnect the hoses, it's done. It's pretty simple.
  • Doug from Alexandria, VA
  • Difficulty Level:
    Really Easy
  • Total Repair Time:
    15 - 30 mins
  • Tools:
    Nutdriver, Pliers
2 of 2 people found this instruction helpful.
Was this instruction helpful to you?
Thank you for voting!
Water dripped into washer even when off
Hardest part was figuring out how to get to the water valve. Turned out that the way in was from the top. All I had to do is remove two screws at the back of the top panel, and then unclip the front edge of the top panel (use a thin screwdriver to press in on the clips from the front of the machine). From there, it was easy to reach down inside and remove/replace the valve.
  • Larry from Mansfield, MA
  • Difficulty Level:
    Easy
  • Total Repair Time:
    30 - 60 mins
  • Tools:
    Nutdriver, Pliers
1 person found this instruction helpful.
Was this instruction helpful to you?
Thank you for voting!
No hot water was making it into the laundry cycle.
First I unplugged the machine, then turned the water supply off in order to disconnect the hoses at the back of the machine. Next I pulled the top up and leaned it back so I could access the water valve at the rear of the machine (You might have to use a screw driver to pry the top off the pins which hold it down in front...). I then unscrewed the the valve and disconnected the wiring and, in order, re-connected to the new valve. Now reverse and turn on the water and yes, the new valve fixed the hot water problem. We can now do the "whites".
  • Neil from Ann Arbor, MI
  • Difficulty Level:
    Really Easy
  • Total Repair Time:
    15 - 30 mins
  • Tools:
    Nutdriver, Wrench (Adjustable)
6 of 8 people found this instruction helpful.
Was this instruction helpful to you?
Thank you for voting!
  • 1
  • 2
Questions and Answers

Ask our experts a question about this part and we'll get back to you as soon as possible!

1 question answered by our experts.
Sort by:
  • 1
Sorry, we couldn't find any existing answers that matched.Try using some different or simpler keywords, or submit your new question by using the "Ask a Question" button above!
Larry
January 6, 2020
Washer has both "water level" & "temperature" setting. Water runs into drum continuously & will overflow. Does not matter what cycle it is set for. Closing water supply is only method to stop water. Purchased dec. 15, 2007
For model number MTW5605TQ0
PartSelect logo
Good Day Larry. Thank you for your question in regards to your unit (Model Number MTW5605TQ0). Based on our research you may need to replace one or more of the following parts: 1) Water Inlet Valve - PartSelect Number PS11746767. 2) Water Level Pressure Switch - PartSelect Number PS3408149. You can order these parts either online at our website www.PartSelect.ca or by calling us by phone at 877-910-4613. Best Regards.

1 person found this helpful.

Was this helpful?
Thank you for voting!
  • 1
Model Cross Reference
This part works with the following models:
PartSelect Number: PS2037989
Manufacturer Part Number: 35-2374N
Brand
Model Number
Description
Kenmore
114344312
Washer - Kenmore Washing Machine Model 114.344312 (114344312, 114 344312) Parts
Norge
6002A
Washer - WASHER
Norge
6205A REV B
Washer - Norge Washing Machine Model 6205A REV B (6205AREVB) Parts
Norge
6205A REV D
Washer - Norge Washing Machine Model 6205A REV D (6205AREVD) Parts
Norge
6215A REV A
Washer - Norge Washing Machine Model 6215A REV A (6215AREVA) Parts
Norge
6215A REV B
Washer - Norge Washing Machine Model 6215A REV B (6215AREVB) Parts
Norge
6215A REV C
Washer - Norge Washing Machine Model 6215A REV C (6215AREVC) Parts
Norge
6215A REV D
Washer - Norge Washing Machine Model 6215A REV D (6215AREVD) Parts
Norge
6368A REV A
Washer - Norge Washing Machine Model 6368A REV A (6368AREVA) Parts
Norge
6375A REV A
Washer - Norge Washing Machine Model 6375A REV A (6375AREVA) Parts
Norge
6375A REV B
Washer - Norge Washing Machine Model 6375A REV B (6375AREVB) Parts
Norge
6416A REV A
Washer - Norge Washing Machine Model 6416A REV A (6416AREVA) Parts
Norge
6430
Washer - WASHER
Norge
6432A
Washer - WASHER
Norge
6432A REV A
Washer - Norge Washing Machine Model 6432A REV A (6432AREVA) Parts
Norge
6432A REV B
Washer - Norge Washing Machine Model 6432A REV B (6432AREVB) Parts
Norge
6432A REV C
Washer - Norge Washing Machine Model 6432A REV C (6432AREVC) Parts
Norge
6432A REV D
Washer - Norge Washing Machine Model 6432A REV D (6432AREVD) Parts
Norge
6433A
Washer - WASHER
Norge
6435A REV A
Washer - Norge Washing Machine Model 6435A REV A (6435AREVA) Parts
Norge
6435A REV B
Washer - Norge Washing Machine Model 6435A REV B (6435AREVB) Parts
Norge
6435A REV C
Washer - Norge Washing Machine Model 6435A REV C (6435AREVC) Parts
Norge
6435A REV D
Washer - Norge Washing Machine Model 6435A REV D (6435AREVD) Parts
Norge
6440A
Washer - WASHER
Norge
6440A REV A
Washer - Norge Washing Machine Model 6440A REV A (6440AREVA) Parts
Norge
6440A REV B
Washer - Norge Washing Machine Model 6440A REV B (6440AREVB) Parts
Norge
6440A REV C
Washer - Norge Washing Machine Model 6440A REV C (6440AREVC) Parts
Norge
6440A REV D
Washer - Norge Washing Machine Model 6440A REV D (6440AREVD) Parts
Norge
6440A REV E
Washer - Norge Washing Machine Model 6440A REV E (6440AREVE) Parts
Norge
6440A REV F
Washer - Norge Washing Machine Model 6440A REV F (6440AREVF) Parts
Customer Service Representative

Get in touch, we're here to help!

Daily 8am - 9pm EST

Contact Customer Service