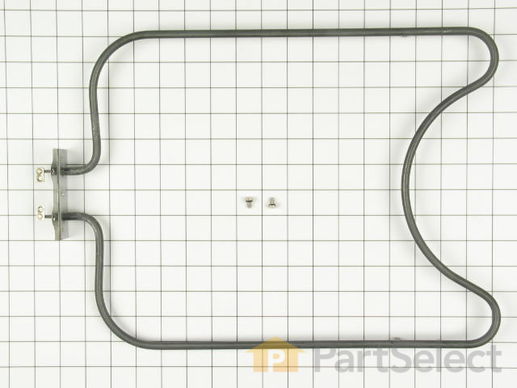
Part Location Diagram of WP715269 Whirlpool Bake Element with Screws
See part 19 in the diagram
( Grid squares measure 1x1 inch )
Customer Service Representative

Get in touch, we're here to help!

Daily 8am - 9pm EST

customerservice@partselect.com

Bake Element with Screws WP715269

★★★★★
★★★★★
7 Reviews

Rated by 13 customers 

Easy 

15 - 30 mins 

Ratings submitted by customers like you who bought this part.

$ 105.39
  In Stock
Get FREE EconoShip on orders over $100! T&C apply

Get this part fast! Average delivery time for in-stock parts via standard shipping: 1.8 days.

PartSelect Number PS11743929
Manufacturer Part Number WP715269
Manufactured by Whirlpool
Product Description

Bake Element with Screws Specifications

This bake element is eighteen inches long. Its terminal depth is less than an inch long, and it comes with two screws.
How Buying OEM Parts Can Save You Time and Money

How Buying OEM Parts Can Save You Time and Money

Troubleshooting
This part fixes the following symptoms:
Little to no heat when baking | Element will not heat
This part works with the following products:
Range, Wall Oven.
This part works with the following products:
Jenn-Air, Hoover.
Part# WP715269 replaces these:
AP6010745, 715269, Y700618
Back to Top
Customer Reviews
Average Rating:
★★★★★
★★★★★
7 Reviews
4.9
Filter By Rating:
  • 5 Stars
    6
  • 4 Stars
    1
  • 3 Stars
    0
  • 2 Stars
    0
  • 1 Star
    0
Sort by:
  • 1
Sorry, we couldn't find any existing reviews that matched. Try using some different or simpler keywords.
  • 1
Customer Repair Stories
 Average Repair Rating: 3.7 / 5.0, 13 reviews. What's this?
Sort by:
  • 1
  • 2
Sorry, we couldn't find any existing installation instruction that matched.
No heat in vintage JennAir oven
The oven on the 40 year old JennAir range stopped heating. It took more time to locate the model number D120 and conduct part/price search than the time it took to install the correct oven bake element from PartSelect! We read all the comments posted by others. We did not remove oven door. The old element had only 2 screws instead of the 3 reported by many. We followed the sequence--Power off at box; unscrew old element; pull out about 3 inches; disconnect wiring; used telescoping mirror to assist; connect wiring to new element; position new element; install 2 new screws; turn on power; turn on oven -- SUCCESS -- heating better than before. Thank you PartSelect.
  • Ricka from HOUSTON, TX
  • Difficulty Level:
    Really Easy
  • Total Repair Time:
    30 - 60 mins
  • Tools:
    Pliers, Screw drivers
1 person found this instruction helpful.
Was this instruction helpful to you?
Thank you for voting!
After the old element kicked the bucket with a final loud buzz, it was time for a new element
I turned the breaker to the appliance off in the breaker box. Took a mirror and a flashlight to figure out what type of tools I needed. Turned out all that was needed was a phillips screw driver and a pair of vicegrips as the front mounting screws were in pretty tight. Disconnected the element mounting plate, pulled the element forward just a few inches to where I could get to the wire connectors and unscrewed them. Connected the wires to the new element, pushed it back into place and refastened the front mounting plate. Turned the power back on to the oven at the breaker box and turned the oven on the check the element and it worked.
  • Beth from BROOKLAND, AR
  • Difficulty Level:
    Easy
  • Total Repair Time:
    Less than 15 mins
  • Tools:
    Screw drivers
1 person found this instruction helpful.
Was this instruction helpful to you?
Thank you for voting!
There was a third screw that I was not awhere off it was alittle difficult to get the lock but on the back.
Had to use a little mirror to get it on not a big problem.
  • Joe from ROLLING MDWS, IL
  • Difficulty Level:
    Easy
  • Total Repair Time:
    15 - 30 mins
  • Tools:
    Screw drivers
1 person found this instruction helpful.
Was this instruction helpful to you?
Thank you for voting!
bake element not heating up
removed element and tested wirh ohm meter. No reading telling it was bad. Tested voltage from supply wires. Voltage correct. Ordered new element which can in 2 days. Installed-tested- problem solved. 2 scres connect element.
  • john from chatham, MA
  • Difficulty Level:
    Easy
  • Total Repair Time:
    15 - 30 mins
  • Tools:
    Screw drivers
0 of 2 people found this instruction helpful.
Was this instruction helpful to you?
Thank you for voting!
super old Jenn-Air range needed an element
Pulled out the old one-couldn't find it ANYWHERE that was a comparable match except for partselect. shut off breaker to oven-put in the new one-hard to reach in due to limited space and hard to see due to sticking your head in an oven.used a mirror/flashlight to see behind element to unscrew and screw it back in.Other than space restriction and light-pretty easy. Works great! Thanks for HAVING the part!! :)
  • Edgar from Montgomery, IL
  • Difficulty Level:
    Easy
  • Total Repair Time:
    15 - 30 mins
  • Tools:
    Screw drivers
1 of 2 people found this instruction helpful.
Was this instruction helpful to you?
Thank you for voting!
Oven element burned out
The only trouble I couldn't remove the screws that held the wires to the element, so I cut the wires as close to the end as possible and attached new hardware. After that was done it was simple to reinstall the new element. Turned the power back on. Turned the oven on and it worked like new.
  • Eugene from Satellite Beach, FL
  • Difficulty Level:
    Easy
  • Total Repair Time:
    15 - 30 mins
  • Tools:
    Pliers, Screw drivers
0 of 2 people found this instruction helpful.
Was this instruction helpful to you?
Thank you for voting!
Heating coil/ element gave out.
I turned off the power first. Then I removed the element by taking out the three screws. The oven was quite old so getting the screws out took a little extra effort. Installation of the new element went easier. I was pleased with how soon the part arrived after I ordered it.
  • Tom from Rochester Hills, MI
  • Difficulty Level:
    Easy
  • Total Repair Time:
    30 - 60 mins
  • Tools:
    Pliers, Screw drivers
0 of 1 people found this instruction helpful.
Was this instruction helpful to you?
Thank you for voting!
electric bake element had a physicle break
First I removed the two screws that hold the element in place. Then I pulled the element out about 2 inches & disconnected the two wires, Then I removed the ground wire. I then wired in the new element ( this was the only tough part of the process, because I had a very tight space to work in- less than 2 inches.
  • Edward from Summit, NJ
  • Difficulty Level:
    A Bit Difficult
  • Total Repair Time:
    15 - 30 mins
  • Tools:
    Screw drivers
1 of 3 people found this instruction helpful.
Was this instruction helpful to you?
Thank you for voting!
lower element was burnt out
same as your example
  • JOSEPH from WARRENTON, VA
  • Difficulty Level:
    Really Easy
  • Total Repair Time:
    15 - 30 mins
  • Tools:
    Screw drivers
0 of 4 people found this instruction helpful.
Was this instruction helpful to you?
Thank you for voting!
bake element not working
Our oven is at least 30 years old and the parts are not even available through the manufacture anymore. A new stove would cost well over $1000.00. Jen airr is the only down draft stove available. So the repair was much more affordable that the alturnative. So thank you to part select for providing this service. The repair was simple. This is coming from a 36 year old female who has been around electrical work, but never done any myself. My husband was out of town and I felt I could do the job. I first made sure I had another adult present. I turned off the power to the oven. I then removed the visible screws to the element plate (2 on top and 1 in lower middle). I then pulled the element out enough to get behind the plate and feel the screws that were connecting the wires to the element/ground. Again 3 total. The oven space is very small and difficult to work in. I had to do a lot by feel. Once the old element was free I just exchanged it for the new one and reversed the process, making sure all the wires were tight. I then turned the power back on. Turned the oven on, it smoked lightly for a moment and turned red hot. Over all it was extreemly simple.
  • Shan'te from Saint Joseph, MI
  • Difficulty Level:
    Easy
  • Total Repair Time:
    15 - 30 mins
  • Tools:
    Screw drivers
23 of 26 people found this instruction helpful.
Was this instruction helpful to you?
Thank you for voting!
  • 1
  • 2
Questions and Answers

Be the first to ask our experts a question about this part!

Model Cross Reference
This part works with the following models:
PartSelect Number: PS11743929
Manufacturer Part Number: WP715269
Brand
Model Number
Description
Hoover
4760
Range
Hoover
4770
Range
Hoover
4775
Range
Hoover
4790
Range
Hoover
4855
Range
Hoover
4860
Range
Hoover
4870
Range
Hoover
4875
Range
Hoover
4890
Range
Jenn-Air
800181
Wall Oven - Electric
Jenn-Air
800181-C
Wall Oven - Electric
Jenn-Air
800263
Wall Oven - Electric
Jenn-Air
800263-C
Wall Oven - Electric
Jenn-Air
800264
Wall Oven - Electric
Jenn-Air
800264-C
Wall Oven - Electric
Jenn-Air
88168
Range - Freestanding, Electric
Jenn-Air
88169
Range - Freestanding, Electric
Jenn-Air
88170
Range - Freestanding, Electric
Jenn-Air
88368
Range - Freestanding, Electric
Jenn-Air
88369
Range - Freestanding, Electric
Jenn-Air
88370
Range - Freestanding, Electric
Jenn-Air
D-100
Range - Jenn Air Range/Stove/Oven Model D-100 (D100, D 100) Parts
Jenn-Air
D120
Range - Freestanding, Electric
Jenn-Air
F101
Range - Jenn Air Range/Stove/Oven Model F101 Parts
Jenn-Air
W100
Wall Oven - Electric
Jenn-Air
W100-C
Wall Oven - Electric
Jenn-Air
W120
Wall Oven - Electric
Jenn-Air
W120-C
Wall Oven - Electric
Customer Service Representative

Get in touch, we're here to help!

Daily 8am - 9pm EST

Contact Customer Service