This part is commonly known to cause a leak at the top left corner of the outer tub. It fits over the injector nozzle. It is black in color and measures approximately 2 inches in length. To access this part, you will need to remove the front panel of your washer. There will be 2 screws holding it in place. Once these have been removed, the top will pivot to open, which will give you access to the injector assembly. This is an OEM part that comes right from the manufacturer and is sold individually.
How Buying OEM Parts Can Save You Time and Money
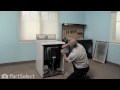
Part Videos
Replacing your Maytag Washer Rubber Injector Valve
Troubleshooting
This part fixes the following symptoms:
Leaking
This part works with the following products:
Washer, Washer Dryer Combo.
This part works with the following products:
Maytag, Jenn-Air.
Part# WP216201 replaces these:
AP6005883, 2-13016, 2-16201, 213016, 216201
Customer Reviews
Average Rating:
★★★★★
★★★★★
36 Reviews
4.7
Filter By Rating:
5 Stars
29
4 Stars
6
3 Stars
0
2 Stars
0
1 Star
1
Sort by:
< Prev
1
2
3
Next >
Search filter:
Clear Filter
Your search term must have 3 or more characters.
Keep searches simple. Use keywords, e.g. "leaking", "pump", "broken" or "fit".
Sorry, we couldn't find any existing reviews that matched. Try using some different or simpler keywords.
★★★★★
★★★★★
Thomas R - 19 days ago
Verified Purchase
Part fit exactly and arrived quickly
Great service. Part was exact fit and repair 100%.
★★★★★
★★★★★
F Michael F - May 7, 2023
Verified Purchase
Maytag rubber injector valve
The you-tube with Steve worked well, easy to follow, and no problems.
★★★★★
★★★★★
Susan E - April 30, 2023
Verified Purchase
Easy & fast & it worked!
Easy, fast & it worked! Thank you!!!
★★★★★
★★★★★
Harold B - April 14, 2021
Verified Purchase
perfect OEM replacement
Prat fit perfectly and was exactly as described. Even listed my symptoms in the part description!
★★★★★
★★★★★
Patricia J - March 3, 2021
Verified Purchase
Easy repair.
The part was in good condition and repair was easy. The video was very
helpful. Shipping was very slow but we did have major weather conditions so
I can forgive the delay.
★★★★★
★★★★★
Sherry W - January 19, 2021
Verified Purchase
easy repair
ordered 2 parts for washer came super fast even with the slow shipping due to pandemic dont know how they managed it but it came in 2 days. Parts worked perfectly and the wifey is happy. would buy from anytime the washer breaks down.
★★★★★
★★★★★
Thomas C - January 12, 2021
Verified Purchase
Perfect fit
Exact match for my Maytag washer. Installed easy and keeps my Maytag in good working order for many more years to come!
★★★★★
★★★★★
William H - July 22, 2020
Verified Purchase
Solved the leak
This did the trick. Water was leaking on initial fill, not a lot just enough to make a small puddle under front left corner of washer. replaced this and all is well. Cheap fix on a 27 year old machine
★★★★★
★★★★★
Jerry R - January 28, 2020
Verified Purchase
Easy repair
The part was what was necessary and except for some difficulty to get screws out all went well and 35 year old washer is working perfectly!
Video was wonderfully helpful. Could not have made repair without it!
Thank you!
★★★★★
★★★★★
William F - January 22, 2020
Verified Purchase
Injector valve
Worked great. Very easy to install.
< Prev
1
2
3
Next >
Customer Repair Stories
Average Repair Rating: 3.6 / 5.0, 66 reviews.
What's this?
Sort by:
< Prev
1
2
3
Next >
Search filter:
Clear Filter
Your search term must have 3 or more characters.
Keep searches simple. Use keywords, e.g. "leaking", "pump", "broken" or "fit".
Sorry, we couldn't find any existing installation instruction that matched.
Water leaking
I'm a 70 year old woman. I followed all instructions provided by "Steve" from Partselect video. The video was very well presented and allowed me to fix the leaking problem myself. Watch the video...you can do it.
1. Remove the front panel of the washer by removing two screws at bottom of panel … 2. pull bottom of panel out, and remove. … 3. Remove two screws that secure the washer's top to the box (one on each side of the top; located in front. … 4. lift front edge of top and tilt it up and backward. … 5. you now have EASY access to the fill hos
... Read moree at the top of the tub. This is where the Rubber injector valve and Injector Sleeve are located (right on top). Replace these parts and re-assemble the washer by reversing process. I suggest that while you are in this deep, replace the factory compression-type hose clamps with stainless steel hose clamps. You can see this demonstrated on a YouTube video.
Used a Phillips head screwdriver to allow removal of the front panel. Used a socket set to allow tipping back of the top panel of the washer, to access the injector assembly. Used nut driver to loosen hose clamp. Replaced old injector nozzle and valve. Inserted plastic injector nozzle into rubber injector valve, ensuring that the nozzle w
... Read moreas completely inserted into the valve. VERY IMPORTANT: Moistened the rim of the rubber injector valve, and gently inserted it into the hose, to ensure that the valve did not unroll from the nozzle during insertion into the hose. I found this caused a more serious leak on my first attempt at replacing the injector assembly. Inserted the hose and injector back into injector sleeve and retightened the hose clamp. Then repositioned the top panel, and replaced the front panel.
Waher was leaking at the injecotr valve at the top left of the washer.
The three parts fit together to form one unit. As has been mentioned here already I'm not sure what purpose they serve. I'm also not sure how replacing them stopped the leak but it did. If it had not stopped I think I could have bypassed the valve entirely with a piece of hose or PVC and had it work just fine.
Washer was leaking immediately as it started filling.
I removed the front panel and discovered the general area of the leak. Raised the top and found the injector valve had a hole in it. Removed the injector valve by removing the collar closest to the front of the washer. Searched the internet and found the PartSelect website. To my delight, not only was I able to order the part on a 27
... Read moreyear old washing machine, but there was also a 10 minute video on how to replace the part!! Although my wife was not terribly interested, I kept telling her how cool it was that there was a video showing how to replace this part. I think she was hoping this leak meant a new washing machine. Anyway, part replaced following the directions in the video and the old washer is fully functional again. Thanks for the awesome website!!
Read less
Jonathan from Jacksonville, AR
Difficulty Level:
Really Easy
Total Repair Time:
15 - 30 mins
Tools:
Screw drivers, Socket set
0 of 1 peoplefound this instruction helpful.
Was this instruction helpful to you?
Thank you for voting!
< Prev
1
2
3
Next >
Questions and Answers
Ask our experts a question about this part and we'll get back to you as soon as possible!
5 questions answered by our experts.
Sort by:
< Prev
1
Next >
Search filter:
Clear Filter
Your search term must have 3 or more characters.
Keep searches simple. Use keywords, e.g. "leaking", "pump", "broken" or "fit".
Sorry, we couldn't find any existing answers that matched.Try using some different or simpler keywords, or submit your new question by using the "Ask a Question" button above!
Joel
December 10, 2017
Hi, i would like to order these two parts: Wp213015 and Wp216201. The plastic injector and the valve. Would this be the correct parts to go with this model
For model number A882
Hi Joel,
Thank you for your question. Yes, both of those parts are listed underneath your model information as compatible parts. Good luck with your repair.
19 people found this helpful.
Was this helpful?
Thank you for voting!
Tom
December 7, 2019
What is the function of this injector? Partselect number ps11738945 will my washer be damaged if replace it with a piece of tubing?
Hi Tom, this part is commonly known to cause a leak at the top left corner of the outer tub. It fits over the injector nozzle. I would not recommend diy solutions. Thank you for your question and good luck with your repair!
3 people found this helpful.
Was this helpful?
Thank you for voting!
Reg
June 27, 2021
I would like to replace both the injector valve and the rubber hose the injector valve fits inside of, on my Maytag A412 washer. Can you give me the correct part numbers that I need? Also the switch when you open and close the lid needs to be replaced.
For model number A412
Hello Reg, Thank you for contacting us. We have researched the model you have provided and have found the part you are looking for is PartSelect Number PS1583805 for the Valve, PS11738877 for the Hose and PS11723153 for the Lid Switch. We hope this helps!
I need parts numbers for rubber injector valve and plastic gut piece.Thank you.
For model number LAT9400AAL
Hi Joe,
Thank you for your question. The part number listed under your model number for the rubber injector valve is PS11738945 and the part number for plastic injector nozzle is PS11738878. If you would like to place an order for the parts, you may order them either online or by calling our customer service line and anyone will be happy to assist you. We hope this helps! If you have any questions, please let us know.
1 person found this helpful.
Was this helpful?
Thank you for voting!
Kathy
November 1, 2021
Please give me the parts numbers for both the rubber valve and the injector? Thank you. It’s an A506 model.
For model number A506
Hello Kathy, Thank you for contacting us. We have researched the model you have provided and have found the part you are looking for is PartSelect Number: PS11738945 for the Rubber Injector Valve. The PartSelect Number PS11739774 is the Injector Sleeve Bracket - Side Mounting. Part #: PS11738878 for the Plastic Injector Nozzle and Part #: PS11738785 for the full Assembly with Hose. We hope this helps!