


Models
>
RLS359-OF
RLS359-OF (RLS3590OF) Caloric Range - Overview
Sections of the RLS359-OF
[Viewing 3 of 3]


Keep searches simple, eg. "belt" or "pump".

Light Bulb - 40W
PartSelect #: PS884734
Manufacturer #: 8009
This an authentic OEM 40-Watt replacement light bulb, used in a number of household appliances. It is specially designed to withstand extreme temperatures, which is why these replacement bulbs are mos...
$11.73
In Stock

Square Chrome Drip Pan
PartSelect #: PS11757427
Manufacturer #: WPY0060872
The drip pan is found under the burner. This square chrome stovetop drip pan is intended for use with gas ranges. It has a 4-inch diameter center hole and 7 3/4 inch sides. Drip pans should be cleaned...
$27.48
In Stock

Suface Burner Ignition Switch
PartSelect #: PS11742283
Manufacturer #: WP4157180
When the gas burner valve knob is depressed and turned, this part creates a spark that lights the gas and starts the burner.
$65.30
In Stock

Surface Burners Spark Module Kit
PartSelect #: PS2011188
Manufacturer #: 1430322
This part sends enough current to the igniter to create a spark to the bottom of the burner cap.
No Longer Available

KNOB
PartSelect #: PS11770337
Manufacturer #: W11032824
This top burner knob is a little over two inches in diameter. It has a chrome strip of trim around the perimeter of the knob, as well as white lettering denoting the off, light, and high positions.
$21.02
Special Order

Gas Burner Grate
PartSelect #: PS11740765
Manufacturer #: WP314647B
This gas burner grate is used for some gas ranges and cooktops. This is a black burner grate with each side measuring almost eight inches. This part may become rusted or burnt over time if not properl...
No Longer Available

Top Burner Spark Igniter
PartSelect #: PS1757313
Manufacturer #: Y07491203
Also known as a spark electrode.
No Longer Available


Questions And Answers for RLS359-OF
We're sorry, but our Q&A experts are temporarily unavailable.
Please check back later if you still haven't found the answer you need.
Common Symptoms of the RLS359-OF
[Viewing 1 of 1]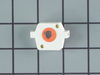


Keep searches simple. Use keywords, e.g. "leaking", "pump", "broken" or "fit".
gas burners and gas oven would not light
unplug the oven and pull it away from the wall. looking at the oven from the back, the spark module is at the bottom on the lower left. there is a two piece sheetmetal cover over the area of the spark module. use a phillips head screwdriver to remove five screws and the covers come off. the spark module is the blue cube with four push
... Read more
on wire connectors. all you have to do is hold the new one next to the old one and swap one wire at a time. both were clearly marked with identical numbers and letters. really nothing to it. it took me longer to clean the back of the oven than to replace the module. the old module was eaton part number Y-54052-3. the new one is eaton part number Y-054052-34.
Read less
Parts Used:

-
nicholas from livermore, CA
-
Difficulty Level:Really Easy
-
Total Repair Time:30 - 60 mins
-
Tools:Screw drivers
14 of 21 people
found this instruction helpful.
Was this instruction helpful to you?
Thank you for voting!
Ignitor did not spark when turning the know
Had to remove the 4 range knobs, and the oven knob and then the facie. Two screws under the end caps and two on each side from the back on each end. Design defect: one of these screws which attaches through the frame to the facie also attaches the support which holds up the range top. Take that one off last. Remove the two wires that atta
... Read more
ch to the oven light switch. After detaching the power supply to the defective ignition unit, it just pulls right off. Push the new switch on over the knob shaft and reassemble.
Read less
Parts Used:

-
Richard from Lansing, MI
-
Difficulty Level:Easy
-
Total Repair Time:15 - 30 mins
-
Tools:Screw drivers
9 of 11 people
found this instruction helpful.
Was this instruction helpful to you?
Thank you for voting!
The range burners would not catch a spark and ignite. They would just keep clicking with no ignition.
I had an appliance repair rep do the replacement. He made it look relatively easy.
The repair man first turned off the breaker to the range and confirmed there was no power to the range.
After lifting off the range top cover exposing the burner igniters, he unhooked and removed the igniters. He opened the lower oven door exp ... Read more osing the screws which hold the front knob plate in position. He took those out. After loosening the knob plate he was able to unscrew and raise the inside cover which exposes the wires and the spark module.
My spark module was located in the front left corner area tucked a little under the knob plate. That is another reason why he had to loosen the plate. The replacement part was a universal part so he had to do a little work on the wire connectors but it only took a couple of minutes. Once he configured the wire ends, he was able to plug in the new spark module and put the top back together again.
The repair man knew exactly what to do and made it look relatively easy. I did not want to tackle this problem because I did not know exactly where the spark module was since some models have them in the back of the oven and the oven has to come out from the wall. Also, the wire connections had to be worked with a little and he knew exactly how to do that.
The repair man took about 45 minutes from beginning to end with most of that time spent getting to the part and putting it back together. The replacement itself took only about 10 minutes.
Read less
Parts Used:
-
Adrienne from Lake Havasu City, AZ
-
Difficulty Level:Easy
-
Total Repair Time:30 - 60 mins
-
Tools:Pliers, Screw drivers
6 of 9 people
found this instruction helpful.
Was this instruction helpful to you?
Thank you for voting!