The bake element is located on the bottom of the oven. If your oven will not heat properly it may be due to a faulty or damaged baking element. If you can see that the element has been separated or bl...
$122.85
In Stock
Order within the next 1 hr and 18 mins and your part ships today!
This burner bowl is also known as a burner drip bowl or burner drip pan, and is designed for use with your cooktop or range. It is black in color and is approximately 6 inches in diameter. It can be f...
$16.56
In Stock
Order within the next 1 hr and 18 mins and your part ships today!
The oven rack is sold individually. It is chrome in color and measures approximately 24 inches wide by 17-1/2 inches deep. The rack is used to hold cookware in the oven and slides back and forth for e...
$67.42
In Stock
Order within the next 1 hr and 18 mins and your part ships today!
This 40-Watt light bulb is sold individually and is a genuine OEM replacement option for your home appliances. It is specially designed to withstand extreme temperatures, so this bulb is compatible wi...
$11.02
In Stock
Order within the next 1 hr and 18 mins and your part ships today!
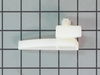
This is a replacement drawer support for your oven. The drawer support provides stability to the drawer unit as it opens and closes. If your oven drawer is hanging or will not slide in or out efficien...
$11.07
In Stock
Order within the next 1 hr and 18 mins and your part ships today!
This part is the replacement light socket for your oven. The oven light socket provides power to the light, and at the same time holds the light bulb in place.
$8.54
In Stock
Order within the next 1 hr and 18 mins and your part ships today!
First I slid the stove out and unpluged it, then removed two screws,slid out element, disconected two wires, slid new element in to place, pluged two wires in ,put into place and installed two screws, pluged stove back in, and turned on to try. Works perfect.
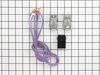
After unplugging the range I took the rear sheet metal panel at the top off with a nut driver to expose the wiring connections. The next step was to remove the single screw holding the old part in place. (under the drip pan) Once free I snipped the old part from the wires and then taped the new female ends to the old wires with black elec
... Read moretrical tape. From rear I carfully pulled the old wires through the back until I could reach the new wiring connections. Unplugged old, plugged in new and replaced the rear metal cover. Then I put the screw that holds the new block bracket in place, replaced drip pan, and burner. The final step was to plug the range back in and check to see if the burner worked. It did and I was done. Approx. 5 minutes
1)Turn off power to stove 2)remove 2 bolts holding heating element 3)pull element out of the back of the oven about 8" so that the wire connects is visable 4)pull wire clips off of heating element and remove element from the oven 5)put wire clips on the new heating element 6)push new heating element back into the
... Read moreholes in the back of the oven 7)screw botls back into the oven holding the heating element in place 8)Turn power back on