


Models
>
RB526WW1
RB526WW1 Hotpoint Range - Overview
Sections of the RB526WW1
[Viewing 3 of 3]


Keep searches simple, eg. "belt" or "pump".

Surface Burner Terminal Block Kit
PartSelect #: PS242972
Manufacturer #: WB2X8228
Also known as receptacle.
$31.61
In Stock

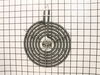
Surface Element - 8 Inch - 2350W
PartSelect #: PS243868
Manufacturer #: WB30M2
The surface element, also known as the coil surface element, transfers heat to the area on top of range. The element is 8 inches in diameter. If your surface element does not heat, over heats, or heat...
$61.79
In Stock

Drip Bowl - 6 Inch
PartSelect #: PS244800
Manufacturer #: WB32X5075
This 6 inch chrome drip bowl is intended for use with solid terminal plug-in style surface burner units on electric ranges.
$9.15
In Stock

Surface Element - 6 Inch - 240V
PartSelect #: PS243867
Manufacturer #: WB30M1
If you notice that your surface element will not heat properly, you may need to replace it. This surface element is 6 inches in diameter and 240V. It is a Y-frame surface burner element with five turn...
$57.41
In Stock

Drip Bowl - 8 Inch
PartSelect #: PS244801
Manufacturer #: WB32X5076
This 8 inch chrome drip bowl is intended for use with solid terminal plug-in style surface burner units on electric ranges.
$12.66
In Stock

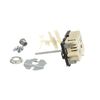
INFINITE HEAT SWITCH KIT
PartSelect #: PS16216966
Manufacturer #: WB21X36771
The infinite switch controls the stove top surface burner. This switch will work with most of the electrical range models with coil burner elements.
$51.36
In Stock


Broiler Pan - Large
PartSelect #: PS1517612
Manufacturer #: WB48X10056
This large broiler pan is found in the bottom of your oven and is used to catch drippings from broiling foods. This part includes the grate and bottom pan and is made of porcelain. The grate measures ...
$30.07
In Stock

Bottom Trim - White
PartSelect #: PS2321159
Manufacturer #: WB07K10250
Screws not included.
$25.43
In Stock

Screws - Package of 12
PartSelect #: PS234746
Manufacturer #: WB1X500D
These are replacement screws designed to fit your range. They are made of metal and are approximately ¼ inch long. They come in a package of 12. These are OEM parts sourced directly from the manufacturer.
$9.12
Special Order

Broil Element Support
PartSelect #: PS241927
Manufacturer #: WB2X1452
This part supports the broil element in the oven.
$28.69
In Stock

Questions And Answers for RB526WW1
We're sorry, but our Q&A experts are temporarily unavailable.
Please check back later if you still haven't found the answer you need.
Common Symptoms of the RB526WW1
[Viewing 3 of 3]Element will not heat
Fixed by
these parts
these parts

Show All
Will Not Start
Fixed by
these parts
these parts
Show All
Little to no heat when broiling
Fixed by
these parts
these parts
Show All


Keep searches simple. Use keywords, e.g. "leaking", "pump", "broken" or "fit".
The Bake-o-lite (Hard Plastic) block that holds the burners female connection in place had chipped away over time and wouldn't allow the male part of the burner to connect up correctly.
After unplugging the range I took the rear sheet metal panel at the top off with a nut driver to expose the wiring connections. The next step was to remove the single screw holding the old part in place. (under the drip pan) Once free I snipped the old part from the wires and then taped the new female ends to the old wires with black elec
... Read more
trical tape. From rear I carfully pulled the old wires through the back until I could reach the new wiring connections. Unplugged old, plugged in new and replaced the rear metal cover. Then I put the screw that holds the new block bracket in place, replaced drip pan, and burner. The final step was to plug the range back in and check to see if the burner worked. It did and I was done. Approx. 5 minutes
Read less
Parts Used:
-
Robert from Mt. Vernon, IN
-
Difficulty Level:Really Easy
-
Total Repair Time:Less than 15 mins
-
Tools:Nutdriver
112 of 114 people
found this instruction helpful.
Was this instruction helpful to you?
Thank you for voting!
Front burner would not heat up
1. Pull out range and unplug from socket.
2. Lift range lid.
3. Remove back panel. Loosen the 6 - 1/4" nuts, then lift up slightly, which compresses the "latch" at the top middle. Let down and panel comes off easily.
(Note: Do not remove wires yet)
4. Remove control knob from front panel by pulling gently, exposing ... Read more 2 small tap screws
5. unscrew the 2 small tap screws, freeing the switch.
6. NOTE THE EXISTING WIRING! Each terminal has a letter. Take a photo or drawing for reference, because the new switch's post locations were not the same as the old.
7. In my case I had to replace the terminal block kit with a new one. (don't try the aftermarket one's at Home Depot...bad idea event though they say Hotpoint) so I ran those wires first. Easy removal of old, only one wire clip, then fish the wires through. Secure with tap screw at burner location.
8. Hook up the wires. The ones coming from the burner don't seem to matter which one goes to which post but make sure you're replacing them on the posts that the original were on. What I did was just unhook the old posts one at a time and find the corresponding letter on the new one.
9. Break off stem at length of old switch with pliers. make sure you find where off and on are on the switch. Orient the off at the top, then push through from back of range.
10. Screw the 2 tap screws in, securing the switch.
11. Place the orange retainer oriented with flat side the same as the knob, and push the knob back in place.
12. Close lid, replace back panel
13. Insert drip pan/burner into terminal block and secure in drip pan. If your burner plugs are corroded or exposed, replace the burner as it will short out.
14. Plug in to socket and test before pushing range back into place.
Read less
Parts Used:
-
Scott from Olathe, KS
-
Difficulty Level:Really Easy
-
Total Repair Time:15 - 30 mins
-
Tools:Nutdriver, Screw drivers
78 of 111 people
found this instruction helpful.
Was this instruction helpful to you?
Thank you for voting!
Replacement of Coils
Removed by slightly wiggling out of the coupling. No tools needed, seriously, (and I'm a contractor). Basically, pull out and snap back in.
Parts Used:
-
Joseph from South Plainfield, NJ
-
Difficulty Level:Really Easy
-
Total Repair Time:Less than 15 mins
35 of 42 people
found this instruction helpful.
Was this instruction helpful to you?
Thank you for voting!