


Models
>
RA511*J4
RA511*J4 Hotpoint Range - Overview
Sections of the RA511*J4
[Viewing 1 of 1]
Keep searches simple, eg. "belt" or "pump".

Drip Bowl - 6 Inch
PartSelect #: PS244677
Manufacturer #: WB32X10012
This six inch chrome drip bowl is intended for use with tilt lock style surface mount burner element units.
$11.33
In Stock

Trim Ring - 6 Inch
PartSelect #: PS244475
Manufacturer #: WB31X5013
This 6 inch high rise burner trim ring is intended for use with detached style low rise tilt lock surface mount burners on ranges.
$8.44
In Stock

Trim Ring - 8 Inch
PartSelect #: PS244479
Manufacturer #: WB31X5014
This 8 inch high rise burner trim ring is intended for use with detached style low rise tilt lock surface mount burners on ranges.
$11.96
In Stock

Drip Bowl - 8 Inch
PartSelect #: PS244680
Manufacturer #: WB32X10013
This eight inch chrome drip bowl is intended for use with with tilt lock style surface mount burner element units.
$17.90
In Stock

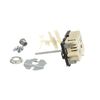
INFINITE HEAT SWITCH KIT
PartSelect #: PS16216966
Manufacturer #: WB21X36771
The infinite switch controls the stove top surface burner. This switch will work with most of the electrical range models with coil burner elements.
$51.36
In Stock

8 Inch Surface Burner
PartSelect #: PS244046
Manufacturer #: WB30X348
This surface element kit includes an 8 inch element, two wire, 2350 watt surface element, and a terminal block with all three-wire units. These high rise elements do not come with an attached trim ring.
$90.22
In Stock

Tilt Lock Hinge Mounted Surface Element - 6"
PartSelect #: PS244055
Manufacturer #: WB30X359
This tilt lock hinge mounted surface element kit includes a 6 inch, two wire, 1350 watt surface element, and a terminal block with all three-wire units. These high rise elements do not come with an attached trim ring.
$72.39
In Stock

Broil Element Kit
PartSelect #: PS249386
Manufacturer #: WB44X134
This element has screw on terminals.
$39.69
In Stock

Screws - Package of 12
PartSelect #: PS234746
Manufacturer #: WB1X500D
These are replacement screws designed to fit your range. They are made of metal and are approximately ¼ inch long. They come in a package of 12. These are OEM parts sourced directly from the manufacturer.
$9.12
Special Order

Broil Element Support
PartSelect #: PS241927
Manufacturer #: WB2X1452
This part supports the broil element in the oven.
$28.69
In Stock


Questions And Answers for RA511*J4
We're sorry, but our Q&A experts are temporarily unavailable.
Please check back later if you still haven't found the answer you need.
Common Symptoms of the RA511*J4
[Viewing 2 of 2]Element will not heat
Fixed by
these parts
these parts


Show All
Little to no heat when broiling
Fixed by
these parts
these parts

Show All


Keep searches simple. Use keywords, e.g. "leaking", "pump", "broken" or "fit".
Two 6" and two 8" burner elements needed replacing on a 36 year old counter range.
First of all I want to thank PartSelect. I have been looking for these parts for over 15 years. I am so happy to have found PartSelect. 1. Turn off Range 2. Turn off Breaker to the Range at your home Breaker Box. 3. Turn on Range to see if you turned off the right Breaker if so then turn Range off. 4. Lift Burner Element up. 5. Take off S
... Read more
ilver Trim Ring and Drip Bowl. 6. With screw driver unscrew the screw that is holding the Burner Element to the Range. It is located at the base of the hing where the Burner Element attaches to the Range. 7. Pull the Burner Element out just far enough to see the entire Element where the wires attach. 8. Snap off the two silver clips from each side of the White Glass Insulation Block with a screw driver. 9. With an adjustable wrench (crescent) loosen and remove the screws holding one of the wires to the Burner Element. 10. Find the same Terminal on the new Burner Element and reattach the wire to the new Burner Element Terminal. 11. Now do the same to the remaining Terminal. 12. Install the White Glass Insulation Block over the two Terminals and secure with the two silver clips. 13. Reattach Burner Element to Range with screw. 14. Replace Silver Trim Ring and Drip Bowl. 15. Turn on Breaker and test by turning on Range. You will smell a slight electrical burn smell for a moment while the new Elements heat for the first time. This will dissipate quickly. NOTE: I used the old White Glass Insulation Block I did not use the one that came with the new Burner Element. I found the old one to be the better choice. I saved the new one in case needed at a later date. The Job to replace both the 6" & 8" Burner Elements took less than 30 Minutes. I think it took longer to write this replacement instruction. LOL Very easy...Thanks again PartSelect. Charles McAllen, Texas
Read less
Parts Used:
-
Charles from McAllen, TX
-
Difficulty Level:Really Easy
-
Total Repair Time:15 - 30 mins
-
Tools:Screw drivers, Wrench (Adjustable)
60 of 66 people
found this instruction helpful.
Was this instruction helpful to you?
Thank you for voting!
Needed to replace Drip Pans and Trim Rings for old stove
Repair was simple (just lift off the old and put on the new). What was pleasantly surprising was how quickly I received the parts (amazing)!
Lastly, I've been looking for the correct parts/sizes in stores for years (yes, I should have tried this sooner). I was delighted to finally find a place that actually had the correct ... Read more parts.
Lastly, I've been looking for the correct parts/sizes in stores for years (yes, I should have tried this sooner). I was delighted to finally find a place that actually had the correct ... Read more parts.
Read less
Parts Used:
-
Cynthia from Tampa, FL
-
Difficulty Level:Really Easy
-
Total Repair Time:Less than 15 mins
39 of 46 people
found this instruction helpful.
Was this instruction helpful to you?
Thank you for voting!
Large burner would operate on high setting only.
1. Removed the back panel.
2. Disconnected the wires from the old switch while connecting wires to the new switch one at a time.
3. Installed the new switch and broke off the excess metal on the post which fits into the burner knob on front of the range.
4. Replaced the burner knob and replaced the back panel.
2. Disconnected the wires from the old switch while connecting wires to the new switch one at a time.
3. Installed the new switch and broke off the excess metal on the post which fits into the burner knob on front of the range.
4. Replaced the burner knob and replaced the back panel.
Parts Used:
-
Ernest from Bellevue, NE
-
Difficulty Level:Really Easy
-
Total Repair Time:15 - 30 mins
-
Tools:Pliers, Socket set
20 of 24 people
found this instruction helpful.
Was this instruction helpful to you?
Thank you for voting!