Models > MEW6627BAS

MEW6627BAS Maytag Wall Oven - Overview

Sections of the MEW6627BAS

[Viewing 6 of 6]
Keep searches simple, eg. "belt" or "pump".
Screw, 8/18 x 3/8 – Part Number: WP90767
Screw, 8/18 x 3/8
★★★★★
★★★★★
(2)
PartSelect #: PS11746840
Manufacturer #: WP90767
This screw is sold individually.
$5.42
  In Stock
Order within the next 7 hrs and your part ships today!
Electronic Clock Assembly – Part Number: WP71001872
Electronic Clock Assembly
PartSelect #: PS11743864
Manufacturer #: WP71001872
This part controls the functions of your oven such as bake, broil, timed bake and the clock.
$619.05
  In Stock
Order within the next 7 hrs and your part ships today!
Screw – Part Number: WPY706189
Screw
★★★★★
★★★★★
(1)
PartSelect #: PS11757587
Manufacturer #: WPY706189
$8.04
  In Stock
Order within the next 7 hrs and your part ships today!
Frame Screw – Part Number: WP7101P126-60
Frame Screw
★★★★★
★★★★★
(1)
PartSelect #: PS11743908
Manufacturer #: WP7101P126-60
Sold Individually.
$7.76
  In Stock
Order within the next 7 hrs and your part ships today!
Screw – Part Number: WP98008545
Screw
★★★★★
★★★★★
(1)
PartSelect #: PS11747488
Manufacturer #: WP98008545
Sold Individually.
$8.12
  In Stock
Order within the next 7 hrs and your part ships today!
Door Lock Switch – Part Number: 71001129
Door Lock Switch
PartSelect #: PS2077099
Manufacturer #: 71001129
This door lock switch is a black and metallic switch that carries 120 volts. It is designed to lock the oven door during self-clean, and will not open until sufficient cooling time has elapsed.
  No Longer Available
Screw – Part Number: WP355214
Screw
PartSelect #: PS11741849
Manufacturer #: WP355214
$6.77
  In Stock
Order within the next 7 hrs and your part ships today!
Door Gasket – Part Number: WP71001970
Door Gasket
★★★★★
★★★★★
(3)
PartSelect #: PS11743865
Manufacturer #: WP71001970
This gasket prevents heat from escaping the oven cavity when in use. It contains all of the attaching clips needed for installation.
$111.44
  In Stock
Order within the next 7 hrs and your part ships today!
Screw – Part Number: WP488234
Screw
PartSelect #: PS11742713
Manufacturer #: WP488234
This screw is sold individually. Size: 8-32 x 1/4 inch.
$9.13
  Special Order
Plate Nut – Part Number: WP3400029
Plate Nut
PartSelect #: PS11741518
Manufacturer #: WP3400029
This size 10 plate nut with 32 threads per inch is located in your household appliances. It securely fastens various parts together, such as panels, brackets, and accessories, to the frame. It feature...
$7.59
  In Stock
Order within the next 7 hrs and your part ships today!
Bracket – Part Number: WP74008015
Bracket
★★★★★
★★★★★
(1)
PartSelect #: PS11744216
Manufacturer #: WP74008015
$57.56
  In Stock
Order within the next 7 hrs and your part ships today!
Door Light Switch – Part Number: 71002904
Door Light Switch
PartSelect #: PS2078101
Manufacturer #: 71002904
  No Longer Available

Questions And Answers for MEW6627BAS

Be the first to ask our experts a question about this model!

Common Symptoms of the MEW6627BAS

[Viewing 2 of 2]
Will not program
Fixed by
these parts
Fixing
Show All
Will Not Start
Fixed by
these parts
Fixing
Show All
Keep searches simple. Use keywords, e.g. "leaking", "pump", "broken" or "fit".
Dim display
This is a Jenn-Air double oven. Turned off circuit breaker to the oven. Removed 7 screws that hold the top panel in place. Removed 3 cable/connectors from the clock module so panel can be removed from oven and placed on a table. Unscrew 4 hex head screws attaching clock module to front panel. Press on two tabs and remove circuit board from plastic frame. Replace with new board reversing dis-assembly sequence.

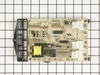
After examining the old board I discovered that the 470 microfarad aluminum electrolytic capacitor (in the corner) was badly deformed. I replaced this. Now I have a spare board. I believe that the failure (common in Jenn-Air ovens) starts with a transient on the power line (it did with mine). This damages the capacitor which progressively gets worse. This capacitor probably acts as a low pass filter on the power supply for the display. If any of you are into electronics, I would suggest wiring a zener diode across the capacitor to suppress transients. I wish the Jenn-Air engineers had put this in the design. It would have avoided a lot of costly repairs and saved them the bad reputation that they have as a result of this board failing over and over again.
Parts Used:
Electronic Clock Assembly
  • Gregory from Ann Arbor, MI
  • Difficulty Level:
    Really Easy
  • Total Repair Time:
    Less than 15 mins
  • Tools:
    Screw drivers, Socket set
29 of 31 people found this instruction helpful.
Was this instruction helpful to you?
Thank you for voting!
Clock assembly went so dim we could not read it.
On the front panel I removed 3 screws on top and 4 screws under the bottom. Pulled the panel down to expose the computer board, removed 4 hex head screws and disconnected 2 plugs and 1 ribbon connecter. I reversed the process and used the awl to locate the screw holes and finshed in 23 minutes and saved $ 89.00.
Parts Used:
Electronic Clock Assembly
  • Don from Moon Township, PA
  • Difficulty Level:
    Really Easy
  • Total Repair Time:
    15 - 30 mins
  • Tools:
    Screw drivers, Socket set
20 of 20 people found this instruction helpful.
Was this instruction helpful to you?
Thank you for voting!
Oven display was out
This repair is sooo easy! First I down loaded the service manual (free pdf) from Maytag as they make this appliance. They give all of the voltages for the J1 and J2 plugs. I checked those to be sure I was getting power to the board. I did not want to lay out close to $200 and then discover that the problem was elsewhere. All voltages on the J1 and J2 plugs were good. Next I ordered the clock and when it came in it may have taken me 5 minutes to replace the old board with the new one. Including time to go out to the garage and turn the power off and on. Also beware that the ribbon cable attaches to the clock with a compression type connector. The connector does not separate with the ribbon. Simply press on the two tabs on either side and then pull the ribbon from the connector. Reverse to reassemble.
Parts Used:
Electronic Clock Assembly
  • Dennis from Grapevine, TX
  • Difficulty Level:
    Really Easy
  • Total Repair Time:
    Less than 15 mins
  • Tools:
    Nutdriver, Screw drivers
17 of 18 people found this instruction helpful.
Was this instruction helpful to you?
Thank you for voting!