


Models
>
LRDN22734ST
LRDN22734ST LG Refrigerator - Overview
Sections of the LRDN22734ST
[Viewing 5 of 5]


Manuals & Care Guides for LRDN22734ST
Click to downloadKeep searches simple, eg. "belt" or "pump".

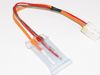
Refrigerator Door Switch
PartSelect #: PS3529268
Manufacturer #: 6600JB1010A
The interior light in your refrigerator is controlled by a switch that is activated when the door is opened and closed. If your refrigerator light will not turn on, or stays on when the door is closed...
$31.60
In Stock


Lower Holder Cover
PartSelect #: PS3524311
Manufacturer #: 4930JJ2021A
This lower holder cover is also known as a toe grille clip, or a kickplate clip. It is designed for use with refrigerators. The main purpose of this part is to hold the molding at the base of your ref...
$16.59
In Stock


Door Shelf Bin - White/Clear
PartSelect #: PS3525696
Manufacturer #: 5005JJ2020A
This bin is white in color with a clear front insert.
$102.98
In Stock


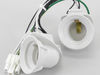
SOCKET,LAMP
PartSelect #: PS3643279
Manufacturer #: EAG62831801
This part is a replacement light socket for your refrigerator. This model is white in color, and it has two sockets that will fit two separate light bulbs. The light socket connects to the power sourc...
$91.02
In Stock


Guide Rail Assembly - Right Side
PartSelect #: PS3524811
Manufacturer #: 4975JJ2002A
$30.73
On Order

Tilt Basket End Cap - Right Side
PartSelect #: PS3525559
Manufacturer #: 5004JA2017A
Sold individually.
$16.93
In Stock

Questions And Answers for LRDN22734ST
We're sorry, but our Q&A experts are temporarily unavailable.
Please check back later if you still haven't found the answer you need.
Common Symptoms of the LRDN22734ST
[Viewing 3 of 3]Light not working
Fixed by
these parts
these parts

Show All
Door won’t open or close
Fixed by
these parts
these parts
Show All
Fridge too warm
Fixed by
these parts
these parts

Show All
Keep searches simple. Use keywords, e.g. "leaking", "pump", "broken" or "fit".
Ice was building up in the bottom floor of the freezer
This refrigerator/freezer problem had been escalating for almost a year, requiring me to frequently knock the ice buildup free with a rubber mallet. I finally decided to try to identify the problem by removing the freezer door and all of the shelves and shelf tracks (easily removed with only a phillips screwdriver). Then I removed the bac
... Read more
k plastic panel to expose the cooling coils, which were partially encased in ice. I deduced that the evaporator fan motor was failing, which blows air over the freezer cooling coils and forces the cool air up into the upper refrigerator section (which was not staying cold). I then found and ordered the fan motor from part select. Their search function and exploded drawing schematics made it easy to identify the part and part number. It seems the original part number had been superceded with a new number, which I ordered. Once it arrived after about a week, I transferred the fan blades from the old motor to the new fan motor, and after completely drying out the freezer compartment, I reinstalled all of the parts and plugged in the unit and waited. By the next day, the refrigerator was operating at peak efficiency, and the ice buildup in the freezer has not returned. I was very close to scrapping the entire refrigerator as junk, but with a little diagnostic effort and about $110 for the new motor, I have a fully functioning refrigerator again. Thanks to Part Select for a great experience.
Read less
Parts Used:

-
Ronald S. from SANTA CLARITA, CA
-
Difficulty Level:A Bit Difficult
-
Total Repair Time:30 - 60 mins
-
Tools:Screw drivers, Socket set
27 of 29 people
found this instruction helpful.
Was this instruction helpful to you?
Thank you for voting!
Remove and replace light switch
Video makes it look easy. Kenmore refrigerator does not have "groove" along the right hand side of switch that allows for pushing down on release. Used a thin screwdriver to get under to push while holding switch edge with pliers. Kept slipping. Tape sides to avoid scratching inside of refrigerator.
Parts Used:
-
Debbie from Waltham, MA
-
Difficulty Level:A Bit Difficult
-
Total Repair Time:30 - 60 mins
-
Tools:Pliers, Screw drivers
36 of 58 people
found this instruction helpful.
Was this instruction helpful to you?
Thank you for voting!
old bushing worn and broken
removed the upper freezer door to access screws to remove lower door.
laid bottom door on its side, removed bad bushing, put new bushing in, put bottom door back on refridge, put upper door back on fridge. Door worked easy as when new. good closure of door and story..Happy customer, and wife even happier.....thank you....
laid bottom door on its side, removed bad bushing, put new bushing in, put bottom door back on refridge, put upper door back on fridge. Door worked easy as when new. good closure of door and story..Happy customer, and wife even happier.....thank you....
Parts Used:
-
Jerry from CORSICANA, TX
-
Difficulty Level:Really Easy
-
Total Repair Time:30 - 60 mins
-
Tools:Screw drivers, Socket set
13 of 20 people
found this instruction helpful.
Was this instruction helpful to you?
Thank you for voting!