


Models
>
GS395LEGZ1
GS395LEGZ1 Whirlpool Range - Overview
Sections of the GS395LEGZ1
[Viewing 6 of 6]


Manuals & Care Guides for GS395LEGZ1
Click to downloadKeep searches simple, eg. "belt" or "pump".

Light Bulb - 40W
PartSelect #: PS884734
Manufacturer #: 8009
This an authentic OEM 40-Watt replacement light bulb, used in a number of household appliances. It is specially designed to withstand extreme temperatures, which is why these replacement bulbs are mos...
$11.73
In Stock

Rear Drawer Glide
PartSelect #: PS890554
Manufacturer #: WP8053334
This OEM replacement rear drawer glide supports the storage drawer on your range, and allows the drawer to open and close with ease. If your storage drawer will not open or close, or catches and stick...
$11.10
In Stock

Oven Rack
PartSelect #: PS11751295
Manufacturer #: WPW10256908
This oven rack is a piece for your range. The oven rack is sold individually and is silver in color. The function of this part is to provide a balanced and flat surface for your cookware to sit inside...
$63.36
On Order

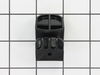
Screw
PartSelect #: PS12349731
Manufacturer #: W11233072
This is a multi-use and multi-appliance screw. It can be used on a microwave, refrigerator, range/oven, air conditioner, dehumidifier, washer, or dryer. The measurements of this screw are 8 x 1/2 inch...
$20.79
In Stock

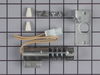
Spark Igniter
PartSelect #: PS11770331
Manufacturer #: W11032529
This is the replacement spark igniter or surface burner igniter for your range. This igniter has a blue tube, but the tube can come in a variety of colors, and still do the same job. The spark igniter...
$41.03
In Stock

Screw
PartSelect #: PS11738704
Manufacturer #: WP179051
Sold individually. Lock washers are used with screws when vibration from an appliance may cause the screw to loosen. Lock washers are also used in the electrical components of an appliance to ensure ...
$7.95
In Stock

Front Drawer Glide
PartSelect #: PS11740957
Manufacturer #: WP3195546
Sold individually.
$11.06
In Stock

Grate Kit
PartSelect #: PS11754863
Manufacturer #: WPW10447925
This kit includes 4 black burner grates.
$264.57
In Stock

Touch-Up Paint - White
PartSelect #: PS385132
Manufacturer #: 72017
This touch-up paint can be used on a wide variety of household appliances. It is most often used on washers, dryer, refrigerators, dishwashers, ranges, freezers, trash compactors, or microwaves. It is...
$8.00
In Stock

Oven Door Trim Kit
PartSelect #: PS732532
Manufacturer #: 8184859
This white oven door trim set contains three pieces: two for the sides of the door and one for the bottom. The screws are sold separately.
$91.72
In Stock


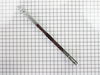
Round Carborundum Oven Igniter
PartSelect #: PS360921
Manufacturer #: 4342528
This round style gas oven igniter, or also known as a broil or bake igniter, has an amperage range between 2.5 and 3.0. It glows white hot to ignite the gas for the oven. The igniter does this by attr...
$51.37
In Stock
Questions And Answers for GS395LEGZ1
We're sorry, but our Q&A experts are temporarily unavailable.
Please check back later if you still haven't found the answer you need.
Common Symptoms of the GS395LEGZ1
[Viewing 7 of 7]Will Not Start
Fixed by
these parts
these parts


Show All
Door won’t close
Fixed by
these parts
these parts

Show All
Gas igniter glows, but will not light
Fixed by
these parts
these parts
Show All
Little to no heat when baking
Fixed by
these parts
these parts
Show All
Element will not heat
Fixed by
these parts
these parts
Show All
Oven not heating evenly
Fixed by
these parts
these parts
Show All
Oven is too hot
Fixed by
these parts
these parts
Show All


Keep searches simple. Use keywords, e.g. "leaking", "pump", "broken" or "fit".
mice had made nests in the insulation wrap in the range
I numbered every part. ex: 1 L., for first part removed left side. I used a magic marker to circle the holes and wrote the number of screws used on the part, set the srews in a separete place, so that I new where these screws went to. The cleanup was pretty time consuming, but I was able to keep my stove, when every repairman I called to
... Read more
fix my stove told me I was better off buying a new stove. ($600.00 stove 2 years old)Please Note: The insulation blanket needed for the entire stove is two pieces, the sides and top are one part # and the bottom and back, are another part #. I did not know this. I just purchased the top and sides. I got lucky, the back and bottom were still in good shape. So I guess I should have read the description of the part more carefully to see what it covers, before I ordered it. It took two people two hours to do the work, it was really nice to have an extra set of eyes, to remember what direction pieces of metal from the stove went. I would do it all over in a heart beat instead of buying a new stove.
Read less
Parts Used:

-
Wendy from Red Hook, NY
-
Difficulty Level:Easy
-
Total Repair Time:More than 2 hours
-
Tools:Screw drivers
97 of 131 people
found this instruction helpful.
Was this instruction helpful to you?
Thank you for voting!
The lower burner would not ignite.
First I removed the oven racks. Then I loosened the two screws in the back of the oven floor and figured out how to remove it. Then I loosened the two screws at the front of the diverter and, with some pushing and pulling and twisting, was able to get that to come out, too. Then I tried lighting the oven and noticed that the igniter wa
... Read more
s not glowing. When I saw that the upper (broiler) burner was working fine, I hoped that the problem was the lower igniter itself. I checked the wires and they seemed fine. I saw that two bolts held the igniter onto its bracket, so with a socket wrench (which size I got right on the first guess!) I removed those bolts and the igniter came loose. I found the connecter for the wires when I removed the drawer under the oven and was able to pull it apart easily. The igniter came out completely. There was nothing unusual about it, but I decided to take a chance and order a new one, hoping that replacing it would solve the problem. I put the rest of the oven together and waited. About three days later the part arrived (it was sent on a holiday; FedEx is soooo much better than USPS). I retraced the steps of taking the oven apart, put the two bolts into the new igniter to attach it to the bracket, and went back underneath behind the drawer to connect the wires. Then came the moment of truth: I tried turing on the oven. I held the button down to keep the light off, and after a few seconds I saw it: IT GLOWED!! It worked!! After yelling a satisfying "YEAH!!," I turned it off, put back the drawer, the diverter (more pulling and pushing and twisting), and the oven floor. Now it's all working perfectly and it took a very short time to fix. And a little luck that the problem was with such a simple part.
Read less
Parts Used:
-
Mark from Rego Park, NY
-
Difficulty Level:Easy
-
Total Repair Time:Less than 15 mins
-
Tools:Screw drivers, Socket set
80 of 86 people
found this instruction helpful.
Was this instruction helpful to you?
Thank you for voting!
Front burner would not light. The igniter was cracked and the spark would not jump to the burner head.
I pulled the range from the wall and disconnected the power cord. I removed the grates, burner caps and the burners from the cooktop. Using a plastic putty knife, on either side of the range in the front I pushed the retaining clips to allow the cooktop to be raised. I used a short board to keep the cooktop open. I cut the wire leading to
... Read more
the broken igniter and removed the old igniter. I put the new ignitor in the mounting hole. The igniter wire connects to the spark module which is in the back of the range. To access the module I removed three top screws on the backplate(you have to get behind the range) and removed the top access panel. I used the old wire to pull the new wire through to the module. I disconnected the old wire from the module and connected the new one.
Reassembly was easy. I replaced the backplate and screws, lowered the cooktop, replaced the burners, caps and grates. I plugged the power cord back in and slid the range back.
Reassembly was easy. I replaced the backplate and screws, lowered the cooktop, replaced the burners, caps and grates. I plugged the power cord back in and slid the range back.
Read less
Parts Used:
-
Marilyn from Antioch, IL
-
Difficulty Level:Easy
-
Total Repair Time:30 - 60 mins
-
Tools:Screw drivers
48 of 48 people
found this instruction helpful.
Was this instruction helpful to you?
Thank you for voting!