This is a multi-use and multi-appliance screw. It can be used on a microwave, refrigerator, range/oven, air conditioner, dehumidifier, washer, or dryer. The measurements of this screw are 8 x 1/2 inch...
This hose clamp is used in a wide variety of household appliances. Most often it is found in washers, dishwashers, refrigerators, freezers, dehumidifiers, garbage disposals, or air conditioners. This ...
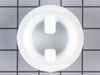
This refrigerator ice maker fill cup dispenses the water into the ice cube mold during the fill cycle. Replacing the water fill cup is a possible solution if you notice that the ice maker is leaking, ...
This is a cut-to-fit door shelf retainer bar for a refrigerator. The door shelf retainer bar holds food-related items, usually jars and condiments, on your refrigerator or freezer door shelf. This par...
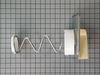
This ice level arm, also known as an ice shutoff arm, is designed to detect the level of ice within the ice bin of your ice maker or refrigerator and turn it off when enough ice has been made. When th...
The ice maker thermostat, also known as the cycling thermostat, controls and regulates the ice maker ejection cycle by monitoring the temperature inside the freezer to determine when to release the ic...
This is the replacement ice maker auger and crusher blade assembly for your refrigerator. It is approximately 15 inches long and 7 inches wide. The ice maker auger sits within the ice maker assembly a...
$318.88
In Stock
Questions And Answers for GS20A8D3V
Be the first to ask our experts a question about this model!
✖
Ask a Question
Ask our experts a question on this model and we'll respond as soon as we can.
I removed the ice maker from the refrigerator, by removing one screw on the underside bracket and loosening the two screws at the top side, then lifting the ice maker off the loosened screws. I then unplugged the electrical harness that supplies power from the refrigerator to the ice maker. I then disassembled the ice maker by removing
... Read morethe front cover which is snapped in place, then removing two recessed screws at the front. I removed the broken part, I then reassembled the ice maker with the new part. I replaced the two recessed screws at the front and snapped on the cover. Then I reinstalled the ice maker in the refrigator by plugging in the harness, slipping the ice maker over the loosened screws in the refrigerator and replacing the screw that was removed from the underside bracket. Tightening all the screws completed the project.
I used a flat-head screwdriver to pop out the old light rocker switch. Then, I unplugged the wires, plugged them into the new light rocker switch, and then popped the new switch into the hole. That's it! Lights began working again.
The easiest thing to do was pull the ice make off. After taking the 3 screws out of the wall of the freezer, take a screwdriver (flathead) and push on the tab for the electrical plug and wiggle the cord out. Then you can take 3 screws out for the main cover and another 2 screws on the next cover. There's the part, pop it out and replace h
... Read moreolding pins and start the process of putting back together the opposite way you took it apart.