


Models
>
GHW9160PW0
GHW9160PW0 Whirlpool Washer - Overview
Sections of the GHW9160PW0
[Viewing 7 of 7]


 Diagram and Parts List for Whirlpool Washer")
 Diagram and Parts List for Whirlpool Washer")


Manuals & Care Guides for GHW9160PW0
Click to downloadKeep searches simple, eg. "belt" or "pump".

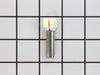
Door Handle
PartSelect #: PS11744938
Manufacturer #: WP8181846
This door handle for your washer is sold without screws, they can be ordered separately, or you can reuse the existing screws if they are in good shape. To replace this part, simply unscrew the handle...
$43.33
In Stock


Washer Baffle
PartSelect #: PS11744968
Manufacturer #: WP8182233
This part moves the clothes around inside your dryer/washer and helps to direct the flow of hot air during the drying cycle. Sold individually.
$63.95
In Stock

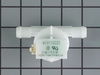
Drain Pump Kit
PartSelect #: PS1485610
Manufacturer #: 280187
This pump helps expel water from the washing machine and is activated after the spin speed is maintained for a specific period of time. This part is used on front load models.
$160.49
In Stock

Control Knob
PartSelect #: PS11744940
Manufacturer #: WP8181859
This knob is light gray and is used on platinum-colored models. Sold individually and accepts a D-shaped shaft.
$43.64
In Stock

Door Lock Latch
PartSelect #: PS11745016
Manufacturer #: WP8182634
This part is used on front load washers and includes the interlock switch assembly.
$123.10
In Stock

Screw, 8/18 x 3/8
PartSelect #: PS11746840
Manufacturer #: WP90767
This screw is sold individually.
$5.42
In Stock

Water Inlet Valve
PartSelect #: PS11744913
Manufacturer #: WP8181694
Used with some front load washers. The attaching solenoids on the valve open and close according to the desired temperature, or amount of water needed.
$75.56
In Stock

Shock Absorber
PartSelect #: PS11745030
Manufacturer #: WP8182703
Shock absorbers help keep the washer from vigorous shaking during its cycles. Sold individually.
$51.14
In Stock

Screw
PartSelect #: PS11742721
Manufacturer #: WP488729
Metallic screw that is less than an inch long. Does not include the plastic washer.
$7.91
In Stock

Touch-Up Paint - White
PartSelect #: PS385132
Manufacturer #: 72017
This touch-up paint can be used on a wide variety of household appliances. It is most often used on washers, dryer, refrigerators, dishwashers, ranges, freezers, trash compactors, or microwaves. It is...
$8.00
In Stock

Door Hook/Strike
PartSelect #: PS11744910
Manufacturer #: WP8181651
Attaches to door lock mechanism.
$16.36
In Stock
Questions And Answers for GHW9160PW0
We're sorry, but our Q&A experts are temporarily unavailable.
Please check back later if you still haven't found the answer you need.
Sort by:
- < Prev
- 1
- Next >
Search filter:
Clear Filter
Your search term must have 3 or more characters.
Keep searches simple. Use keywords, e.g. "leaking", "pump", "broken" or "fit".
Sorry, we couldn't find any existing answers that matched.Try using some different or simpler keywords, or submit your new question by using the "Ask a Question" button above!
Linda
March 10, 2020
Getting a F02 error code. Cleaned out drain clean out, not much there, except water. Timer on machine is slow, makes noise when rinsing, not much water. Then just keeps running with error code
For model number GHW9160PW0
Hi Linda, thank you for your question. This is what that error code means: F02 - Long Drain (Drain Exceeds 8 Minutes) - Select 'cancel' twice to clear error code. Note: You may see a "SUD" error code appear first during this failure. This should change to the F02 error code after a few minutes. Proceed by checking the drain hoses for proper connection and kinks. Unplug unit and disconnect power. Check the electrical connections at the pump and make sure it is operational with no debris or blockage. Reconnect power and plug unit in. If problem has not been corrected, replace the pump. Good luck with your repair.
1 person found this helpful.
Was this helpful?
Thank you for voting!
Gerald
October 24, 2022
My washer wants spin out. It’s not the drive belt.
For model number GHW9160PW0
Hello Gerald, thank you for contacting us. Given that the drive motor and belt are good, the most probable reasons behind such an issue are a faulty microswitch, part number PS11748225, the door lock latch, part number PS11745016, and/or the drive pulley, part number PS11745017. The micro switch can stop the motor if a cabinet panel isn't in place. Customer service is always available to help you place an order if you are having trouble doing so. Good luck with your repair.
Was this helpful?
Thank you for voting!
Related Parts:

 – Part Number: WPW10085220")
- < Prev
- 1
- Next >
Common Symptoms of the GHW9160PW0
[Viewing 14 of 14]Leaking
Fixed by
these parts
these parts


Show All
Will not drain
Fixed by
these parts
these parts


Show All
Lid or door won’t close
Fixed by
these parts
these parts


Show All
Will Not Start
Fixed by
these parts
these parts
Show All
Will not agitate
Fixed by
these parts
these parts


Show All
Marks left on clothes
Fixed by
these parts
these parts
Show All
No hot or cold water
Fixed by
these parts
these parts
Show All
Door latch failure
Fixed by
these parts
these parts
Show All
Burning smell
Fixed by
these parts
these parts
Show All
Spins slowly
Fixed by
these parts
these parts
Show All
Draining Issues
Fixed by
these parts
these parts
Show All
Water Filling Issues
Fixed by
these parts
these parts
Show All
Locking Issues
Fixed by
these parts
these parts
Show All
Touchpad does not respond
Fixed by
these parts
these parts

Show All


Keep searches simple. Use keywords, e.g. "leaking", "pump", "broken" or "fit".
broken plastic washer door handle
Just required removal of two screws, placing the new handle and reinstalling the two screws. Easiest repair I've ever done!
Parts Used:
-
dave from woodway, WA
-
Difficulty Level:Really Easy
-
Total Repair Time:Less than 15 mins
-
Tools:Screw drivers
540 of 549 people
found this instruction helpful.
Was this instruction helpful to you?
Thank you for voting!
Bellows were moldy, needed to replace
The first step is to remove the retainer ring that holds the outside of the bellow in place.
To do this, Open the washer door as far as you can to get it out of the way. look underneath of the front of the bellow on the outside of the washer where it meets the door. Put your head almost on the floor and look up.
You will fin ... Read more d a spring streached about 3" connected to a small diameter wire (1mm.) that runs all the way around the outside portion of the bellow.
Use a small screwdriver or other to pull and pry the spring away from the rubber bellow. Be careful not to damage the spring or ring. Once you have grip on it, pull it carefully toward you then up and off of the bellow.
The front portion of the bellow is now free and can be peeled off. Start at any point and pull the rubber bellow in toward the opening of the washer, it comes off easily.
When you get to the detergent outlet on the upper left side, grab the plastic tube and carefully pull the bellow from around it. There is no adhesive or clamp holding this in place, just friction. Remove the rest of the front portion of the bellow.
Push as much of the bellow into the washer as possible to get it out of the way.
Once this is off comes the slightly tricky part. Look up at the top right portion of the bellow that is still attached. You may need to feel with your hand but you should be able to see it. You are looking for the screw/nut end of a giant hose clamp. This hose clamp goes around the entire bellow and the secures it to the portion that holds the basket.
This is where the stubby screw driver comes in handy. There is not nearly enough room for a standard one and a nut driver or wratchet are too big. The nut will be pointing down and will need to be replaced the same way.
Loosen the hose clamp almost all of the way, not necessary to have the hose clamp come completely apart.
You can now remove the entire hose clamp from around the bellow by pulling it forward.
You will need to remove the hose clamp from the washer. To do this, squeeze it in from the sides about 6", don't kink it. Push it down toward the floor between the basket and the metal front panel. You will now be able to remove it from the top of the opening and be able to pull the bottom portion out.
Pull the old bellow completely out, very easy to do.
Time to install the new bellow. Figure out which side goes in and which faces out. The big hint is that the water inlet is on the upper left side.
You will notice at the top of the bellow on the portion that goes inside of the washer, you will find a small triangular shaped tab about 1/4" high. This is your centering mark. This will be at the very top. If you keep this at the top, everything will line up perfectly.
Slip the bellow over the edge of the portion that holds the basket where you removed the old one. I started at the top and worked left so I could install the detergent inlet tube. Pull this through the bellow carefully. It doesn't take a lot of force.
As you are pressing the bellow on this lip, you will notice that there is a 1/2" high back stop all of the way around. This is great because as you press it on, there is a positive stop and you can't go further than necessary. Continue to press it in all of the way around.
Now it is time to install the Hose clamp. Un bend anything that might have bent on the clamp. With the nut at the top or top right with the nut facing down to the floor while holding it vertically, squish it slightly inward, put the bottom portion in first then the top portion. Orient is as it was when you took it off. Slide it around the bellow. You will feel a positive stop.
Grab the stubby screwdriver and tighten down the hose clamp. I did about a medium force when tightening. It doesn't take a lot of force.
Now it is time to pull the remaining part of the bellow out of the basket and fit it into place. Press it around the outside portion of the opening so it hooks over the lip. This w
Read less
Parts Used:
-
Franck from Annandale, VA
-
Difficulty Level:Easy
-
Total Repair Time:15 - 30 mins
363 of 390 people
found this instruction helpful.
Was this instruction helpful to you?
Thank you for voting!
Washer would not drain ,F02 and SUD code displaying
(1) First I unpluged the washer then I removed the water from the tube with a water vac.(2) Then I removed the three (3) screws that holds the front panel, using a Torx T-20 socket. ( this is a front load washer ). The panel is below the loading door.
(3) I packed towels under the washer.
(4) I slowly removed the cleanout i ... Read more n the front of the pump, using the water vac to catch the water as it leaked out.
(5) I removed the wiring to the motor.
(6) I removed the screw that holds the pump in place with a Torx T-20 socket.
(7) I pulled the pump forward so the clamps that hold the drain hose and discharge hose could be removed using the hose clamp pliers. ( they come off much easier then they go back on ).
(8) I tested the pump and found it would run but was making a lot of noise and running slow.
(9) To reinstall start with number (7) and work backwards to number (1) skipping (3) and (4).
Don Kramer
Wichita, Kansas
Read less
Parts Used:

-
Donald from Wichita, KS
-
Difficulty Level:A Bit Difficult
-
Total Repair Time:1- 2 hours
-
Tools:Pliers, Socket set
231 of 243 people
found this instruction helpful.
Was this instruction helpful to you?
Thank you for voting!