This oven rack is a piece for your range. The oven rack is sold individually and is silver in color. The function of this part is to provide a balanced and flat surface for your cookware to sit inside...
This is a multi-use and multi-appliance screw. It can be used on a microwave, refrigerator, range/oven, air conditioner, dehumidifier, washer, or dryer. The measurements of this screw are 8 x 1/2 inch...
Sold individually. Lock washers are used with screws when vibration from an appliance may cause the screw to loosen. Lock washers are also used in the electrical components of an appliance to ensure ...
This touch-up paint can be used on a wide variety of household appliances. It is most often used on washers, dryer, refrigerators, dishwashers, ranges, freezers, trash compactors, or microwaves. It is...
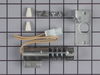
This round style gas oven igniter, or also known as a broil or bake igniter, has an amperage range between 2.5 and 3.0. It glows white hot to ignite the gas for the oven. The igniter does this by attr...
This is a door handle for the oven on your range. It mounts onto your oven, allowing you the ability to have full control of the door. This handle does not come with the required screws, and they will...
Appliance spray paint is a great way to cover up any chips and scratches that have appeared on your appliances. Instead of replacing the part entirely, this is an easy fix. This is also a great way to...
This kit includes the 2 side pieces and 1 bottom piece. NOTE: This kit has been updated by the manufacturer. The lower screws are no longer needed for the side trim now locks in to the lower trim piece.
$91.34
In Stock
Questions And Answers for FGP325EW0
Be the first to ask our experts a question about this model!
✖
Ask a Question
Ask our experts a question on this model and we'll respond as soon as we can.
I numbered every part. ex: 1 L., for first part removed left side. I used a magic marker to circle the holes and wrote the number of screws used on the part, set the srews in a separete place, so that I new where these screws went to. The cleanup was pretty time consuming, but I was able to keep my stove, when every repairman I called to
... Read more fix my stove told me I was better off buying a new stove. ($600.00 stove 2 years old)Please Note: The insulation blanket needed for the entire stove is two pieces, the sides and top are one part # and the bottom and back, are another part #. I did not know this. I just purchased the top and sides. I got lucky, the back and bottom were still in good shape. So I guess I should have read the description of the part more carefully to see what it covers, before I ordered it. It took two people two hours to do the work, it was really nice to have an extra set of eyes, to remember what direction pieces of metal from the stove went. I would do it all over in a heart beat instead of buying a new stove.
First I removed the oven racks. Then I loosened the two screws in the back of the oven floor and figured out how to remove it. Then I loosened the two screws at the front of the diverter and, with some pushing and pulling and twisting, was able to get that to come out, too. Then I tried lighting the oven and noticed that the igniter wa
... Read mores not glowing. When I saw that the upper (broiler) burner was working fine, I hoped that the problem was the lower igniter itself. I checked the wires and they seemed fine. I saw that two bolts held the igniter onto its bracket, so with a socket wrench (which size I got right on the first guess!) I removed those bolts and the igniter came loose. I found the connecter for the wires when I removed the drawer under the oven and was able to pull it apart easily. The igniter came out completely. There was nothing unusual about it, but I decided to take a chance and order a new one, hoping that replacing it would solve the problem. I put the rest of the oven together and waited. About three days later the part arrived (it was sent on a holiday; FedEx is soooo much better than USPS). I retraced the steps of taking the oven apart, put the two bolts into the new igniter to attach it to the bracket, and went back underneath behind the drawer to connect the wires. Then came the moment of truth: I tried turing on the oven. I held the button down to keep the light off, and after a few seconds I saw it: IT GLOWED!! It worked!! After yelling a satisfying "YEAH!!," I turned it off, put back the drawer, the diverter (more pulling and pushing and twisting), and the oven floor. Now it's all working perfectly and it took a very short time to fix. And a little luck that the problem was with such a simple part.
This product comes in a bottle with a brush like Liquid Paper. It goes on incredibly easy. A second coat might be needed. I wanted to prevent rust from setting in so I covered the scratches and dings. The paint is a little brighter since my washer is 10 years old but it still looks great.