


Models
>
CVE3401B
CVE3401B Jenn-Air Cooktop - Overview
Sections of the CVE3401B
[Viewing 4 of 4]


Keep searches simple, eg. "belt" or "pump".

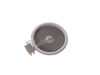
Infinite Switch Knob - black
PartSelect #: PS11744334
Manufacturer #: WP74009592
This infinite switch knob is two inches long. It is black in color and is made of plastic. This knob has a white indicator dot. Sold individually.
$26.81
In Stock

Cooktop Downdraft Vent Grease Filter
PartSelect #: PS11757584
Manufacturer #: WPY706012
This is a grease filter, and it works with your range/stove/oven. This part is chrome-colored and measures 16.5 inches long by 9 inches wide. It is made of metal and is intended for use with downdraft...
$48.41
In Stock

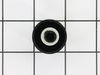
Fan Knob
PartSelect #: PS11744721
Manufacturer #: WP7739P122-60
This knob accepts a D-shaped shaft.
$23.11
In Stock

Surface Burner Switch
PartSelect #: PS12070671
Manufacturer #: W11088181
This is the replacement surface burner switch for your range. It measures approximately 1.5 inches by 1.5 inches, with a shaft that is approximately 1 inch long. The surface burner switch turns the su...
$83.91
In Stock

Dual Surface Burner Switch Kit
PartSelect #: PS2003583
Manufacturer #: 12002125
This switch is used to operate the dual surface burner.
$89.03
In Stock

Cooktop Cleaner
PartSelect #: PS2344170
Manufacturer #: TJ114
Cleans/Polishes all glass, ceramic, porcelain and fiberglass surfaces.
No Longer Available

Dual Radiant Element with Limiter
PartSelect #: PS11759488
Manufacturer #: W10823709
$225.21
In Stock

6 Inch Element with Limiter
PartSelect #: PS11764912
Manufacturer #: W10823704
This element can be used for the left front or right rear.
$268.43
In Stock


Main Range Top
PartSelect #: PS2084686
Manufacturer #: 74007072
This range top is black in color and is made of metal and glass. This top assembly has four holes for burner knobs.
$537.03
In Stock


Stand Mixer Screw
PartSelect #: PS11742292
Manufacturer #: WP4159193
This screw is sold individually.
$8.63
In Stock
Questions And Answers for CVE3401B
We're sorry, but our Q&A experts are temporarily unavailable.
Please check back later if you still haven't found the answer you need.
Sort by:
- < Prev
- 1
- Next >
Search filter:
Clear Filter
Your search term must have 3 or more characters.
Keep searches simple. Use keywords, e.g. "leaking", "pump", "broken" or "fit".
Sorry, we couldn't find any existing answers that matched.Try using some different or simpler keywords, or submit your new question by using the "Ask a Question" button above!
Derek
September 14, 2022
Hello!
I have a Jenn air with a cracked stove top! The model number is CVE3401 and it is black. Is the CVE3401B the correct part for this? I wondered whether the “B” describes the color or some design upgrade that would make it incompatible. Please advise. Thanks!
For model number CVE3401B
Hello Derek, Thank you for your inquiry. We have researched the model number that you have provided and the B would indicate the black version. The compatible black cooktop glass is part# PS2084686. We hope this helps and if you need help placing an order for a part, customer service is open 7 days a week. Please feel free to give us a call. We look forward to hearing from you!
2 people found this helpful.
Was this helpful?
Thank you for voting!
Related Parts:
Main Range Top


$537.03
In Stock
Marilyn
July 29, 2021
Do you have to remove the down draft and every thing that is connected to the glass top to repair a burner switch or can you just remove the glass top and how?
For model number CVE3401B
Hello Marilyn, Thank you for the question. You just need to remove the Glass Cooktop to access the Switches for the Burners. We hope this helps!
1 person found this helpful.
Was this helpful?
Thank you for voting!
Related Parts:
Main Range Top
$537.03
In Stock
- < Prev
- 1
- Next >
Common Symptoms of the CVE3401B
[Viewing 2 of 2]


Keep searches simple. Use keywords, e.g. "leaking", "pump", "broken" or "fit".
Outer element of dual element burner didn't work
Remove Ceran Galss top by removing hex screws below the rim. Also remove the two opposing screws in the center of the downdraft opening. Ceran top comes off easily now.
The instructions with the new switch were very poorly written, so here is how I got the new switch to work:
Attach the black wire(s) from the old switch (termi ... Read more nal 2) to the new switch terminal P1. Also attach the jumper cable to P1 and "jump" it to S1.
Attach the orange wire (old switch terminal 5) to S2
Attach the yellow wire (old switch terminal 4) to 4a
Attach the tan/(white?) wire (old switch terminal 3) to terminal 4 on the new switch
Attach the single red wire from the right front element to terminal 2 on the new switch.
Attach the 'compound' red wires (the ones that come from the left rear/outlet connection and is also attached to the right rear switch) to terminal P2 on the new switch.
There is no need to seperate the compound red wires as the instructions might lead you to believe.
Good Luck
Read less
Parts Used:

-
Michael from Collierville, TN
-
Difficulty Level:A Bit Difficult
-
Total Repair Time:30 - 60 mins
-
Tools:Nutdriver, Pliers, Socket set
137 of 178 people
found this instruction helpful.
Was this instruction helpful to you?
Thank you for voting!
The repair itself was very easy. “How to connect” was very hard to get.
The repair itself was very easy. “How to connect” was very hard to get.
To get access to the switch, unscrew 2 screws from each side of front panel and then 4 screws from the bottom of it (open the door first). Have a box or a small table about 30” high to use it as support for the front panel.
The end result ... Read more (colors for the Right Front- R.F.- burner) : Old label -> New label
1. Double RED: N -> P2 (incoming power, Line 1)
2. Single RED: N -> 2 (to Inner AND Outer heating elements common wire)
3. Single BLK: L1 -> P1 (incoming power, Line 2)
4. Single TAN: H1 -> 4 (to the Inner heating element)
5. Single YEL: H2-> 4a (to the Inner heating element)
6. Single BLK: P -> S2 (to the R.F. indicator control light)
7. Attach jumper black wire (included with new switch) from P1 (P1 has two connectors close together) to S1.
Done.
Read less
Parts Used:
-
Igor from Campbell, CA
-
Difficulty Level:Really Easy
-
Total Repair Time:15 - 30 mins
-
Tools:Nutdriver, Pliers, Screw drivers
51 of 60 people
found this instruction helpful.
Was this instruction helpful to you?
Thank you for voting!
Outer Ring of Dual Radiant Burner Does Not Come On
Undid two screws on underside of cook top, lifted and exposed underside. Transferred wires from the faulty burner to the new burner, one at a time, paying close attention to their respective position on the wiring posts/terminals. Undid two screws holding old burner and then mounted the new burner to underside of cook top. Was really simp
... Read more
le to do. :)
Read less
Parts Used:

-
Christopher from Fredericksburg, VA
-
Difficulty Level:Really Easy
-
Total Repair Time:15 - 30 mins
-
Tools:Nutdriver, Pliers
42 of 60 people
found this instruction helpful.
Was this instruction helpful to you?
Thank you for voting!