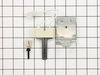
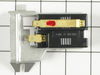
When the igniter reaches a high enough temperature, these coils (Coil Valve, Dryer Gas Valve Coil Kit, Dryer Valve Coil Kit, Gas Valve Solenoid) work together to open the gas valve and allow the gas t...
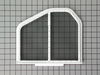
This part replaces your appliances latch (Door Latch Kit, Door Catch, Dryer Door Latch Kit). On your appliance you will find both a strike and a catch. The strike is mounted on the body of the dryer, ...
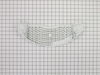
The filter collects lint during the drying cycle. This filter is 12 1/2 inches wide and 10 1/2 inches deep. Replacing the lint filter is an easy repair which requires no tools. When replacing the lint...
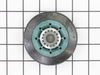
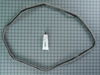
This Idler Pulley includes the tri-ring and gasket and everything included here is manufacturer-certified. This part maintains correct tension on the drive belt in order to spin the drum properly. If ...
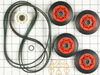
This dryer repair kit consists of five commonly replaced dryer parts: one multi-rib belt (part #661570V and measures 93 1/2 inches long), four drum support rollers, one idler assembly, nine tri-rings,...
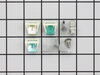
This drum support roller is sold individually. Most dryers require two. The tri-rings are included. This is a drum support roller for a dryer. It is a genuine replacement part. The part includes the d...
This dryer drum belt from Whirlpool/Kenmore has five ridges. It is used for many of Whirlpool's brands of clothes dryers. This flat belt is 1/4 of an inch wide.
If your dryer will not heat, takes too long to dry, or does not provide enough heat, you might want to replace your igniter kit. This silicone carbide igniter with ceramic holder kit includes the 3-in...
If you notice that your dryer is noisy or will not tumble, you may need to replace the tri ring. This part is triangular, and is less than an inch in size. Tri rings can be found both on the idler pul...
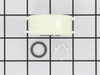
This genuine OEM washer has a 3/4 inch outside diameter. This thrust washer can be used on most makes and models of dryers. A complete list of compatible dryers is available below. The washer is found...
If your gas dryer is not heating up or igniting, then replacing the flame sensor, located in the burner assembly, could solve it. This part senses heat from the igniter to monitor if it is hot enough ...
$47.91
In Stock
Questions And Answers for CSP2761KQ1
Be the first to ask our experts a question about this model!
✖
Ask a Question
Ask our experts a question on this model and we'll respond as soon as we can.
Received your parts, Popped them both right into place, Even though only one side needed to be replaced, I wanted them to match up. It was amazing how easy this was. My husband was quite impressed I had ordered these rather then look for either a new or used dryer from some other source.
PartSelect showed seven different possibilities why the dryer wouldn't heat. I removed the two screws to remove the bottom panel and turned the dryer on and noticed that the heating element that ignites the gas was working fine. This meant that it was not getting gas so it could be the gas valve or one of the two gas valve coils which are
... Read more located on top of the gas valve. I borrowed my neighbor"s ohm meter and touched the two probes on the coils terminals to check for continuity and found that one of the coils read zero. I then took both of the coils out by removing two screws and tested each coil again. One coil read 500-850 and the other read zero. This meant that it was no good so I called for the part and received it in three days. I reassembled the parts and turned the dryer on and it fired up after a few seconds. It works as good as new. The part plus shipping was less than $30. My repairman would have charged me $150-$200. While the dryer was apart I gave it a good cleaning with a vacuum and a toothbrush in delicate areas. I also removed and cleaned the lint trap housing by removing two nuts. I didn't know much about gas dryers, but thanks to PartSelect I easily fixed it myself.
Unplugged the 220 volt source. Disconnected the vent line from the back of the drier. Removed the six screws holding the back panel with a 1/4 inch nut driver. Tipped the drier up at a 45 degree angle against the wall to give better access to the inside. Removed the screws holding the two thermostats to the side of the heater box and
... Read morelaid them aside. Disconnected the two red power lines to the heater element. Removed the large screw at the top of the heater box and removed the flexible bracket holding the heater box, then lifted the heater box up and away from the drier. Removed the one screw holding the heater element inside the heater box and pulled out the old heating element. The old element was open as found using an ohmeter on the two main terminals. Threw away the old element. Removed the new heating element from the box and slid it into the heater box making sure to align the terminal bracket with the hole in the heater box for the reinstallation of the mounting screw. Tightened this screw. Remounted the heater box to the two mounting slots and reinstalled the flexible mounting bracket to the top of the heater box and installed and tightened the large screw holding this bracket. Cut off and removed the old electrical push-on terminals from the two red power wires for the heater element. These were discolored and oxidated from the conducted heat over the years of operation. Using the supplied short red leads with push-on terminals already installed, I wire tied these new leads to the existing red power leads and pushed them onto the heater element terminals. Rechecked the soundness of the twisted wire connections to make sure they were tight. Replaced the back panel and reinstalled the six 1/4" screws with the 1/4' nut driever. Reinstalled the driver vent line and tightened its holding ring. Slid the drier back into position on the floor. Checked the level and readjusted the leveling legs for a steady floor stance. Reinstalled the 220 volt power connecter and set the controlls for a drying cycle. Let the drier run for aproximately 1 minute and then checked the air temperature inside the drier. IT WAS NOW PRODUCING HOT AIR. Project completed successfully and I was now a HERO in my wifes eyes. Absolutely no technical problems encountered. Just remember, unplug the drier before starting ANY repairs. To forget this COULD RUIN YOUR DAY.