This chrome drip bowl is designed for use with electric cooktops and ranges. This drip bowl is sold individually. At the widest point this part has a diameter of approximately 10 inches. It sits benea...
The drip bowl catches grease and spills that come from cooking on your stove top. They are located under the heating elements. Drip bowls are often neglected and can become rusted and cracked. If your...
This part connects the wire harness to the surface element and is used for ranges. The kit includes interchangeable mounting brackets, ceramic wire nuts, heat shrink protective tubing, and wires. If y...
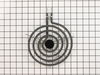
If the burner element on your range will not heat up, or is damaged, it may need to be replaced. This part is 8 inches in diameter, and should not be confused with the smaller 6-inch model. The part i...
This part is sold individually. This is a part for your stove top. The surface element is what your cookware sits on. The element supplies heat at varying temperatures. This may need to be replaced if...
Terminal block kits are also known as terminal boards, or terminal strips, and they are found in a wide variety of household appliances. Most often in ranges, wall ovens, and dryers. This kit attaches...
This is a burner switch kit, also known as the surface element control switch repair kit, for ranges. This burner switch kit sends voltage to the surface element coil and it controls the stove top sur...
This part is a levelling leg and it is used in conjunction with your range. The function of this part is to supply stability and support to your appliance. This part is adjustable to allow you to tail...
PF alarm appeared on display. Noticed clicking when cord was moved. Had arced for some time and melted original block. New part slightly different. Only has 3 lugs, old one had six. Stack using washers provided. Take note of colors before disassembly. Use caution while working through access opening. The edges are sharp. Only tools neede
... Read mored are phillips screwdriver, deep socket for lug nuts. Nut driver optional. Hope this is helpful.
Most of the job is simple fastener mechanics. Use a nut driver or Phillips screwdriver. Remove rear panel.
Pull out control knob. If it is stuck, wrap a small rag around the back of it and pull the rag steadily.
Carefully match marked terminals on the replacement switch with those on original. Switch terminals
... Read moremay not be in the same location. Replace wires one for one, one at a time.
Carefully select the correct knob filler for the switch post. Several are supplied. Proceed with logic and measure the shaft length and the filler length and type to match.