


Models
>
2406W0A
2406W0A Roper Range - Overview
Sections of the 2406W0A
[Viewing 6 of 6]


Keep searches simple, eg. "belt" or "pump".

Drip Bowl - 6 Inch
PartSelect #: PS11750108
Manufacturer #: WPW10196406
This drip bowl is used for electric cooktops and ranges, it is designed to sit under a 6-inch surface burner. It catches the drips and spills coming from the cookware on the surface burner. This drip ...
$6.96
In Stock

Drip Bowl - 8 Inch
PartSelect #: PS2366563
Manufacturer #: W10196405RW
This part is located beneath the element and catches any spills.
$10.88
In Stock

Surface Burner Plug-In Block Kit
PartSelect #: PS340571
Manufacturer #: 330031
The surface burner plug-in block kit features a newer-style terminal block. This kit is designed for use with ranges and cooktops. This terminal block is how the coil element on your stove connects to...
$13.42
In Stock

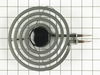
Delta Frame Surface Unit - 6 Inch
PartSelect #: PS11757480
Manufacturer #: WPY04100165
This is a delta frame surface unit, also known as coil element, for a stove, range, or oven. It is a 6-inch surface burner with a reinforced delta frame that carries 1250 watts and 240 volts. The burn...
$50.86
In Stock

Agitator Assembly
PartSelect #: PS334559
Manufacturer #: 285574
Does not include softener dispenser. **** Some assembly required.****
$156.71
In Stock

Hex Nut
PartSelect #: PS11738304
Manufacturer #: WP112432
This 10-32-inch hex nut works with multiple appliances in your home as a fastener. This specific model is sold individually. Hex nuts usually have 6 even sides and together they are used with bolts an...
$8.04
In Stock

Delta Frame Surface Unit - 8 Inch
PartSelect #: PS340503
Manufacturer #: 326789
This electric range delta frame surface element with looped terminal ends measures eight inches and has five turns. It carries 2600 watts the center medallion is black in color.
$91.53
In Stock


Bake Element
PartSelect #: PS360337
Manufacturer #: 4337605
This element has push-on terminals.
No Longer Available

Oven Thermostat
PartSelect #: PS11742378
Manufacturer #: WP4337360
This Harper Wyman style 6707 series oven thermostat has a temperature range between 150 degrees Fahrenheit and 550 degrees Fahrenheit, as well as a fixed broiling temperature. There is an "off" positi...
No Longer Available
Questions And Answers for 2406W0A
We're sorry, but our Q&A experts are temporarily unavailable.
Please check back later if you still haven't found the answer you need.
Common Symptoms of the 2406W0A
[Viewing 2 of 2]


Keep searches simple. Use keywords, e.g. "leaking", "pump", "broken" or "fit".
Agitator wasn't spinning well
First I removed the screw that held it in place with a socket. The agitator became loose and easy to remove at this time so I lifted it from the washing machine. I then just placed the new agitator in place and replaced the screw being careful not to do it too tight. The replacing of this part was an easy job and thanks to Part Select
... Read more
it saves me hundreds of dollars.
Read less
Parts Used:
-
Nora from Marshall, TX
-
Difficulty Level:Really Easy
-
Total Repair Time:Less than 15 mins
-
Tools:Socket set
26 of 31 people
found this instruction helpful.
Was this instruction helpful to you?
Thank you for voting!
One burner didn't work all the time the other would go red hot
I unplugged the stove from the outlet, then removed the two burners I was going to be working on and the drip pans. Then I raised the top part of the stove and removed the screws holding the plug-in blocks to the stove. Then I cut the two wires going to the old plug-in block and stripped the wires back to match the new wire parts. Then I
... Read more
placed the sleeves over the new wires, then I placed the new wire beside the wire I stripped on the stove and screw on the wire cap making sure it was tight. I repeated this three more times, once I had all four wires connected I then placed the sleeves over the connections and heated them up until they were formed around the connection. Once I had all the connections done I placed one wire at a time into the plug-in block until it locked into place ( I looked at my old plug-in blocks first to make sure I placed the new wires in the correct way ).I then used the metal mounting bracket that matched my old ones and snapped the correct one onto each plug-in block. Before mounting them onto the stove I compared them to my old ones to make sure they were correct. Then I used the new screws to mount them to the stove. I took a second look at everything I had done before closing the top cover of my stove. After lowering the cover back into place I put both the drip covers in place and then installed the burners.I then plugged the stove back into the outlet and tried the burners. This was very simple and the video on the web site shows this very well which made my job very simple.
Read less
Parts Used:
-
Phillip from Pekin, IL
-
Difficulty Level:Really Easy
-
Total Repair Time:15 - 30 mins
-
Tools:Screw drivers
14 of 15 people
found this instruction helpful.
Was this instruction helpful to you?
Thank you for voting!
agitator top half would not turn
unplugged unit,removed liquid cup,removed nut holding agitator,removed agitator installed new one installed nut tightened and tested operation very easy job!
Parts Used:
-
patrick from steubenville, OH
-
Difficulty Level:Really Easy
-
Total Repair Time:15 - 30 mins
-
Tools:Socket set
11 of 13 people
found this instruction helpful.
Was this instruction helpful to you?
Thank you for voting!